
Arduino UNO and DFPlayer Mini Audio Playback System with Button Control
View and Edit Project In Cirkit Designer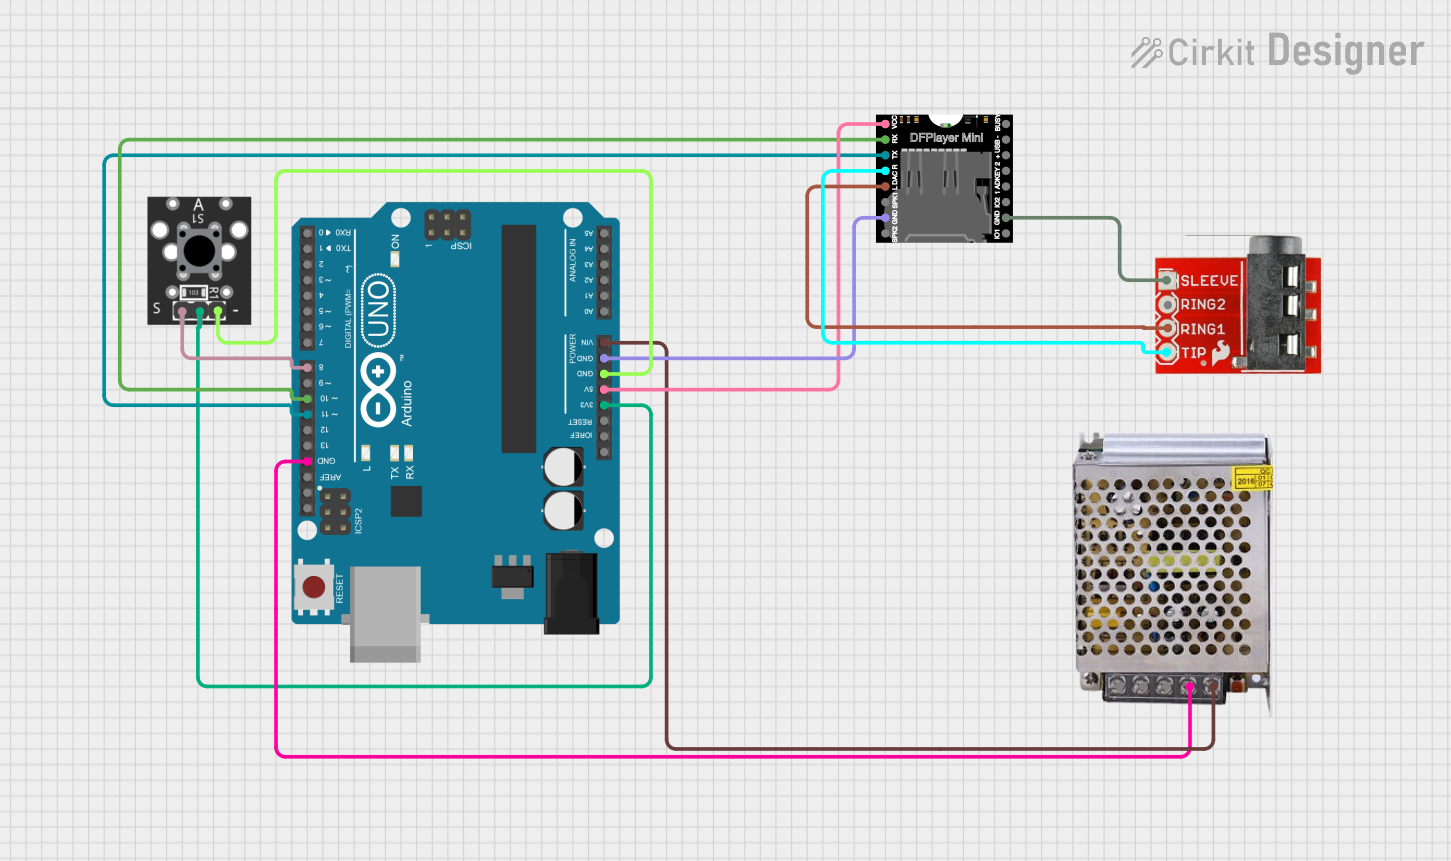
Circuit Documentation
Summary
This circuit is designed to play audio files from a DFPlayer Mini module when a button is pressed. The audio output is sent to a TRRS 3.5mm jack, which can be connected to headphones or an external speaker. The circuit is powered by a 5V power supply and controlled by an Arduino UNO microcontroller.
Component List
DFPlayer MINI
- Description: A small MP3 player module that can play audio files from a microSD card.
- Pins: VCC, BUSY, RX, USB -, TX, USB +, DAC_R, K2/ADC_KEY, DAC_L, K1/ADC_KEY, SPK1, IO 2, GND, SPK2, IO 1
TRRS 3.5mm Jack Breakout
- Description: A breakout board for a 3.5mm TRRS jack, used for audio output.
- Pins: Sleeve, Ring2, Ring1, Tip
POWER SUPPLY 5V 5AMP
- Description: A power supply module that provides 5V DC output.
- Pins: 220V Positive Pole (AC), 220V Negative Pole (AC), GND, GND (DC), 12V-24V Output (DC)
KY-004 Key Switch Module
- Description: A simple key switch module used as a button input.
- Pins: S, Middle, -
Arduino UNO
- Description: A microcontroller board based on the ATmega328P, used to control the circuit.
- Pins: UNUSED, IOREF, Reset, 3.3V, 5V, GND, Vin, A0, A1, A2, A3, A4, A5, SCL, SDA, AREF, D13, D12, D11, D10, D9, D8, D7, D6, D5, D4, D3, D2, D1, D0
Wiring Details
DFPlayer MINI
- VCC connected to 5V on Arduino UNO
- RX connected to D10 on Arduino UNO
- TX connected to D11 on Arduino UNO
- DAC_R connected to Tip on TRRS 3.5mm Jack Breakout
- DAC_L connected to Ring1 on TRRS 3.5mm Jack Breakout
- GND connected to GND on Arduino UNO
- GND connected to Sleeve on TRRS 3.5mm Jack Breakout
TRRS 3.5mm Jack Breakout
- Tip connected to DAC_R on DFPlayer MINI
- Ring1 connected to DAC_L on DFPlayer MINI
- Sleeve connected to GND on DFPlayer MINI
POWER SUPPLY 5V 5AMP
- GND (DC) connected to GND on Arduino UNO
- 12V-24V Output (DC) connected to Vin on Arduino UNO
KY-004 Key Switch Module
- S connected to D8 on Arduino UNO
- Middle connected to 3.3V on Arduino UNO
- - connected to GND on Arduino UNO
Arduino UNO
- 5V connected to VCC on DFPlayer MINI
- GND connected to GND on DFPlayer MINI
- GND connected to GND (DC) on POWER SUPPLY 5V 5AMP
- Vin connected to 12V-24V Output (DC) on POWER SUPPLY 5V 5AMP
- D8 connected to S on KY-004 Key Switch Module
- 3.3V connected to Middle on KY-004 Key Switch Module
- GND connected to - on KY-004 Key Switch Module
- D10 connected to RX on DFPlayer MINI
- D11 connected to TX on DFPlayer MINI
Code Documentation
#include "SoftwareSerial.h"
#include "DFRobotDFPlayerMini.h"

// Define software serial for DFPlayer Mini communication
SoftwareSerial mySerial(10, 11); // RX, TX
DFRobotDFPlayerMini myDFPlayer;

// Pin for button
const int buttonPin = 2;
bool buttonState = false;

void setup() {
  // Start Serial Monitor for debugging
  Serial.begin(9600);
  Serial.println("Initializing...");

  // Initialize button pin
  pinMode(buttonPin, INPUT_PULLUP); // Enable internal pull-up resistor
  Serial.println("Button pin set as INPUT with pull-up.");

  // Initialize DFPlayer Mini
  mySerial.begin(9600); // Start communication with DFPlayer Mini
  if (!myDFPlayer.begin(mySerial)) {
    Serial.println("DFPlayer Mini initialization failed!");
    Serial.println("1. Check wiring (RX, TX, VCC, GND).");
    Serial.println("2. Ensure SD card is formatted as FAT32 and files are loaded.");
    while (true); // Halt execution if DFPlayer Mini fails to initialize
  }
  Serial.println("DFPlayer Mini initialized successfully.");

  // Configure DFPlayer Mini settings
  myDFPlayer.volume(20); // Set volume (0-30)
  Serial.println("Volume set to 20.");
  myDFPlayer.EQ(DFPLAYER_EQ_NORMAL); // Set EQ mode
  Serial.println("EQ set to normal.");
  myDFPlayer.outputDevice(DFPLAYER_DEVICE_SD); // Set SD card as the audio source
  Serial.println("Output device set to SD card.");
}

void loop() {
  // Read button state
  if (digitalRead(buttonPin) == LOW) { // Button is pressed
    if (!buttonState) { // Prevent multiple triggers
      buttonState = true;
      Serial.println("Button pressed. Playing sound...");
      myDFPlayer.play(1); // Play the first file (001.mp3)
      Serial.println("Playing track 001.mp3...");
    }
  } else {
    // Reset button state when released
    if (buttonState) {
      Serial.println("Button released.");
    }
    buttonState = false;
  }

  // Optional: Add a delay for debouncing if needed
  delay(50);
}
This code initializes the DFPlayer Mini and sets up a button input. When the button is pressed, the DFPlayer Mini plays the first audio file on the SD card. The code also includes serial output for debugging purposes.