
Arduino UNO Controlled WS2812 RGB LED Strip with Custom Color Patterns
View and Edit Project In Cirkit Designer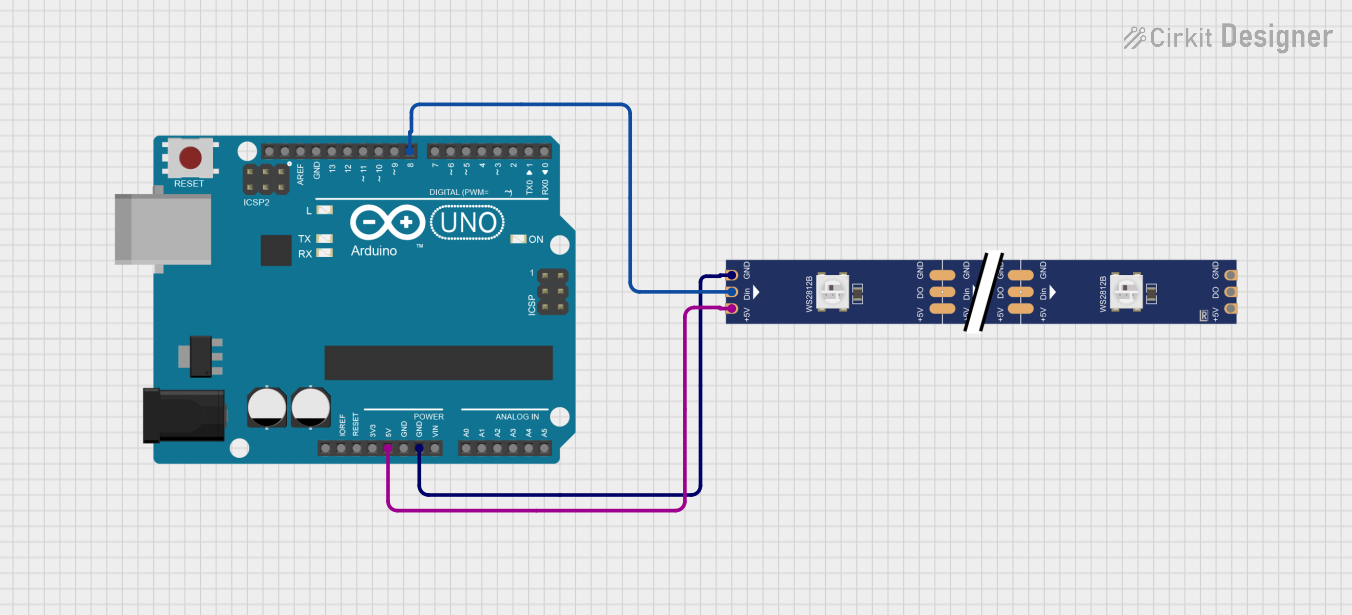
Circuit Documentation
Summary
This circuit consists of an Arduino UNO microcontroller connected to a WS2812 RGB LED strip. The Arduino UNO provides power and control signals to the LED strip, allowing for the control of individual LEDs on the strip.
Component List
Arduino UNO
- Description: A microcontroller board based on the ATmega328P.
- Pins: UNUSED, IOREF, Reset, 3.3V, 5V, GND, Vin, A0, A1, A2, A3, A4, A5, SCL, SDA, AREF, D13, D12, D11, D10, D9, D8, D7, D6, D5, D4, D3, D2, D1, D0
WS2812 RGB LED strip
- Description: An addressable RGB LED strip.
- Pins: DIN, 5V, GND, DO
Wiring Details
Arduino UNO
- 5V: Connected to the 5V pin of the WS2812 RGB LED strip.
- GND: Connected to the GND pin of the WS2812 RGB LED strip.
- D8: Connected to the DIN pin of the WS2812 RGB LED strip.
WS2812 RGB LED strip
- 5V: Connected to the 5V pin of the Arduino UNO.
- GND: Connected to the GND pin of the Arduino UNO.
- DIN: Connected to the D8 pin of the Arduino UNO.
Code Documentation
Arduino UNO Code
#include <Arduino.h>
#include <FastLED.h>

#define PIN 8
#define PIXELCOUNT 5

CRGB leds[PIXELCOUNT];  // Define the array of LEDs

void setup() {
  FastLED.addLeds<WS2811, PIN, RGB>(leds, PIXELCOUNT);
  delay(2000);  // Wait two seconds
  leds[0].setRGB(255, 0, 0);  // Color the first LED in red
  leds[1].setRGB(0, 255, 0);  // Color the second LED in green
  leds[2].setRGB(255, 0, 0);  // Color the third LED in red
  FastLED.show();  // Send the new color settings to the strip
}

void loop() {}
This code initializes the FastLED library to control the WS2812 RGB LED strip. It sets up the LED strip on pin 8 of the Arduino UNO and defines an array of 5 LEDs. In the setup function, it initializes the LED strip, waits for 2 seconds, and then sets the colors of the first three LEDs. The loop function is empty as no continuous operation is required.