Arduino UNO Based Temperature and Humidity Display with I2C LCD
Circuit Documentation
Summary of the Circuit
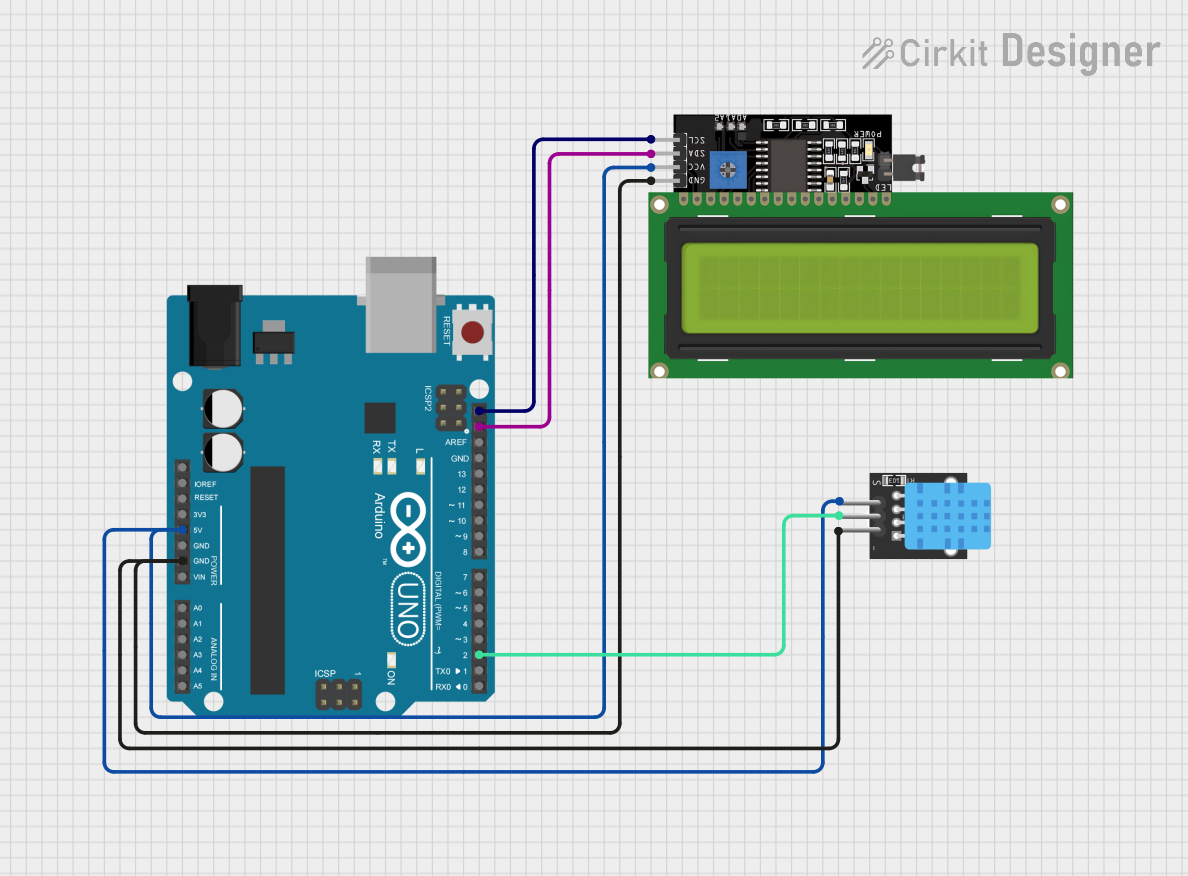
This circuit integrates an Arduino UNO microcontroller with a KY-015 DHT11 temperature and humidity sensor and an LCD Display (16x4 characters) with an I2C interface. The Arduino UNO serves as the central processing unit, reading sensor data from the DHT11 and displaying the information on the LCD screen. The I2C communication protocol is used to interface with the LCD, minimizing the number of pins required for the display. The DHT11 sensor is connected to a digital pin on the Arduino for data reading. Power is distributed from the Arduino to both the sensor and the LCD display, and a common ground is established throughout the circuit.
Component List
Arduino UNO
- Description: A microcontroller board based on the ATmega328P.
- Pins: UNUSED, IOREF, Reset, 3.3V, 5V, GND, Vin, A0-A5, SCL, SDA, AREF, D0-D13.
- Purpose: Acts as the central controller for the circuit, interfacing with the sensor and the LCD display.
KY-015 DHT11
- Description: A basic, ultra low-cost digital temperature and humidity sensor.
- Pins: 5V, S, GND.
- Purpose: Measures the ambient temperature and humidity.
LCD Display 16x4 I2C
- Description: A 16x4 character LCD display with an I2C interface.
- Pins: SCL, SDA, VCC, GND.
- Purpose: Displays the temperature and humidity data read from the DHT11 sensor.
Wiring Details
Arduino UNO
- 5V: Provides power to the KY-015 DHT11 sensor and the LCD Display.
- GND: Common ground for the circuit.
- SCL: Connected to the SCL pin of the LCD Display for I2C communication.
- SDA: Connected to the SDA pin of the LCD Display for I2C communication.
- D2: Sends digital signals to the KY-015 DHT11 sensor.
KY-015 DHT11
- 5V: Receives power from the Arduino UNO.
- S: Sends data to the Arduino UNO digital pin D2.
- GND: Connected to the common ground.
LCD Display 16x4 I2C
- SCL: Receives the I2C clock signal from the Arduino UNO.
- SDA: Receives the I2C data signal from the Arduino UNO.
- VCC: Powered by the 5V output from the Arduino UNO.
- GND: Connected to the common ground.
Documented Code
Arduino UNO Code (sketch.ino)
void setup() {
  // put your setup code here, to run once:

}

void loop() {
  // put your main code here, to run repeatedly:

}
Note: The provided code is a template and does not contain any functional code to operate the circuit. It needs to be populated with the initialization of the I2C interface, DHT11 sensor reading, and LCD display routines.