
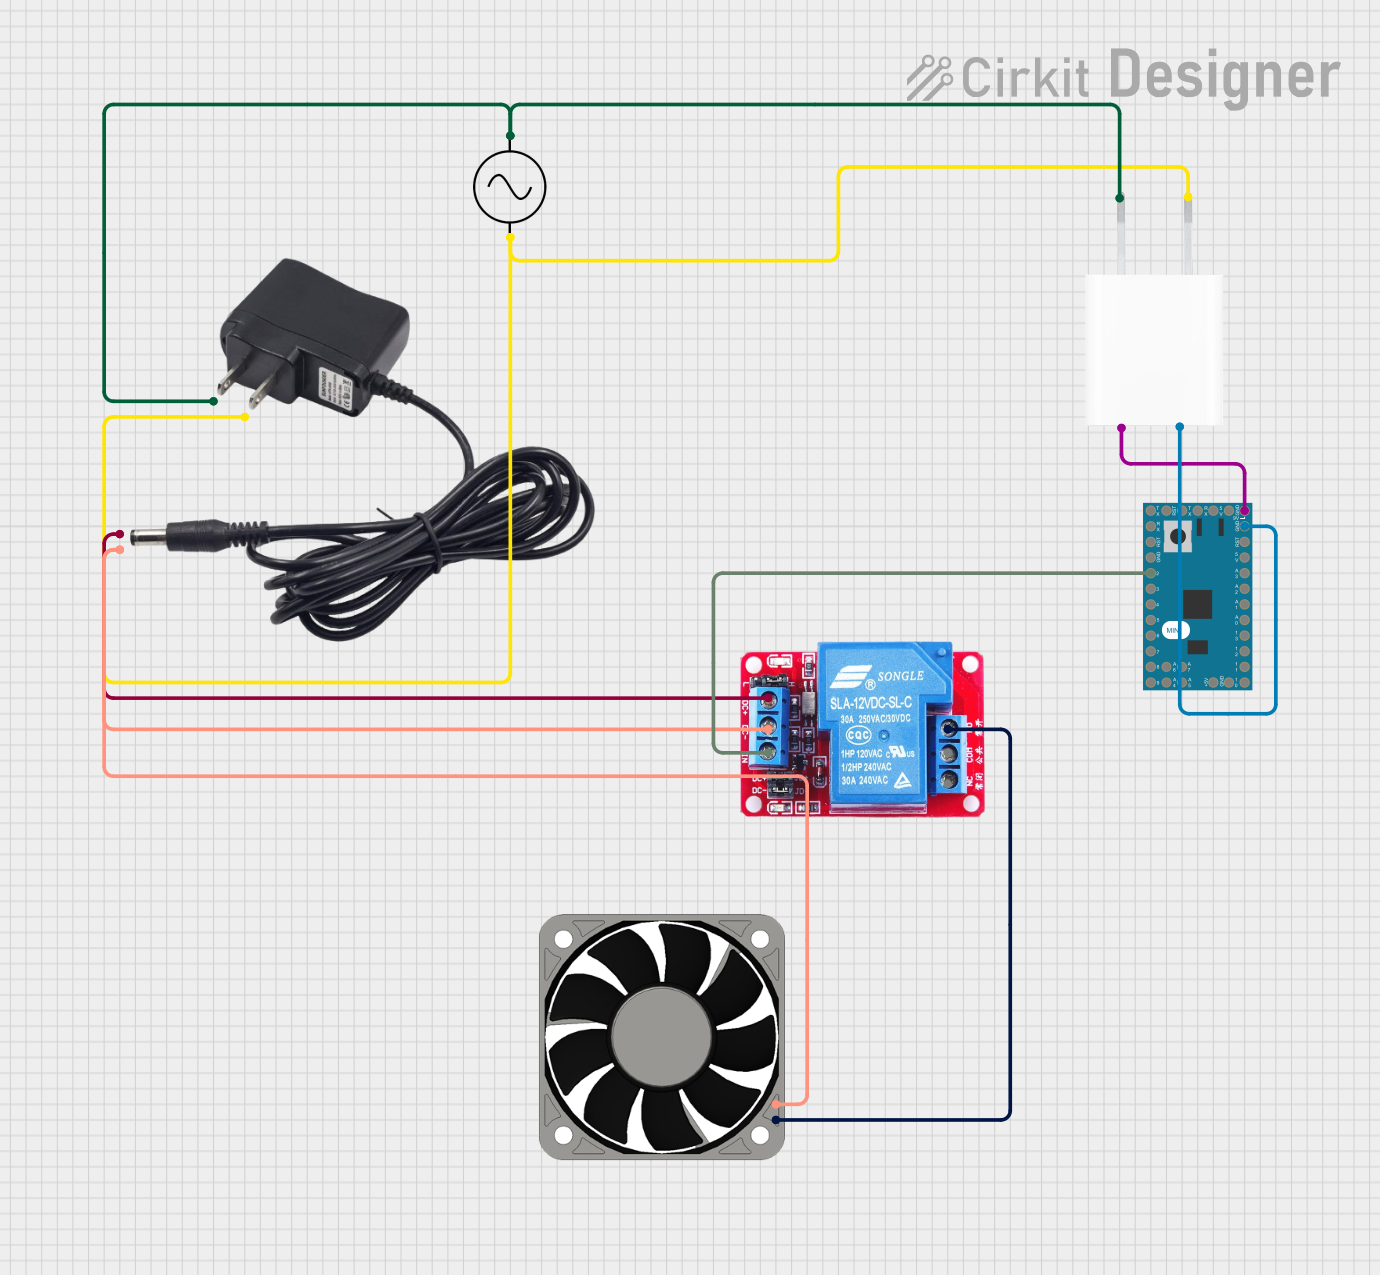
Circuit Documentation
Summary
This circuit is designed to control a 12V fan using a relay and an Arduino Mini (Rev5). The fan is turned on every 10 seconds for a duration of 2 seconds. The relay is controlled by the Arduino, which is powered by a 5V adapter. The 12V fan and relay are powered by a 12V adapter. An AC supply powers both the 12V and 5V adapters.
Component List
12V Relay
- Pins: NO, COM, NC, DC+, DC-, IN
- Description: A relay used to control the 12V fan.
- Purpose: To switch the 12V fan on and off based on the Arduino's control signal.
40 Fan 12V
- Pins: +12V, -12V
- Description: A 12V fan.
- Purpose: To provide cooling.
5V Adapter
- Pins: AC In 1, AC In 2, 5V, GND
- Description: A 5V power adapter.
- Purpose: To power the Arduino Mini (Rev5).
AC Supply
- Pins: +ve, -ve
- Description: An AC power supply.
- Purpose: To provide AC power to the 5V and 12V adapters.
12V Adapter
- Pins: VCC, GND
- Description: A 12V power adapter.
- Purpose: To power the 12V relay and fan.
Arduino Mini (Rev5)
- Pins: D0/TX, D1/RX, RESET, GND, D2, D3 PWM, D4, D5 PWM, D6 PWM, D7, D8, D9 PWM, VCC, 5V, A3, A2, A1, A0, D13, D12, D11 PWM, D10 PWM, A6, A4, A7, A5, TX, RX
- Description: A microcontroller board.
- Purpose: To control the relay based on a programmed schedule.
Wiring Details
12V Relay
- NO: Connected to +12V pin of the 40 Fan 12V.
- DC+: Connected to VCC pin of the 12V Adapter.
- DC-: Connected to GND pin of the 12V Adapter and -12V pin of the 40 Fan 12V.
- IN: Connected to D2 pin of the Arduino Mini (Rev5).
40 Fan 12V
- +12V: Connected to NO pin of the 12V Relay.
- -12V: Connected to DC- pin of the 12V Relay and GND pin of the 12V Adapter.
5V Adapter
- AC In 1: Connected to +ve pin of the AC Supply and VCC pin of the 12V Adapter.
- AC In 2: Connected to -ve pin of the AC Supply and GND pin of the 12V Adapter.
- 5V: Connected to VCC pin of the Arduino Mini (Rev5).
- GND: Connected to GND pin of the Arduino Mini (Rev5).
AC Supply
- +ve: Connected to AC In 1 pin of the 5V Adapter and VCC pin of the 12V Adapter.
- -ve: Connected to AC In 2 pin of the 5V Adapter and GND pin of the 12V Adapter.
12V Adapter
- VCC: Connected to DC+ pin of the 12V Relay and +ve pin of the AC Supply.
- GND: Connected to DC- pin of the 12V Relay, -12V pin of the 40 Fan 12V, and -ve pin of the AC Supply.
Arduino Mini (Rev5)
- D2: Connected to IN pin of the 12V Relay.
- VCC: Connected to 5V pin of the 5V Adapter.
- GND: Connected to GND pin of the 5V Adapter.
Code Documentation
/*
 * This Arduino Sketch controls a 12V fan using a relay. The fan is turned on
 * every 10 seconds for a duration of 2 seconds. The relay is connected to
 * pin D2 of the Arduino Mini (Rev5).
 */

const int relayPin = 2; // Pin connected to the relay IN pin

void setup() {
  // Initialize the relay pin as an output
  pinMode(relayPin, OUTPUT);
  // Ensure the relay is off initially
  digitalWrite(relayPin, LOW);
}

void loop() {
  // Turn the relay on (fan on)
  digitalWrite(relayPin, HIGH);
  delay(2000); // Wait for 2 seconds
  // Turn the relay off (fan off)
  digitalWrite(relayPin, LOW);
  delay(10000); // Wait for 10 seconds
}
This code initializes the relay pin as an output and ensures the relay is off initially. In the main loop, the relay is turned on for 2 seconds to power the fan and then turned off for 10 seconds, creating a periodic on-off cycle for the fan.