
Arduino UNO Controlled Temperature-Activated Motor with LCD Display
View and Edit Project In Cirkit Designer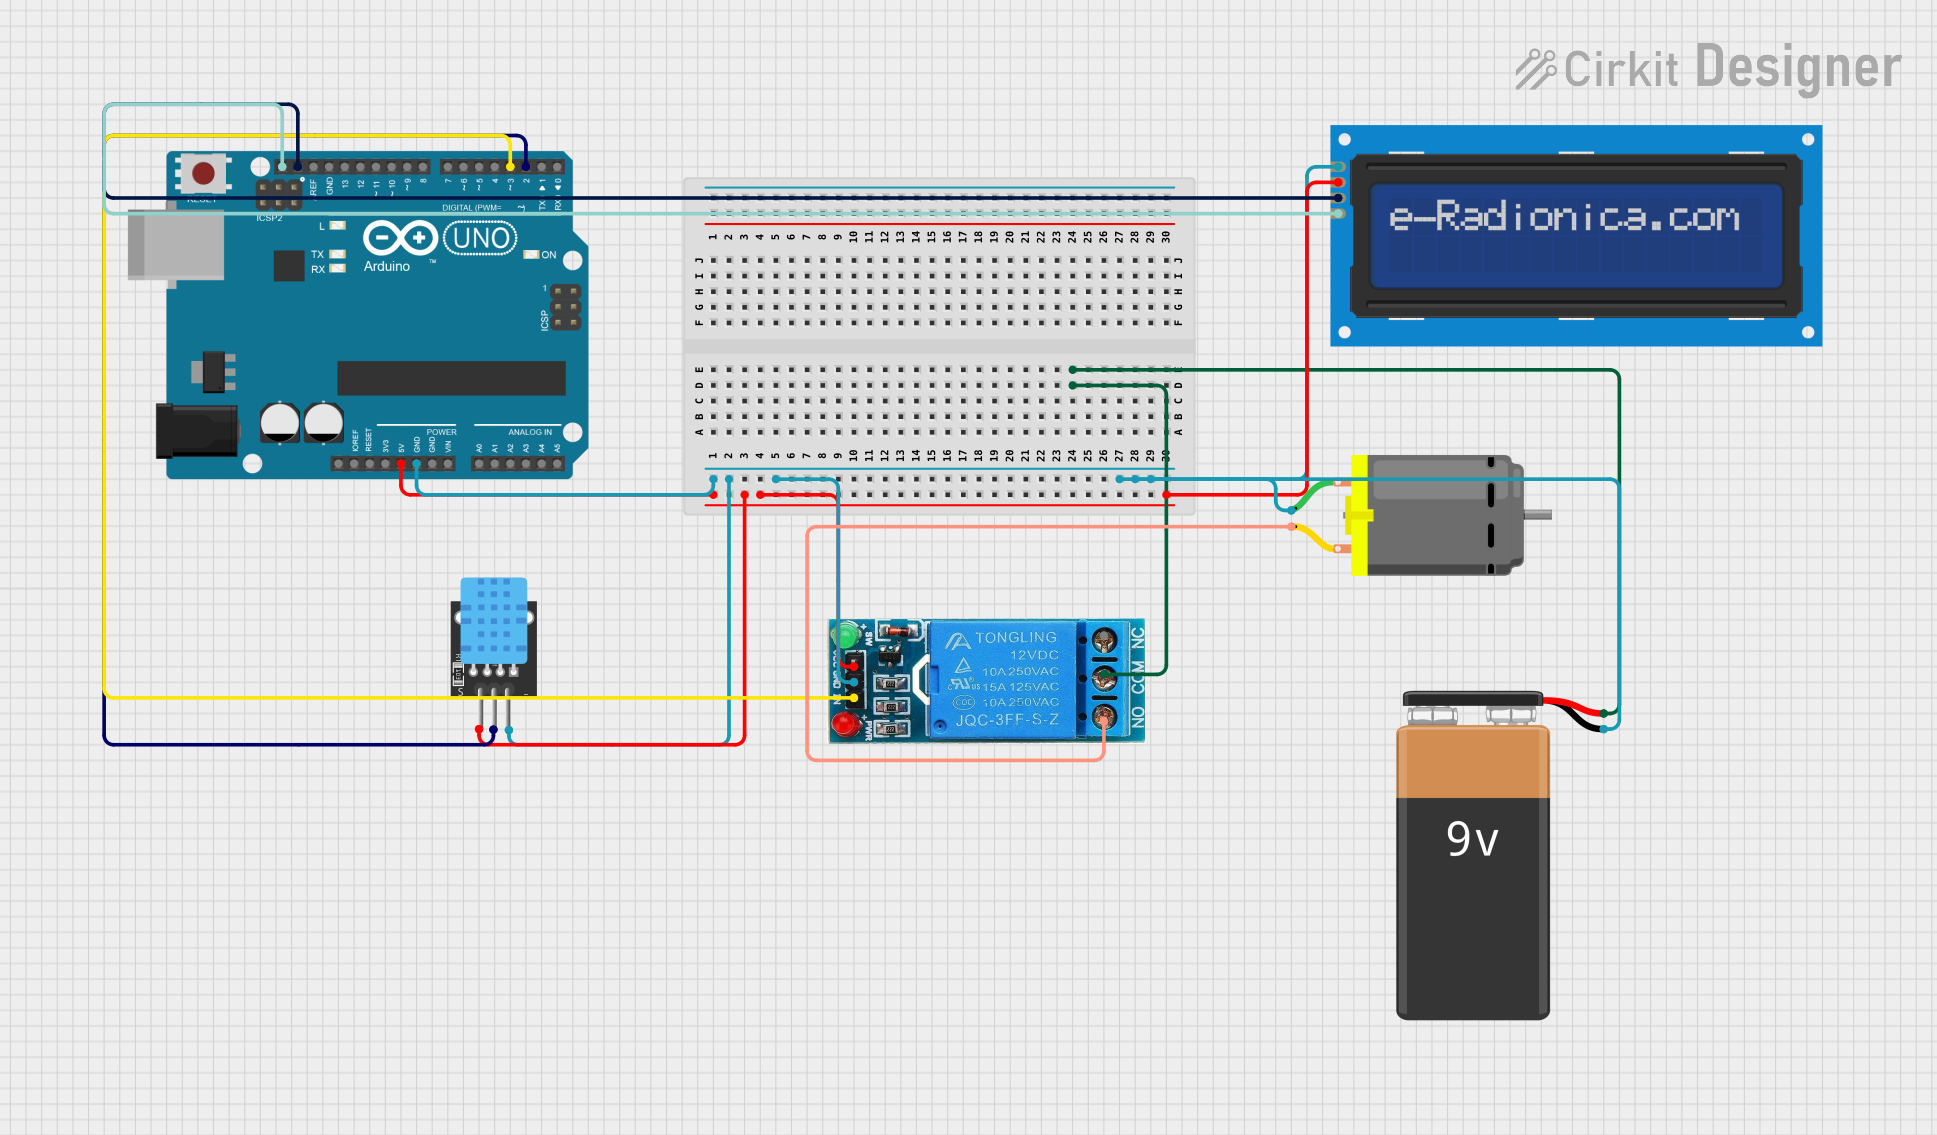
Circuit Documentation
Summary
This circuit is designed to monitor environmental conditions using a DHT11 sensor and display the temperature and humidity on an LCD screen. It also includes a DC motor that is controlled by a relay, which is activated when the temperature exceeds a certain threshold. The Arduino UNO serves as the central microcontroller unit, interfacing with the DHT11 sensor, the LCD screen via I2C, and controlling the relay to manage the DC motor. A 9V battery provides power to the relay, and the Arduino UNO's 5V output powers the other components.
Component List
Arduino UNO
- Microcontroller board based on the ATmega328P
- Provides I/O pins and power for the circuit components
DHT11
- Digital temperature and humidity sensor
- Provides ambient temperature and humidity readings
LCD screen 16x2 I2C
- Alphanumeric liquid crystal display with 16 columns and 2 rows
- Uses I2C communication to display data
DC Motor
- Converts electrical energy into mechanical motion
- Operated by the relay based on temperature readings
12V SINGLE CHANNEL RELAY
- Electromechanical switch controlled by the Arduino
- Drives the DC motor in response to sensor input
9V Battery
- Provides power to the relay
Wiring Details
Arduino UNO
5Vto DHT115V, RelayVCC, and LCDVCCGNDto DHT11GND, RelayGND, DC Motorpin 1, Battery-, and LCDGNDSCLto LCDSCLSDAto LCDSDAD3to RelayIND2to DHT11S
DHT11
5Vto Arduino UNO5VSto Arduino UNOD2GNDto Arduino UNOGND
LCD screen 16x2 I2C
SCLto Arduino UNOSCLSDAto Arduino UNOSDAVCCto Arduino UNO5VGNDto Arduino UNOGND
DC Motor
pin 1to Arduino UNOGNDpin 2to RelayNO
12V SINGLE CHANNEL RELAY
NC(Not connected in this circuit)COMto Battery+NOto DC Motorpin 2INto Arduino UNOD3GNDto Arduino UNOGNDVCCto Arduino UNO5V
9V Battery
+to RelayCOM-to Arduino UNOGND
Documented Code
#include <DHT.h>
#include <Wire.h>
#include <LiquidCrystal_I2C.h>

// Define pin connections
#define DHTPIN 2 // DHT11 data pin connected to Arduino D2
#define DHTTYPE DHT11 // DHT11 sensor type
#define RELAY_PIN 3 // Relay IN pin connected to Arduino D3

// Initialize DHT sensor
DHT dht(DHTPIN, DHTTYPE);

// Initialize the LCD (address 0x27, 16 columns and 2 rows)
LiquidCrystal_I2C lcd(0x27, 16, 2);

void setup() {
  // Initialize the DHT sensor
  dht.begin();

  // Initialize the LCD
  lcd.init();
  lcd.backlight();

  // Initialize the relay control pin as an output
  pinMode(RELAY_PIN, OUTPUT);
  digitalWrite(RELAY_PIN, LOW); // Start with the relay off
}

void loop() {
  // Read temperature and humidity values
  float temperature = dht.readTemperature();
  float humidity = dht.readHumidity();

  // Check if any reads failed and exit early (to try again).
  if (isnan(temperature) || isnan(humidity)) {
    lcd.clear();
    lcd.print("Failed to read");
    return;
  }

  // Display temperature and humidity on the LCD
  lcd.setCursor(0, 0);
  lcd.print("Temp: ");
  lcd.print(temperature);
  lcd.print("C");

  lcd.setCursor(0, 1);
  lcd.print("Humidity: ");
  lcd.print(humidity);
  lcd.print("%");

  // Control the relay based on the temperature
  // For example, turn on the motor if the temperature is above 25 degrees Celsius
  if (temperature > 25) {
    digitalWrite(RELAY_PIN, HIGH); // Turn on the relay (and the motor)
  } else {
    digitalWrite(RELAY_PIN, LOW); // Turn off the relay (and the motor)
  }

  // Wait a bit before reading again
  delay(2000); // Delay of 2 seconds
}
This code is responsible for reading temperature and humidity data from the DHT11 sensor and displaying it on the LCD screen. It also controls the relay, which in turn controls the DC motor, based on the temperature readings.