Cirkit Designer
Your all-in-one circuit design IDE
Home /
Project Documentation
Arduino-Controlled Traffic Light System with Load Cell Feedback and Audio Alerts

Circuit Documentation
Summary
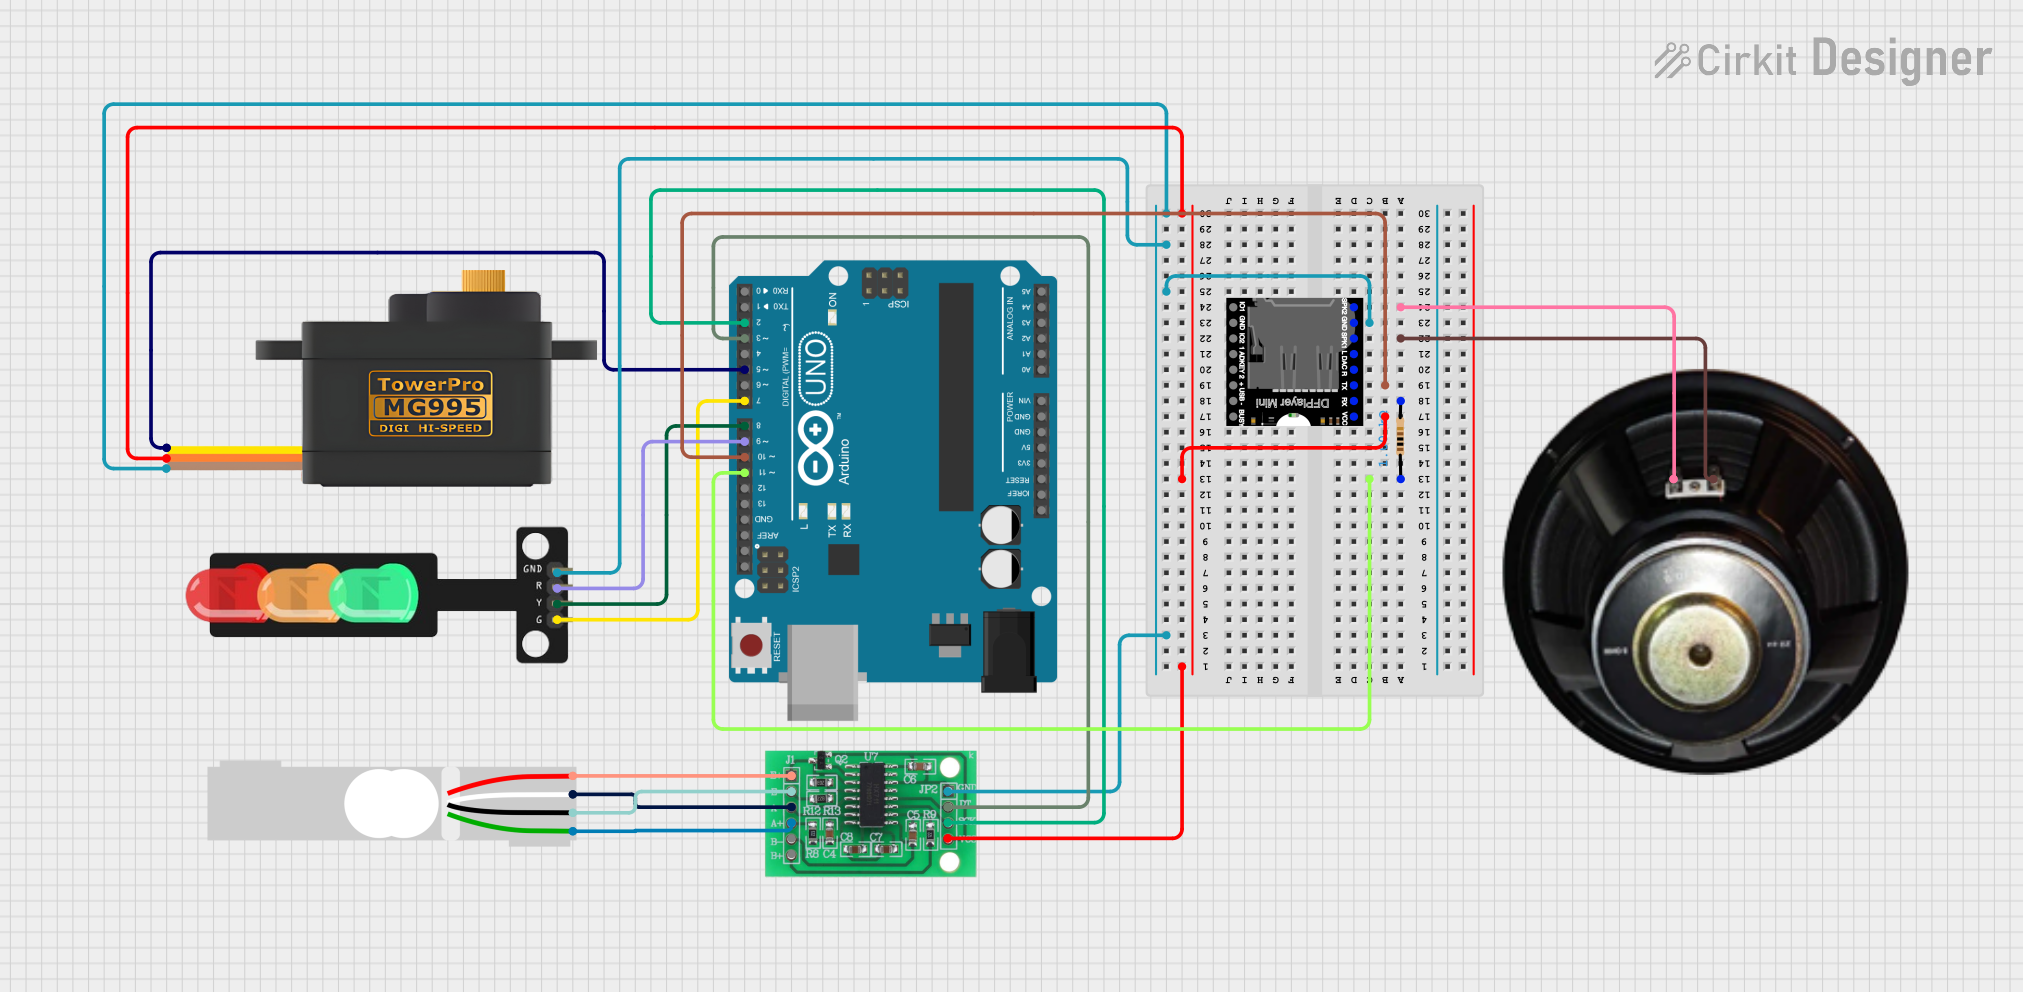
This document provides a detailed overview of a circuit designed to interface various components with an Arduino UNO microcontroller. The circuit includes a traffic light module, a load cell with an HX711 bridge sensor interface, a DFPlayer MINI MP3 module, a speaker, a servomotor, and a resistor. The Arduino UNO controls the traffic light and servomotor, processes signals from the load cell via the HX711, and communicates with the DFPlayer MINI to drive audio output through the speaker.
Component List
Arduino UNO
- Microcontroller board based on the ATmega328P
- It has 14 digital input/output pins, 6 analog inputs, a 16 MHz quartz crystal, a USB connection, a power jack, an ICSP header, and a reset button.
Traffic Light
- A module with three LEDs (Red, Yellow, Green) representing a traffic signal.
Load Cell - Red/white/black/green
- A transducer that converts force into an electrical signal.
Speaker
- An electroacoustic transducer that converts an electrical audio signal into a corresponding sound.
HX711 - Bridge Sensor Interface
- A precision 24-bit analog-to-digital converter (ADC) designed for weigh scales and industrial control applications to interface directly with a bridge sensor.
DFPlayer MINI
- A small and low-cost MP3 module with a simplified output directly to the speaker.
Servomotor MG995
- A high-speed standard servo that can rotate approximately 120 degrees (60 in each direction).
Resistor (1k Ohm)
- A passive two-terminal electrical component that implements electrical resistance as a circuit element.
Wiring Details
Arduino UNO
- D11: Connected to one end of the Resistor
- D10: Connected to TX of DFPlayer MINI
- D9: Connected to Red of Traffic Light
- D8: Connected to Yellow of Traffic Light
- D7: Connected to Green of Traffic Light
- D5: Connected to SIG of Servomotor MG995
- D3: Connected to DATA (OUT) of HX711
- D2: Connected to SCK - CLOCK (IN) of HX711
Traffic Light
- Red: Connected to D9 of Arduino UNO
- Yellow: Connected to D8 of Arduino UNO
- Green: Connected to D7 of Arduino UNO
- GND: Common ground with other components
Load Cell - Red/white/black/green
- E+: Connected to E+ of HX711
- A-: Connected to A- of HX711
- E-: Connected to E- of HX711
- A+: Connected to A+ of HX711
Speaker
- +: Connected to SPK1 of DFPlayer MINI
- -: Connected to SPK2 of DFPlayer MINI
HX711 - Bridge Sensor Interface
- E+: Connected to E+ of Load Cell
- E-: Connected to E- of Load Cell
- A-: Connected to A- of Load Cell
- A+: Connected to A+ of Load Cell
- GND - GROUND: Common ground with other components
- DATA (OUT): Connected to D3 of Arduino UNO
- SCK - CLOCK (IN): Connected to D2 of Arduino UNO
- 3.3/3.5V Supply: Connected to VCC of DFPlayer MINI and VCC of Servomotor MG995
DFPlayer MINI
- VCC: Connected to 3.3/3.5V Supply of HX711 and VCC of Servomotor MG995
- BUSY: Not connected
- RX: Connected to one end of the Resistor
- TX: Connected to D10 of Arduino UNO
- SPK1: Connected to + of Speaker
- SPK2: Connected to - of Speaker
- GND: Common ground with other components
Servomotor MG995
- SIG: Connected to D5 of Arduino UNO
- VCC: Connected to 3.3/3.5V Supply of HX711 and VCC of DFPlayer MINI
- GND: Common ground with other components
Resistor (1k Ohm)
- pin1: Connected to D11 of Arduino UNO
- pin2: Connected to RX of DFPlayer MINI
Documented Code
Arduino UNO Code (sketch.ino)
void setup() {
  // put your setup code here, to run once:

}

void loop() {
  // put your main code here, to run repeatedly:

}
Note: The provided code for the Arduino UNO is a template with empty setup and loop functions. The actual functionality needs to be implemented based on the requirements of the circuit's operation.