
Arduino UNO Solar-Powered Battery Charger with LCD Display and Motor Control
View and Edit Project In Cirkit Designer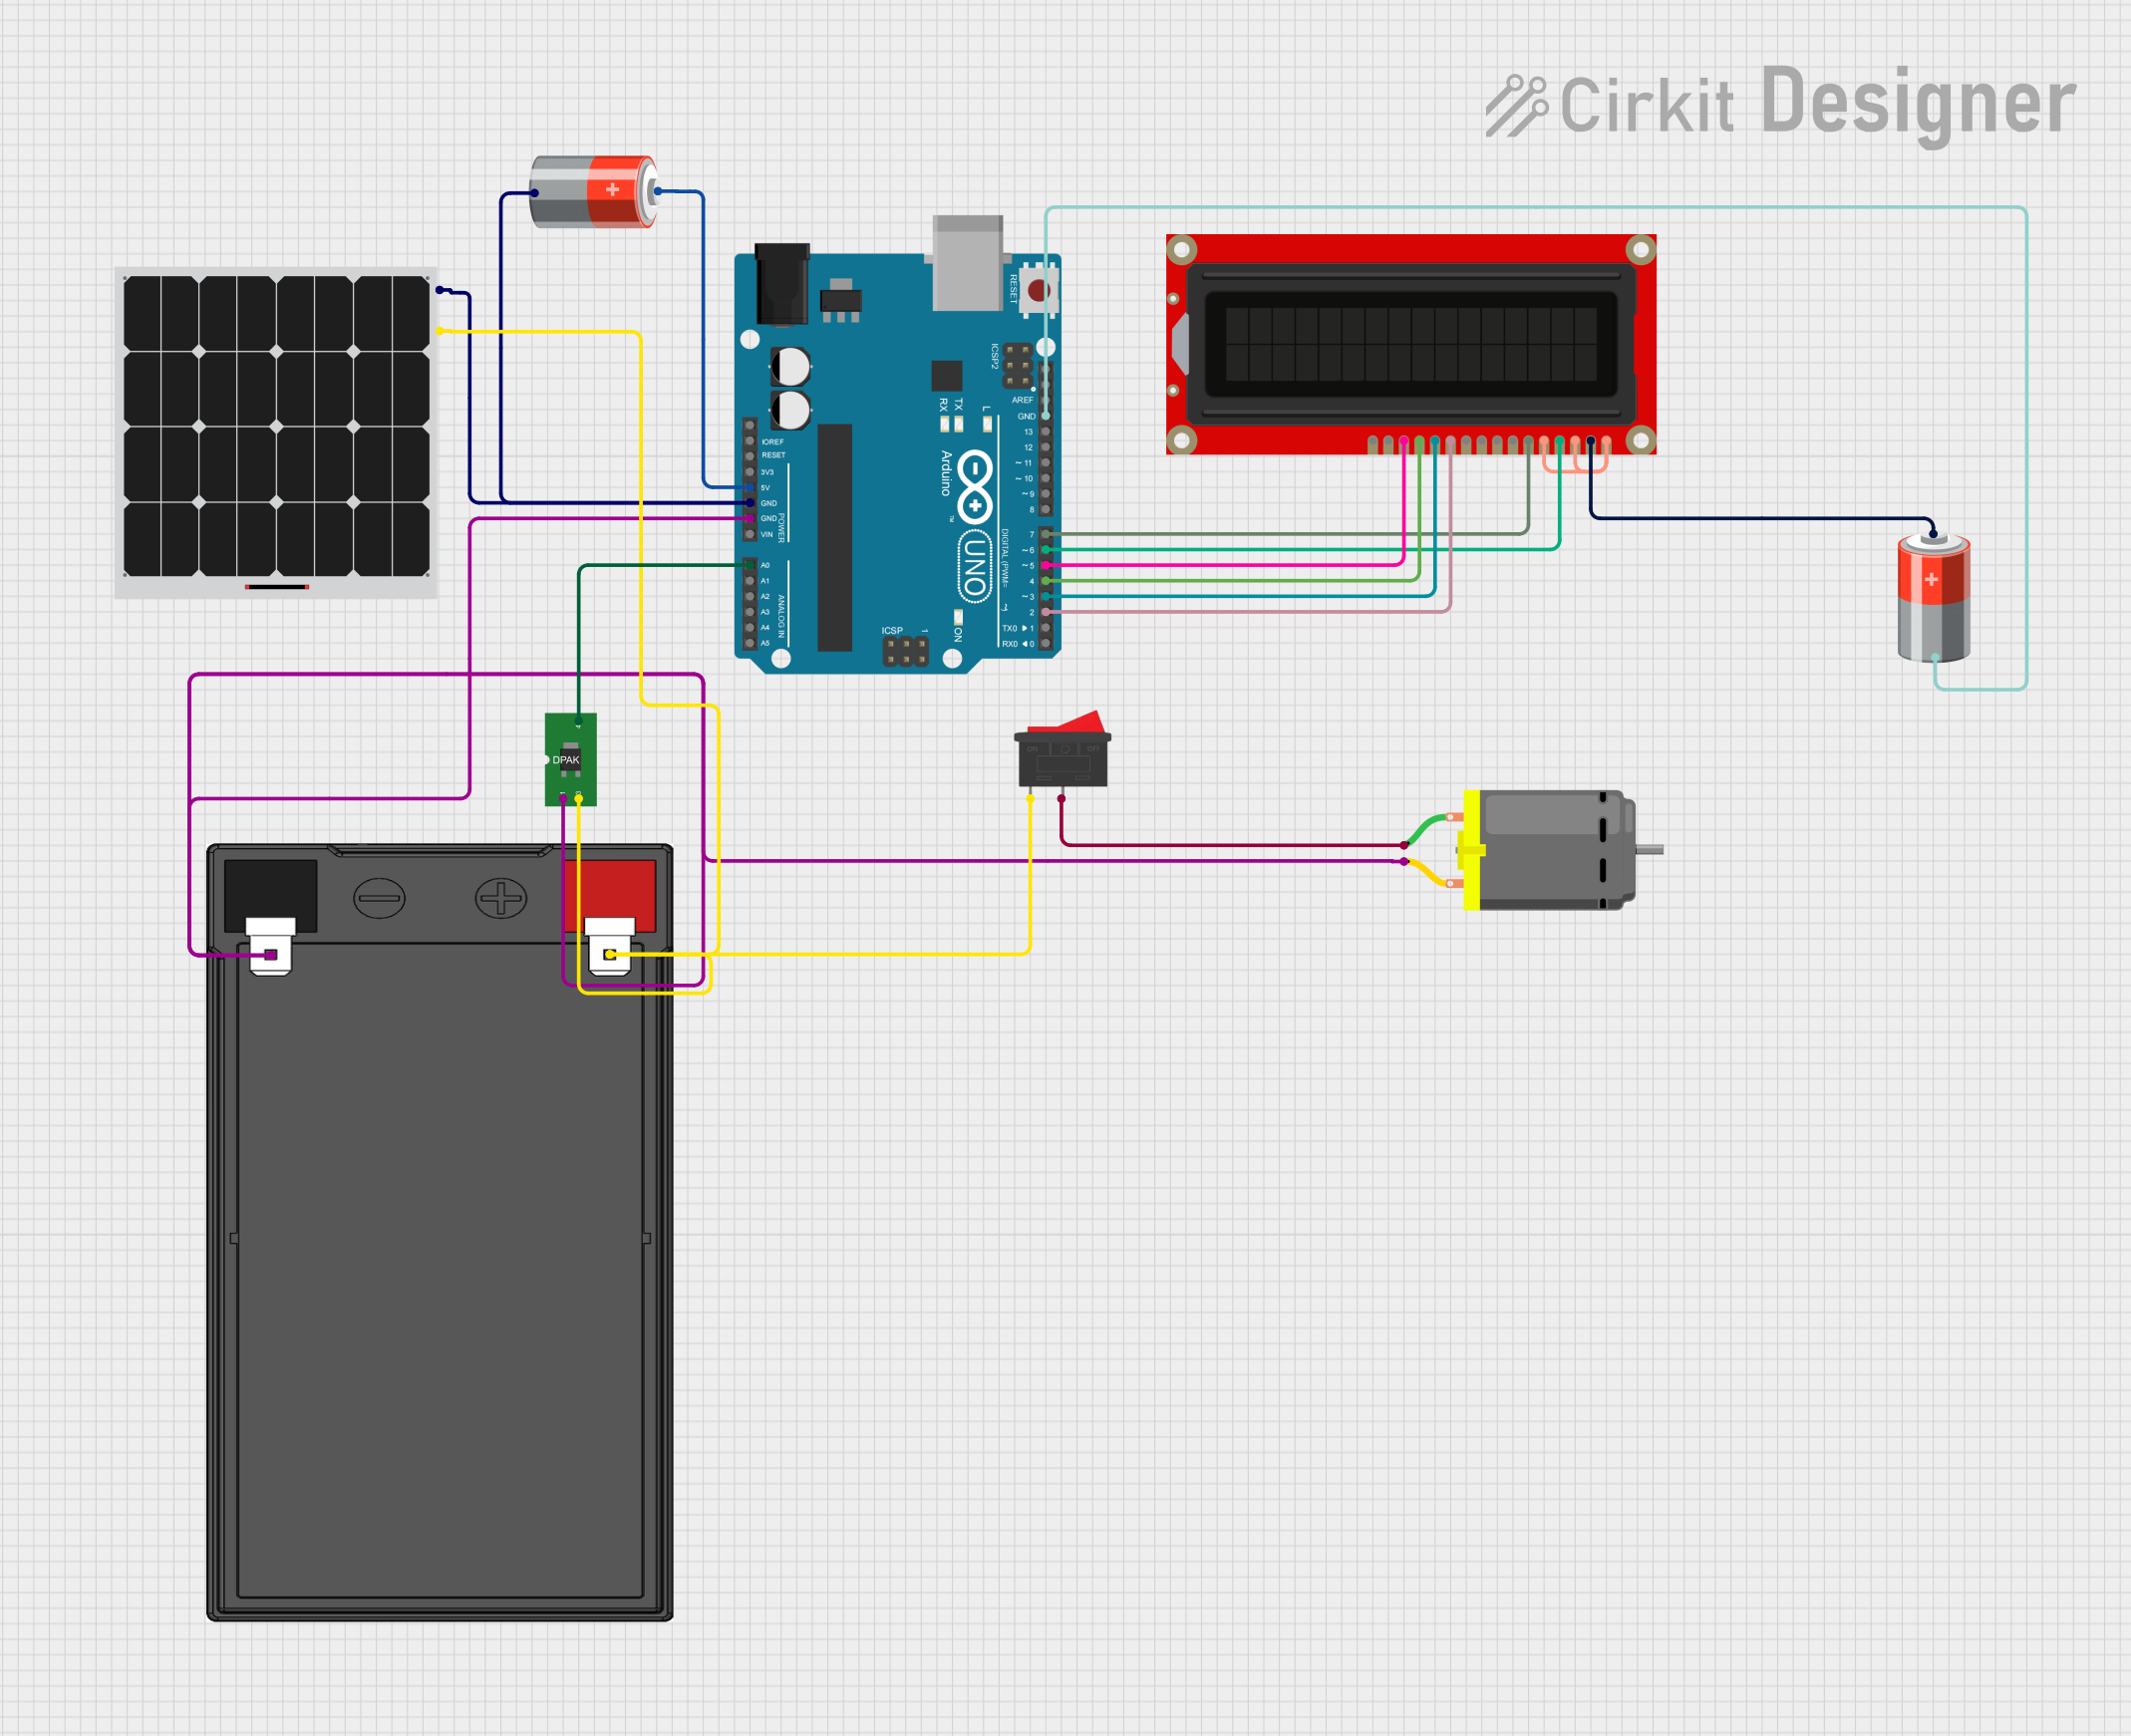
Solar Charger Circuit Documentation
Summary
This document provides a detailed overview of a solar charger circuit. The circuit includes an Arduino UNO microcontroller, a solar panel, a 12V 7Ah battery, a 5V battery, an LCD screen, a DC motor, a voltage regulator, and a rocker switch. The Arduino UNO is programmed to read the voltage from the solar panel, display it on the LCD screen, and control the DC motor based on the state of the rocker switch.
Component List
Arduino UNO
- Description: A microcontroller board based on the ATmega328P.
- Pins: UNUSED, IOREF, Reset, 3.3V, 5V, GND, Vin, A0, A1, A2, A3, A4, A5, SCL, SDA, AREF, D13, D12, D11, D10, D9, D8, D7, D6, D5, D4, D3, D2, D1, D0
Solar Panel
- Description: A device that converts sunlight into electrical energy.
- Pins: +, -
12V 7Ah Battery
- Description: A rechargeable battery providing 12V output.
- Pins: 12v +, 12v -
5V Battery
- Description: A rechargeable battery providing 5V output.
- Pins: +, -
LCD Screen
- Description: A display module used to show information.
- Pins: Backlight (GND), VSS, VDD, Contrast, RS, E, R/W, D0, D1, D2, D3, D4, D5, D6, D7, Backlight_PWR
DC Motor
- Description: A motor that runs on direct current (DC) electricity.
- Pins: pin 1, pin 2
Voltage Regulator (V_REG_MC33269)
- Description: A device that maintains a constant voltage level.
- Pins: GND, IN, OUT
Rocker Switch
- Description: A switch that rocks back and forth to open or close a circuit.
- Pins: 1, 2
Wiring Details
Arduino UNO
- 5V connected to 5V Battery (+)
- GND connected to Solar Panel (-), 5V Battery (-), DC Motor (pin 2), Voltage Regulator (GND), 12V 7Ah Battery (12v -), 5V Battery (-)
- A0 connected to Voltage Regulator (OUT)
- D7 connected to LCD Screen (E)
- D6 connected to LCD Screen (RS)
- D5 connected to LCD Screen (D7)
- D4 connected to LCD Screen (D6)
- D3 connected to LCD Screen (D5)
- D2 connected to LCD Screen (D4)
Solar Panel
- + connected to Voltage Regulator (IN), Rocker Switch (1), 12V 7Ah Battery (12v +)
- - connected to Arduino UNO (GND)
12V 7Ah Battery
- 12v + connected to Solar Panel (+), Rocker Switch (1)
- 12v - connected to DC Motor (pin 2), Arduino UNO (GND)
5V Battery
- + connected to Arduino UNO (5V), LCD Screen (VDD)
- - connected to Arduino UNO (GND), Solar Panel (-)
LCD Screen
- E connected to Arduino UNO (D7)
- RS connected to Arduino UNO (D6)
- D7 connected to Arduino UNO (D5)
- D6 connected to Arduino UNO (D4)
- D5 connected to Arduino UNO (D3)
- D4 connected to Arduino UNO (D2)
- VSS, Contrast, R/W interconnected
DC Motor
- pin 1 connected to Rocker Switch (2)
- pin 2 connected to Voltage Regulator (GND), Arduino UNO (GND), 12V 7Ah Battery (12v -)
Voltage Regulator (V_REG_MC33269)
- GND connected to DC Motor (pin 2), Arduino UNO (GND), 12V 7Ah Battery (12v -)
- IN connected to Solar Panel (+), Rocker Switch (1), 12V 7Ah Battery (12v +)
- OUT connected to Arduino UNO (A0)
Rocker Switch
- 1 connected to Solar Panel (+), Voltage Regulator (IN), 12V 7Ah Battery (12v +)
- 2 connected to DC Motor (pin 1)
Documented Code
#include <LiquidCrystal.h>

// Initialize the library with the numbers of the interface pins
LiquidCrystal lcd(6, 7, 2, 3, 4, 5);

// Pin definitions
const int solarPanelPin = A0; // Voltage from the voltage regulator
const int motorPin = 8;       // Pin to control the motor
const int switchPin = 9;      // Pin to read the rocker switch state

void setup() {
  // Set up the LCD's number of columns and rows:
  lcd.begin(16, 2);
  // Print a message to the LCD.
  lcd.print("Solar Charger");

  // Initialize pins
  pinMode(motorPin, OUTPUT);
  pinMode(switchPin, INPUT);

  // Initialize Serial Monitor
  Serial.begin(9600);
}

void loop() {
  // Read the voltage from the solar panel
  int solarVoltage = analogRead(solarPanelPin);
  float voltage = solarVoltage * (5.0 / 1023.0) * 2; // Assuming a voltage divider

  // Display the voltage on the LCD
  lcd.setCursor(0, 1);
  lcd.print("Voltage: ");
  lcd.print(voltage);
  lcd.print("V");

  // Print the voltage to the Serial Monitor
  Serial.print("Solar Panel Voltage: ");
  Serial.print(voltage);
  Serial.println(" V");

  // Read the state of the rocker switch
  int switchState = digitalRead(switchPin);

  // Control the motor based on the switch state
  if (switchState == HIGH) {
    digitalWrite(motorPin, HIGH);
  } else {
    digitalWrite(motorPin, LOW);
  }

  // Wait for a second before the next loop
  delay(1000);
}
This code initializes the LCD screen, reads the voltage from the solar panel, displays it on the LCD screen, and controls the DC motor based on the state of the rocker switch. The voltage is also printed to the Serial Monitor for debugging purposes.