
ESP32 and L298N Motor Driver Controlled DC and Stepper Motors with Toggle Switch and Battery Power
View and Edit Project In Cirkit Designer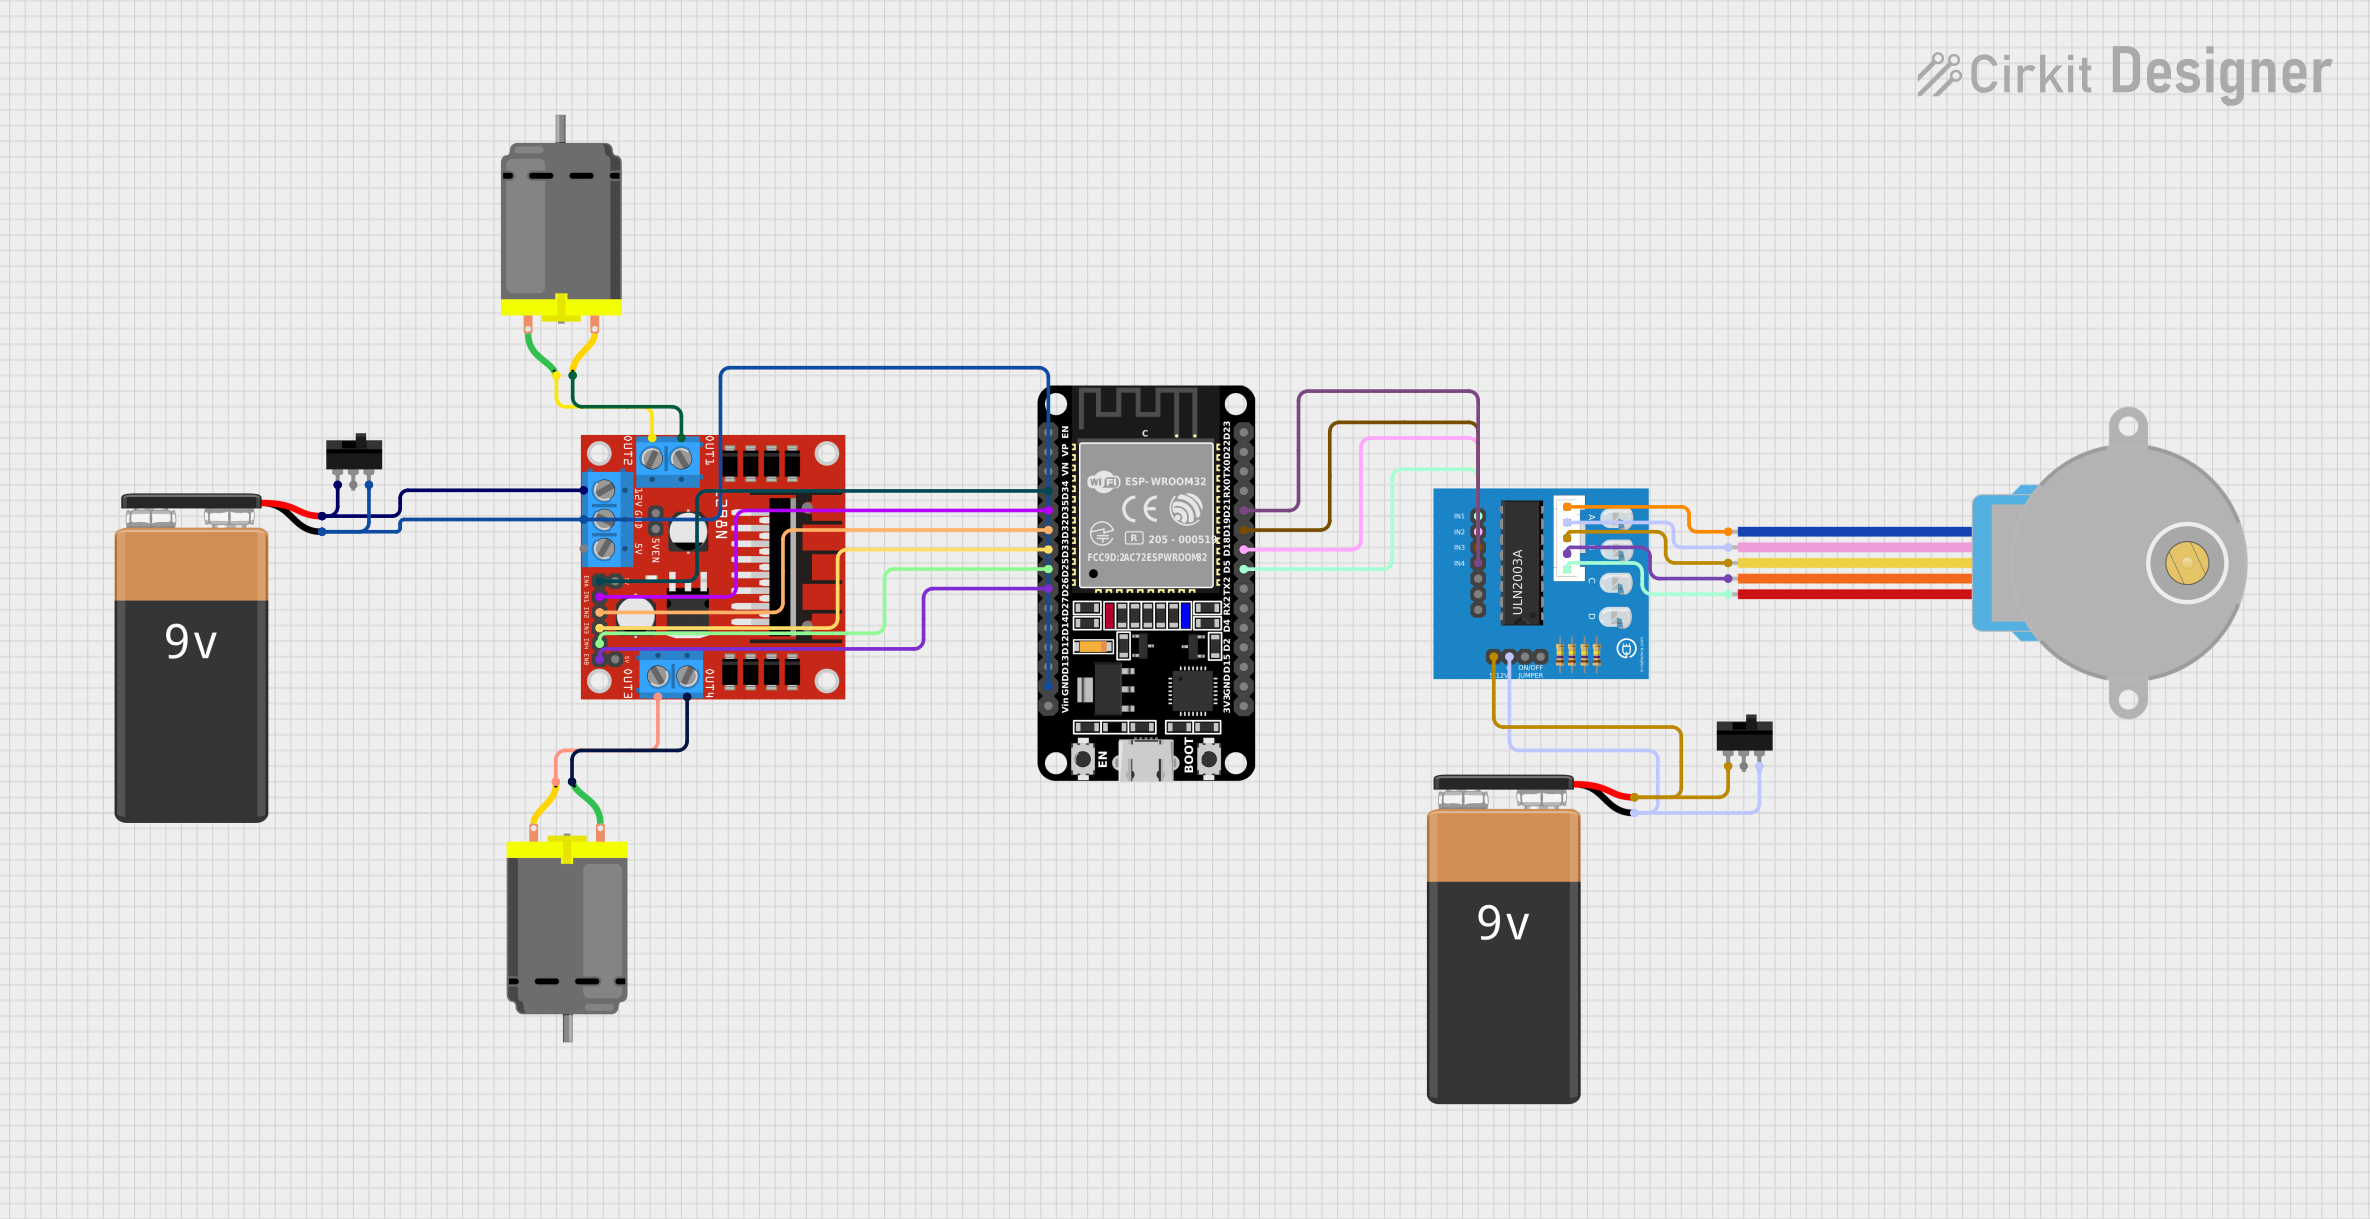
Circuit Documentation
Summary
This circuit involves controlling two DC motors and a stepper motor using an ESP32 microcontroller. The L298N motor driver is used to drive the DC motors, while the ULN2003A breakout board is used to control the stepper motor. The circuit is powered by two 9V batteries, and toggle switches are used to control the power supply to the motors.
Component List
DC Motor
- Description: A standard DC motor.
- Pins: pin 1, pin 2
L298N DC Motor Driver
- Description: A dual H-Bridge motor driver that allows control of two DC motors.
- Pins: OUT1, OUT2, 12V, GND, 5V, OUT3, OUT4, 5V-ENA-JMP-I, 5V-ENA-JMP-O, +5V-J1, +5V-J2, ENA, IN1, IN2, IN3, IN4, ENB
9V Battery
- Description: A 9V battery used to power the circuit.
- Pins: -, +
Toggle Switch
- Description: A switch used to control the power supply.
- Pins: L1, COM, L2
ESP32 (30 pin)
- Description: A microcontroller with Wi-Fi and Bluetooth capabilities.
- Pins: EN, VP, VN, D34, D35, D32, D33, D25, D26, D27, D14, D12, D13, GND, Vin, D23, D22, TX0, RX0, D21, D19, D18, D5, TX2, RX2, D4, D2, D15, 3V3
28BYJ-48 Stepper Motor
- Description: A 5V stepper motor.
- Pins: BLUE, PINK, YELLOW, ORANGE, RED
ULN2003A Breakout Board
- Description: A driver board for the 28BYJ-48 stepper motor.
- Pins: In 1, In 2, In 3, In 4, In 5, In 6, In 7, 0V, +5V, ON/OFF jumper switch, BLUE wire, PINK wire, YELLOW wire, ORANGE wire, RED wire
Wiring Details
DC Motor 1
- pin 1 connected to L298N DC motor driver OUT2
- pin 2 connected to L298N DC motor driver OUT1
DC Motor 2
- pin 1 connected to L298N DC motor driver OUT4
- pin 2 connected to L298N DC motor driver OUT3
L298N DC Motor Driver
- ENA connected to ESP32 D34
- IN1 connected to ESP32 D35
- IN2 connected to ESP32 D32
- IN3 connected to ESP32 D33
- IN4 connected to ESP32 D25
- ENB connected to ESP32 D26
- GND connected to Toggle Switch L2, ESP32 GND, 9V Battery -
- 12V connected to Toggle Switch L1, 9V Battery +
9V Battery 1
- - connected to L298N DC motor driver GND
- + connected to L298N DC motor driver 12V
9V Battery 2
- - connected to Toggle Switch L2, ULN2003A breakout board +5V
- + connected to Toggle Switch L1, ULN2003A breakout board 0V
Toggle Switch 1
- L1 connected to L298N DC motor driver 12V, 9V Battery +
- L2 connected to L298N DC motor driver GND, 9V Battery -
Toggle Switch 2
- L1 connected to ULN2003A breakout board 0V, 9V Battery +
- L2 connected to ULN2003A breakout board +5V, 9V Battery -
ESP32 (30 pin)
- D34 connected to L298N DC motor driver ENA
- D35 connected to L298N DC motor driver IN1
- D32 connected to L298N DC motor driver IN2
- D33 connected to L298N DC motor driver IN3
- D25 connected to L298N DC motor driver IN4
- D26 connected to L298N DC motor driver ENB
- GND connected to L298N DC motor driver GND
28BYJ-48 Stepper Motor
- BLUE connected to ULN2003A breakout board BLUE wire
- PINK connected to ULN2003A breakout board PINK wire
- YELLOW connected to ULN2003A breakout board YELLOW wire
- ORANGE connected to ULN2003A breakout board ORANGE wire
- RED connected to ULN2003A breakout board RED wire
ULN2003A Breakout Board
- In 1 connected to ESP32 D5
- In 2 connected to ESP32 D18
- In 3 connected to ESP32 D19
- In 4 connected to ESP32 D21
- BLUE wire connected to 28BYJ-48 Stepper Motor BLUE
- PINK wire connected to 28BYJ-48 Stepper Motor PINK
- YELLOW wire connected to 28BYJ-48 Stepper Motor YELLOW
- ORANGE wire connected to 28BYJ-48 Stepper Motor ORANGE
- RED wire connected to 28BYJ-48 Stepper Motor RED
- 0V connected to Toggle Switch L1, 9V Battery +
- +5V connected to Toggle Switch L2, 9V Battery -
Documented Code
// Motor A
int motor1Pin1 = 27;
int motor1Pin2 = 26;
int enable1Pin = 14;

// Setting PWM properties
const int freq = 30000;
const int pwmChannel = 0;
const int resolution = 8;
int dutyCycle = 200;

void setup() {
  // sets the pins as outputs:
  pinMode(motor1Pin1, OUTPUT);
  pinMode(motor1Pin2, OUTPUT);
  pinMode(enable1Pin, OUTPUT);

  // configure LEDC PWM
  ledcAttachChannel(enable1Pin, freq, resolution, pwmChannel);

  Serial.begin(115200);

  // testing
  Serial.print("Testing DC Motor...");
}

void loop() {
  // Move the DC motor forward at maximum speed
  Serial.println("Moving Forward");
  digitalWrite(motor1Pin1, LOW);
  digitalWrite(motor1Pin2, HIGH);
  delay(2000);

  // Stop the DC motor
  Serial.println("Motor stopped");
  digitalWrite(motor1Pin1, LOW);
  digitalWrite(motor1Pin2, LOW);
  delay(1000);

  // Move DC motor backwards at maximum speed
  Serial.println("Moving Backwards");
  digitalWrite(motor1Pin1, HIGH);
  digitalWrite(motor1Pin2, LOW);
  delay(2000);

  // Stop the DC motor
  Serial.println("Motor stopped");
  digitalWrite(motor1Pin1, LOW);
  digitalWrite(motor1Pin2, LOW);
  delay(1000);

  // Move DC motor forward with increasing speed
  digitalWrite(motor1Pin1, HIGH);
  digitalWrite(motor1Pin2, LOW);
  while (dutyCycle <= 255){
    ledcWrite(enable1Pin, dutyCycle);
    Serial.print("Forward with duty cycle: ");
    Serial.println(dutyCycle);
    dutyCycle = dutyCycle + 5;
    delay(500);
  }
  dutyCycle = 200;
}
This code is designed to control a DC motor connected to the ESP32 microcontroller. It sets up the necessary pins and PWM properties, and then runs a loop to move the motor forward and backward at different speeds.