
Battery-Powered Environmental Monitoring System with Raspberry Pi Pico
View and Edit Project In Cirkit Designer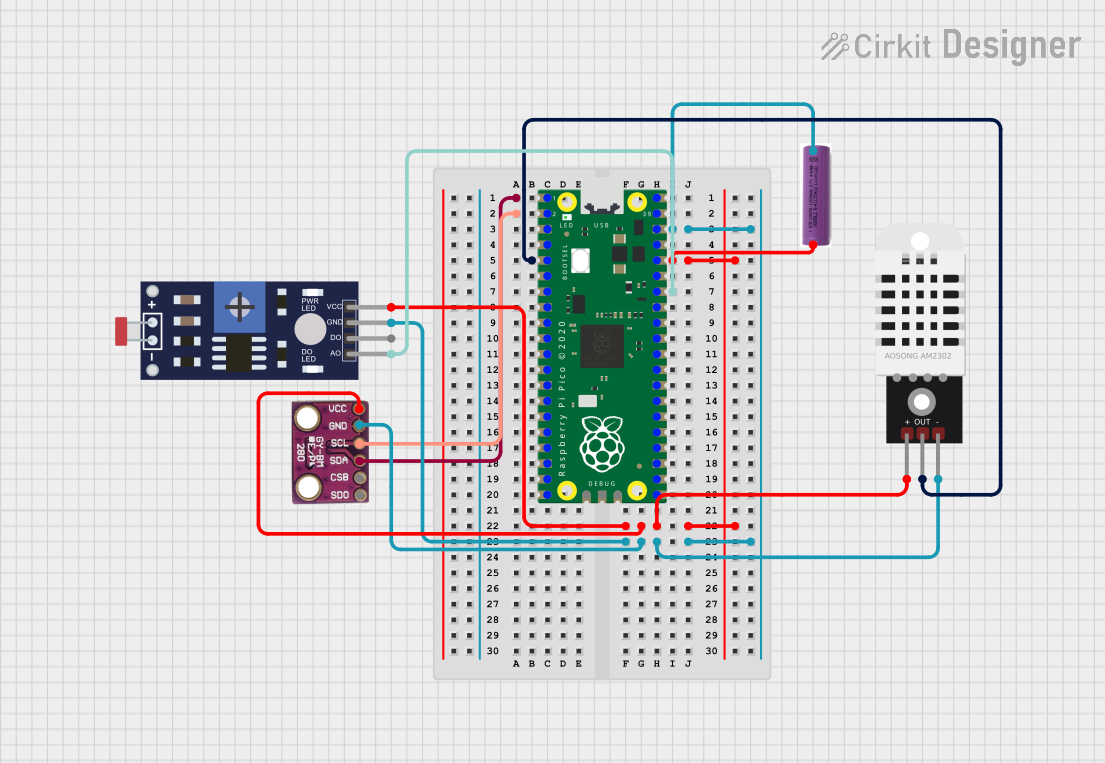
Circuit Documentation
Summary
This document provides a detailed overview of a circuit that includes a Raspberry Pi Pico microcontroller, a BMP280 sensor, a DHT22 sensor, a Photoresistor (LDR) sensor, and a 3.7V battery. The circuit is designed to read environmental data such as temperature, humidity, and light intensity.
Component List
Raspberry Pi Pico
- Description: A low-cost, high-performance microcontroller board with flexible digital interfaces.
- Pins: 43 pins including GPIO, power, and ground pins.
Photoresistor (LDR) Sensor (Wokwi Compatible)
- Description: A light-dependent resistor that changes its resistance based on the light intensity.
- Pins: VCC, GND, DO, AO
BMP280
- Description: A barometric pressure sensor that can measure temperature and pressure.
- Pins: SDO, CSB, SDA, SCL, GND, VCC
DHT22
- Description: A digital temperature and humidity sensor.
- Pins: +, Out, -
3.7V Battery
- Description: A rechargeable lithium-ion battery.
- Pins: +, -
Wiring Details
Raspberry Pi Pico
- pin 1 connected to BMP280 SDA
- pin 2 connected to BMP280 SCL
- pin 5 connected to DHT22 Out
- pin 34 connected to Photoresistor (LDR) Sensor AO
- pin 36 connected to 3.7V Battery +, DHT22 +, BMP280 VCC, Photoresistor (LDR) Sensor VCC
- pin 38 connected to 3.7V Battery -, DHT22 -, BMP280 GND, Photoresistor (LDR) Sensor GND
Photoresistor (LDR) Sensor (Wokwi Compatible)
- VCC connected to Raspberry Pi Pico pin 36
- GND connected to Raspberry Pi Pico pin 38
- AO connected to Raspberry Pi Pico pin 34
BMP280
- SDA connected to Raspberry Pi Pico pin 1
- SCL connected to Raspberry Pi Pico pin 2
- GND connected to Raspberry Pi Pico pin 38
- VCC connected to Raspberry Pi Pico pin 36
DHT22
- + connected to Raspberry Pi Pico pin 36
- Out connected to Raspberry Pi Pico pin 5
- - connected to Raspberry Pi Pico pin 38
3.7V Battery
- + connected to Raspberry Pi Pico pin 36
- - connected to Raspberry Pi Pico pin 38
Code
sketch.ino
void setup() {
  // put your setup code here, to run once:

}

void loop() {
  // put your main code here, to run repeatedly:

}
documentation.txt
This document provides a comprehensive overview of the circuit, including a summary, component list, wiring details, and the code used in the microcontroller.