
Arduino Mega ADK RFID-Controlled Stepper Motor System with DFPlayer Mini and LED Indicators
View and Edit Project In Cirkit Designer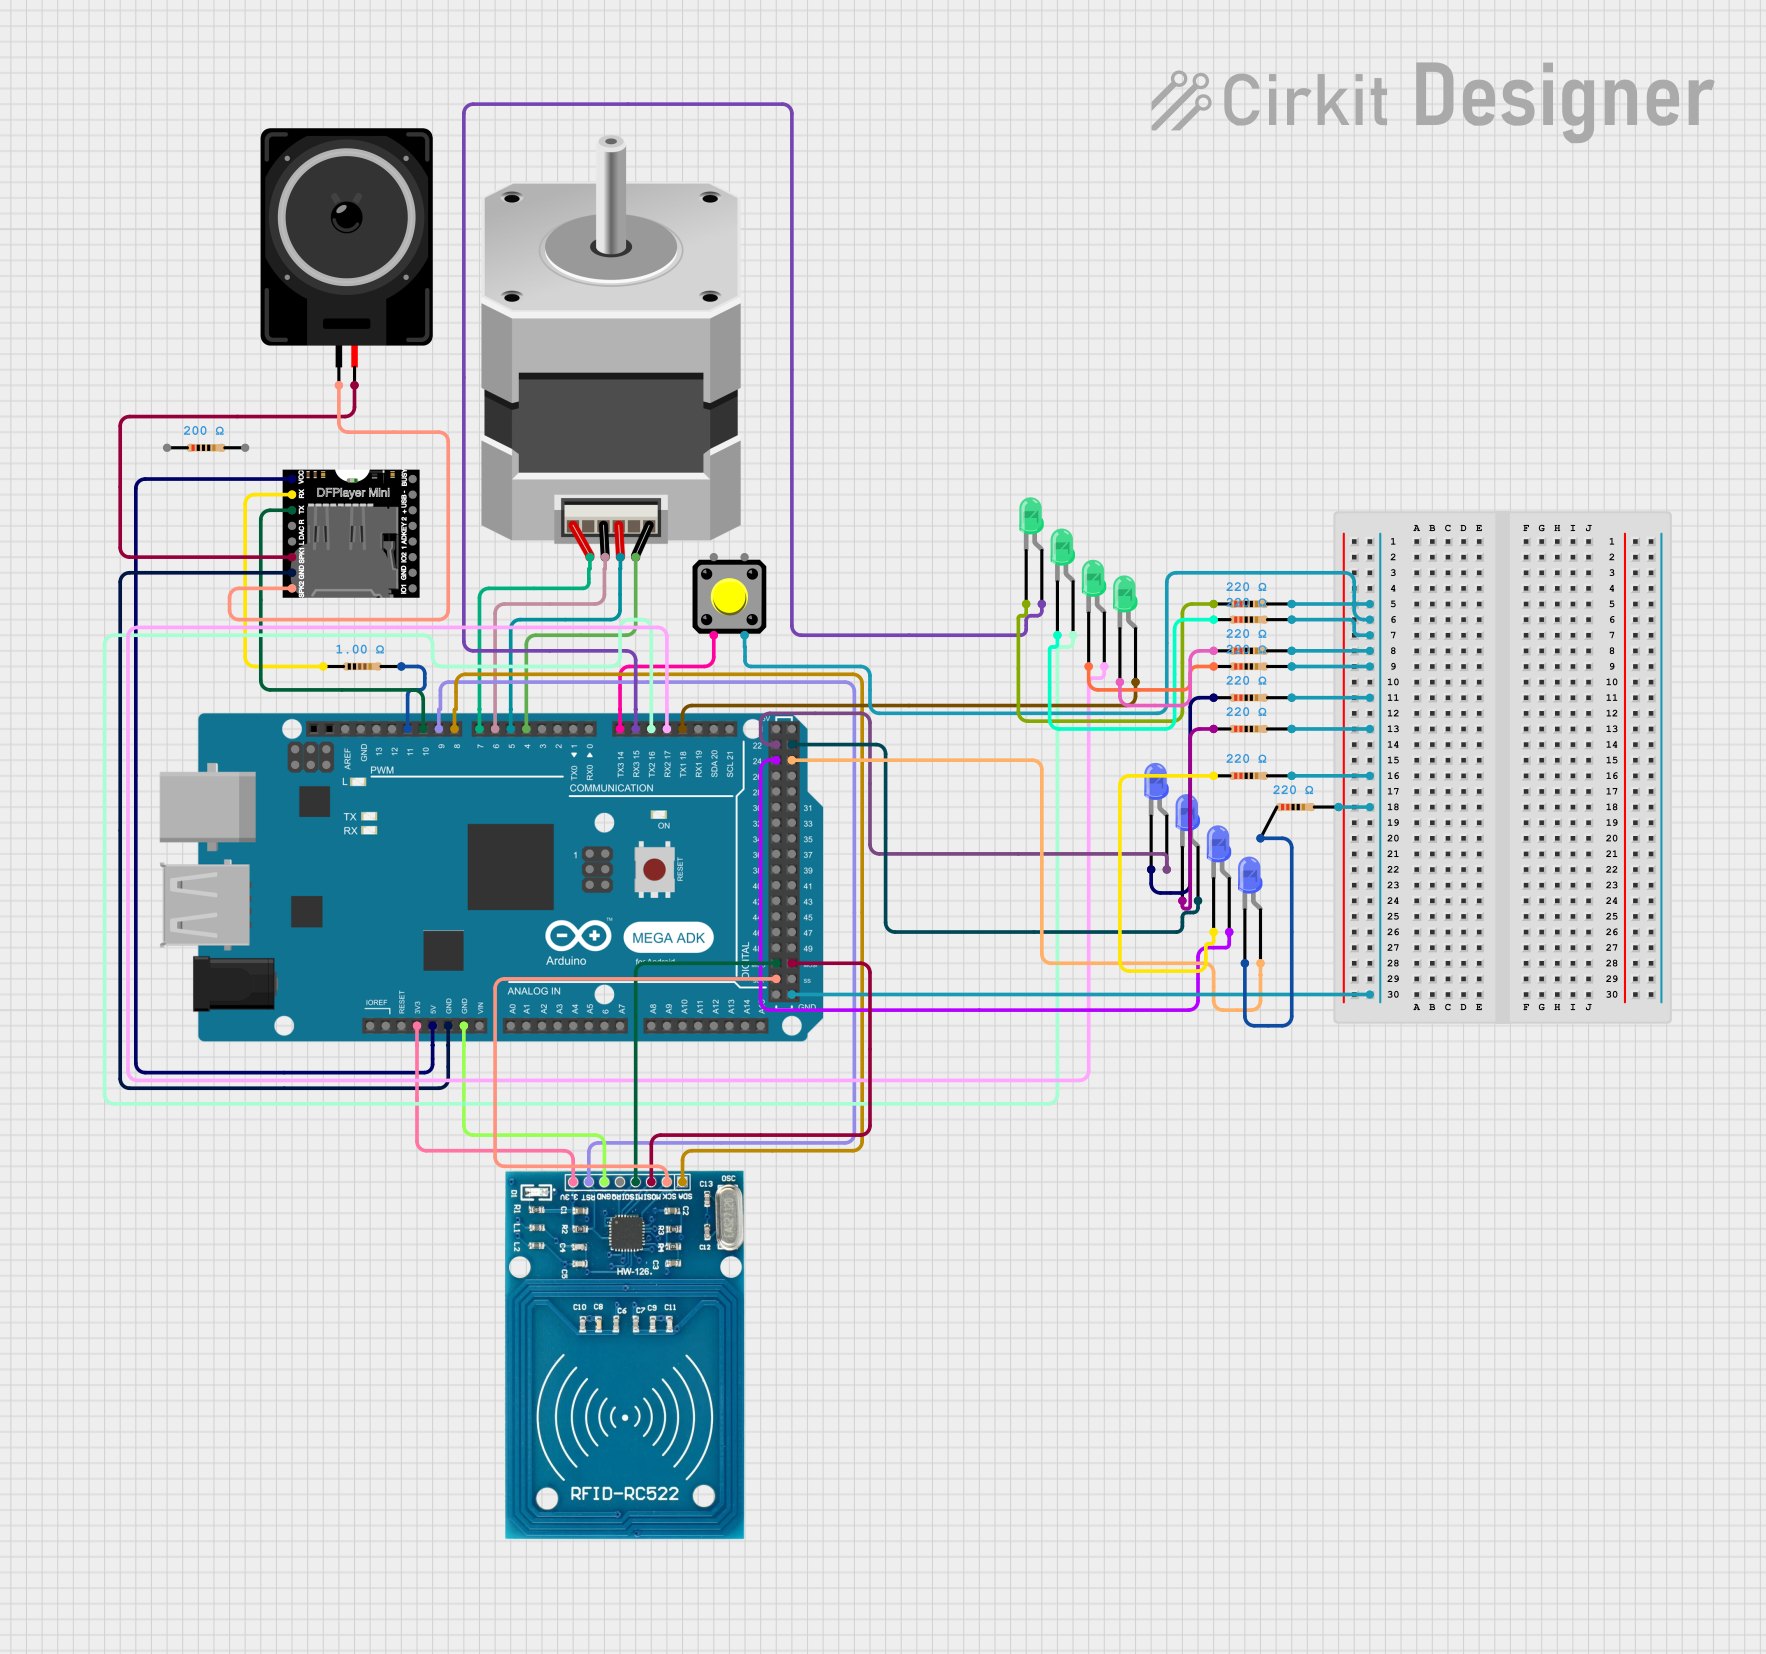
Circuit Documentation
Summary
This circuit is designed to integrate various components including an Arduino Mega ADK, DFPlayer Mini, RFID-RC522, stepper motor, pushbutton, loudspeaker, and multiple LEDs. The system is capable of reading RFID tags, controlling a stepper motor, playing audio files, and providing visual feedback through LEDs.
Component List
Arduino Mega ADK (Rev3)
- Description: A microcontroller board based on the ATmega2560.
- Pins: A0-A15, D0-D53, ICSP, RESET, 3V3, 5V, GND, VIN, IOREF
DFPlayer MINI
- Description: A small MP3 player module with a simplified output directly to the speaker.
- Pins: VCC, BUSY, RX, USB -, TX, USB +, DAC_R, K2/ADC_KEY, DAC_L, K1/ADC_KEY, SPK1, IO 2, GND, SPK2, IO 1
Loudspeaker
- Description: A device that converts electrical signals into sound.
- Pins: pin1, pin2
LED: Two Pin (blue)
- Description: A blue light-emitting diode.
- Pins: cathode, anode
LED: Two Pin (green)
- Description: A green light-emitting diode.
- Pins: cathode, anode
Resistor
- Description: A passive electrical component that limits current flow.
- Pins: pin1, pin2
- Properties: Various resistances (1 Ohm, 200 Ohms, 220 Ohms)
Stepper Motor (Bipolar)
- Description: A motor that moves in discrete steps, used for precise control.
- Pins: D, B, C, A
Pushbutton
- Description: A simple switch mechanism for controlling some aspect of a machine or process.
- Pins: Pin 1, Pin 2, Pin 3, Pin 4
RFID-RC522
- Description: A low-cost RFID reader module.
- Pins: VCC (3.3V), RST, GND, IRQ, MISO, MOSI, SCK, SDA
Wiring Details
Arduino Mega ADK (Rev3)
- D18/TX1: Connected to anode of green LED
- D17/RX2: Connected to anode of green LED
- D16/TX2: Connected to anode of green LED
- D15/RX3: Connected to anode of green LED
- D14/TX3: Connected to Pin 2 of pushbutton
- D11 PWM: Connected to pin2 of 1 Ohm resistor
- D10 PWM: Connected to TX of DFPlayer MINI
- D9 PWM: Connected to RST of RFID-RC522
- D8 PWM: Connected to SDA of RFID-RC522
- 3V3: Connected to VCC (3.3V) of RFID-RC522
- 5V: Connected to VCC of DFPlayer MINI
- GND: Connected to GND of DFPlayer MINI, GND of RFID-RC522, Pin 3 of pushbutton, and pin2 of multiple 220 Ohm resistors
- D4 PWM: Connected to D of stepper motor
- D5 PWM: Connected to B of stepper motor
- D6 PWM: Connected to C of stepper motor
- D7 PWM: Connected to A of stepper motor
- D22: Connected to anode of blue LED
- D23: Connected to anode of blue LED
- D24: Connected to anode of blue LED
- D25: Connected to anode of blue LED
- D50/MISO: Connected to MISO of RFID-RC522
- D51/MOSI: Connected to MOSI of RFID-RC522
- D52/SCK: Connected to SCK of RFID-RC522
DFPlayer MINI
- VCC: Connected to 5V of Arduino Mega ADK
- GND: Connected to GND of Arduino Mega ADK
- TX: Connected to D10 PWM of Arduino Mega ADK
- RX: Connected to pin1 of 1 Ohm resistor
- SPK1: Connected to pin2 of loudspeaker
- SPK2: Connected to pin1 of loudspeaker
Loudspeaker
- pin1: Connected to SPK2 of DFPlayer MINI
- pin2: Connected to SPK1 of DFPlayer MINI
LED: Two Pin (blue)
- anode: Connected to D22, D23, D24, D25 of Arduino Mega ADK
- cathode: Connected to pin1 of 220 Ohm resistors
LED: Two Pin (green)
- anode: Connected to D18/TX1, D17/RX2, D16/TX2, D15/RX3 of Arduino Mega ADK
- cathode: Connected to pin1 of 220 Ohm resistors
Resistor
- pin1: Connected to cathode of LEDs and RX of DFPlayer MINI
- pin2: Connected to GND of Arduino Mega ADK and D11 PWM of Arduino Mega ADK
Stepper Motor (Bipolar)
- D: Connected to D4 PWM of Arduino Mega ADK
- B: Connected to D5 PWM of Arduino Mega ADK
- C: Connected to D6 PWM of Arduino Mega ADK
- A: Connected to D7 PWM of Arduino Mega ADK
Pushbutton
- Pin 2: Connected to D14/TX3 of Arduino Mega ADK
- Pin 3: Connected to GND of Arduino Mega ADK
RFID-RC522
- VCC (3.3V): Connected to 3V3 of Arduino Mega ADK
- RST: Connected to D9 PWM of Arduino Mega ADK
- GND: Connected to GND of Arduino Mega ADK
- MISO: Connected to D50/MISO of Arduino Mega ADK
- MOSI: Connected to D51/MOSI of Arduino Mega ADK
- SCK: Connected to D52/SCK of Arduino Mega ADK
- SDA: Connected to D8 PWM of Arduino Mega ADK
Documented Code
#include <SPI.h>
#include <MFRC522.h>
#include <Stepper.h>
#include "DFRobotDFPlayerMini.h"
#include <SoftwareSerial.h>

// Pin Definitions for Mega 2560
#define RST_PIN 9          // Reset pin for RFID
#define RFID_CS_PIN 8      // RFID Chip Select pin
#define LED1_PIN 22        // System LED 1 (indicates system ON)
#define LED2_PIN 23        // System LED 2 (indicates system ON)
#define LED3_PIN 25        // System LED 3 (indicates system ON)
#define LED4_PIN 24        // System LED 4 (indicates system ON)
#define LED5_PIN 15        // Motor movement LED 1
#define LED6_PIN 17
#define LED7_PIN 16
#define LED8_PIN 18       // Motor movement LED 2
#define SWITCH_PIN 14      // Switch to reset the system
#define STEPPER_PIN1 4     // Stepper motor control pins
#define STEPPER_PIN2 5
#define STEPPER_PIN3 6
#define STEPPER_PIN4 7     // Updated motor connection pin
#define SOUND_RX_PIN 10    // Sound module RX pin
#define SOUND_TX_PIN 11    // Sound module TX pin

// Initialize RFID reader
MFRC522 mfrc522(RFID_CS_PIN, RST_PIN);

// Initialize the stepper motor
const int stepsPerRevolution = 200; // Steps per revolution for the motor
Stepper myStepper(stepsPerRevolution, STEPPER_PIN1, STEPPER_PIN2, STEPPER_PIN3, STEPPER_PIN4);

// Initialize sound system
SoftwareSerial mySoftwareSerial(SOUND_RX_PIN, SOUND_TX_PIN); // RX, TX
DFRobotDFPlayerMini myDFPlayer;

// UIDs of the RFID cards
const byte firstUID[] = {0xA1, 0x9A, 0x1D, 0x1D};  // First RFID UID
const byte secondUID[] = {0xB4, 0x90, 0xDE, 0x03}; // Second RFID UID

// System state variable
bool systemOn = false;

void setup() {
  Serial.begin(9600); // Debugging
  Serial.println("Initializing system...");

  // Initialize RFID
  SPI.begin();
  mfrc522.PCD_Init();
  Serial.println("RFID reader initialized.");

  // Initialize LEDs
  pinMode(LED1_PIN, OUTPUT);
  pinMode(LED2_PIN, OUTPUT