Arduino-Controlled Relay Switch with Pushbutton Activation
Circuit Documentation
Summary
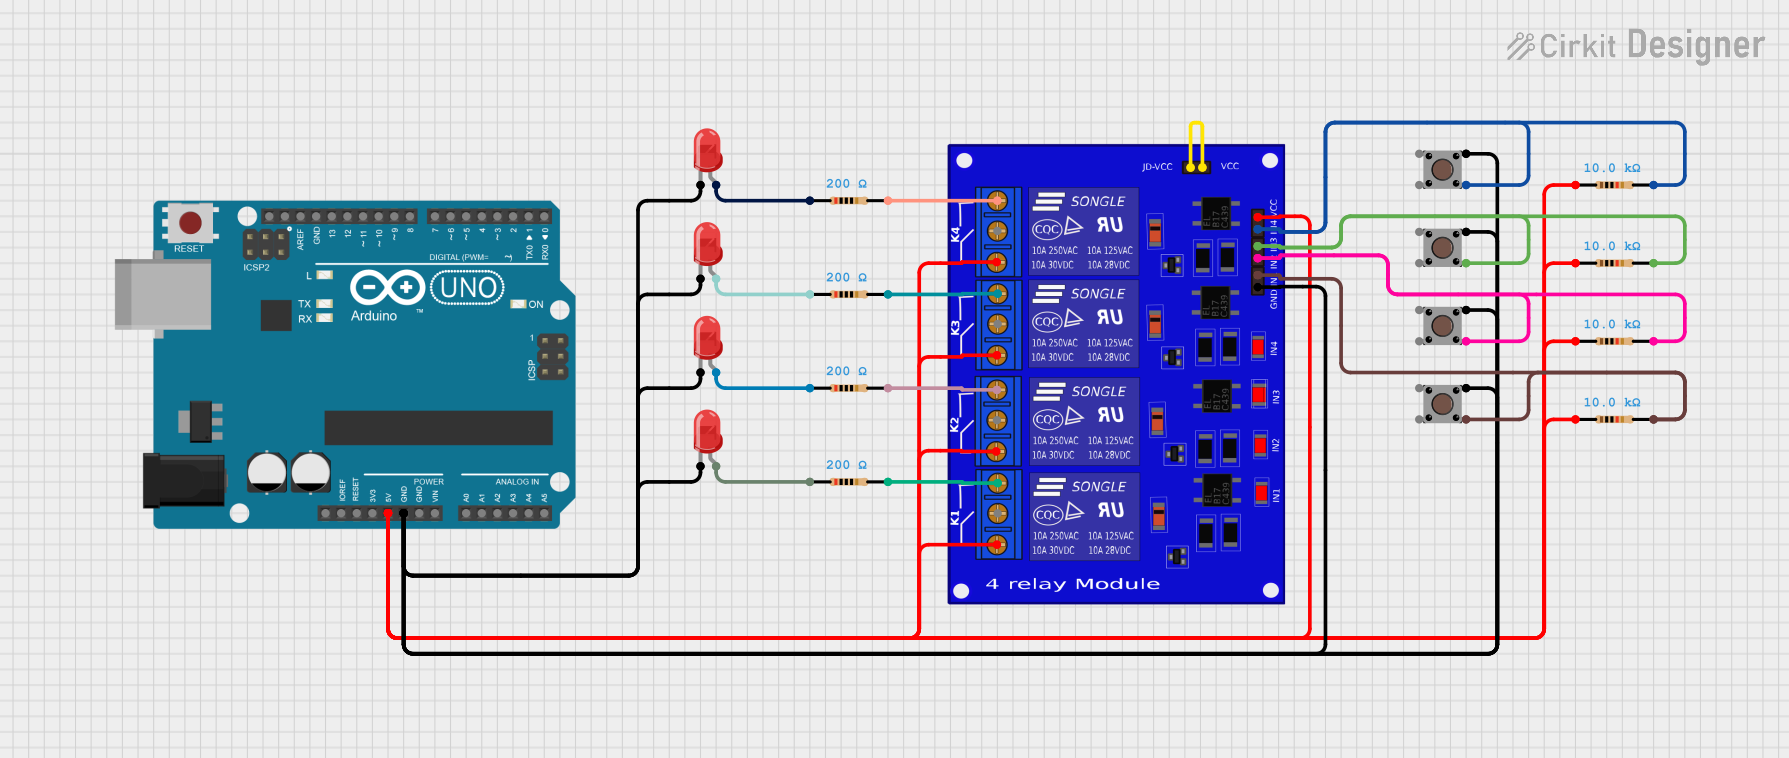
This circuit is designed to control a 4-channel relay module using an Arduino UNO. It incorporates multiple pushbuttons to trigger the relays and LEDs to provide visual feedback. Resistors are used to limit current to the LEDs and ensure proper operation of the pushbuttons. The circuit is powered by a 5V supply, and the relays can control higher voltage devices.
Component List
Relay 4 Channel 5V
- Description: A relay module that allows control of multiple devices with a low voltage signal.
- Pins: K4-NO, K4-NF, K3-NO, K3-NF, K3-Com, K1-NO, K1-NF, K1-Com, K2-NO, K2-NF, K2-Com, JD-VCC, VCC2, IN4, VCC, IN2, IN3, GND, IN1, K4-Com
Arduino UNO
- Description: A microcontroller board based on the ATmega328P, used for programming and controlling the circuit.
- Pins: UNUSED, IOREF, Reset, 3.3V, 5V, GND, Vin, A0, A1, A2, A3, A4, A5, SCL, SDA, AREF, D13, D12, D11, D10, D9, D8, D7, D6, D5, D4, D3, D2, D1, D0
Pushbutton
- Description: A momentary switch that allows user input to control the relays.
- Pins: Pin 3 (out), Pin 4 (out), Pin 1 (in), Pin 2 (in)
LED Two Pin (Red)
- Description: A red LED used for visual indication of relay status.
- Pins: Cathode, Anode
Resistor
- Description: A passive component used to limit current in the circuit.
- Resistance Values:
- 200 Ohms (4 instances)
- 10,000 Ohms (4 instances)
Wiring Details
Relay 4 Channel 5V
K4-NO connected to Resistor (200 Ohms, pin2)
K3-NO connected to Resistor (200 Ohms, pin2)
K2-Com connected to Resistor (10,000 Ohms, pin1), Arduino UNO (5V)
K1-Com connected to Resistor (10,000 Ohms, pin1)
K4-Com connected to Resistor (10,000 Ohms, pin1)
K3-Com connected to Resistor (10,000 Ohms, pin1)
JD-VCC connected to VCC2
GND connected to Arduino UNO (GND)
IN1 connected to Pushbutton (Pin 3 (out))
IN2 connected to Pushbutton (Pin 3 (out))
IN3 connected to Pushbutton (Pin 3 (out))
IN4 connected to Pushbutton (Pin 3 (out))
Pushbutton
Pin 1 (in) connected to Relay 4 Channel 5V (IN1)
Pin 3 (out) connected to Relay 4 Channel 5V (IN2)
Pin 3 (out) connected to Relay 4 Channel 5V (IN3)
Pin 3 (out) connected to Relay 4 Channel 5V (IN4)
LED Two Pin (Red)
Anode connected to Resistor (200 Ohms, pin1)
Cathode connected to Pushbutton (Pin 1 (in))
Resistor
200 Ohms:
- pin1 connected to LED Two Pin (Red, Anode)
- pin2 connected to Relay 4 Channel 5V (K4-NO)
10,000 Ohms:
- pin1 connected to Relay 4 Channel 5V (K2-Com)
- pin2 connected to Relay 4 Channel 5V (K1-NO)
Documented Code
Arduino UNO Code
void setup() {
  // put your setup code here, to run once:

}

void loop() {
  // put your main code here, to run repeatedly:

}
Documentation
This section is reserved for additional documentation or notes related to the circuit.