
Arduino UNO-Based Countdown Timer with LCD Display and Relay Control
View and Edit Project In Cirkit Designer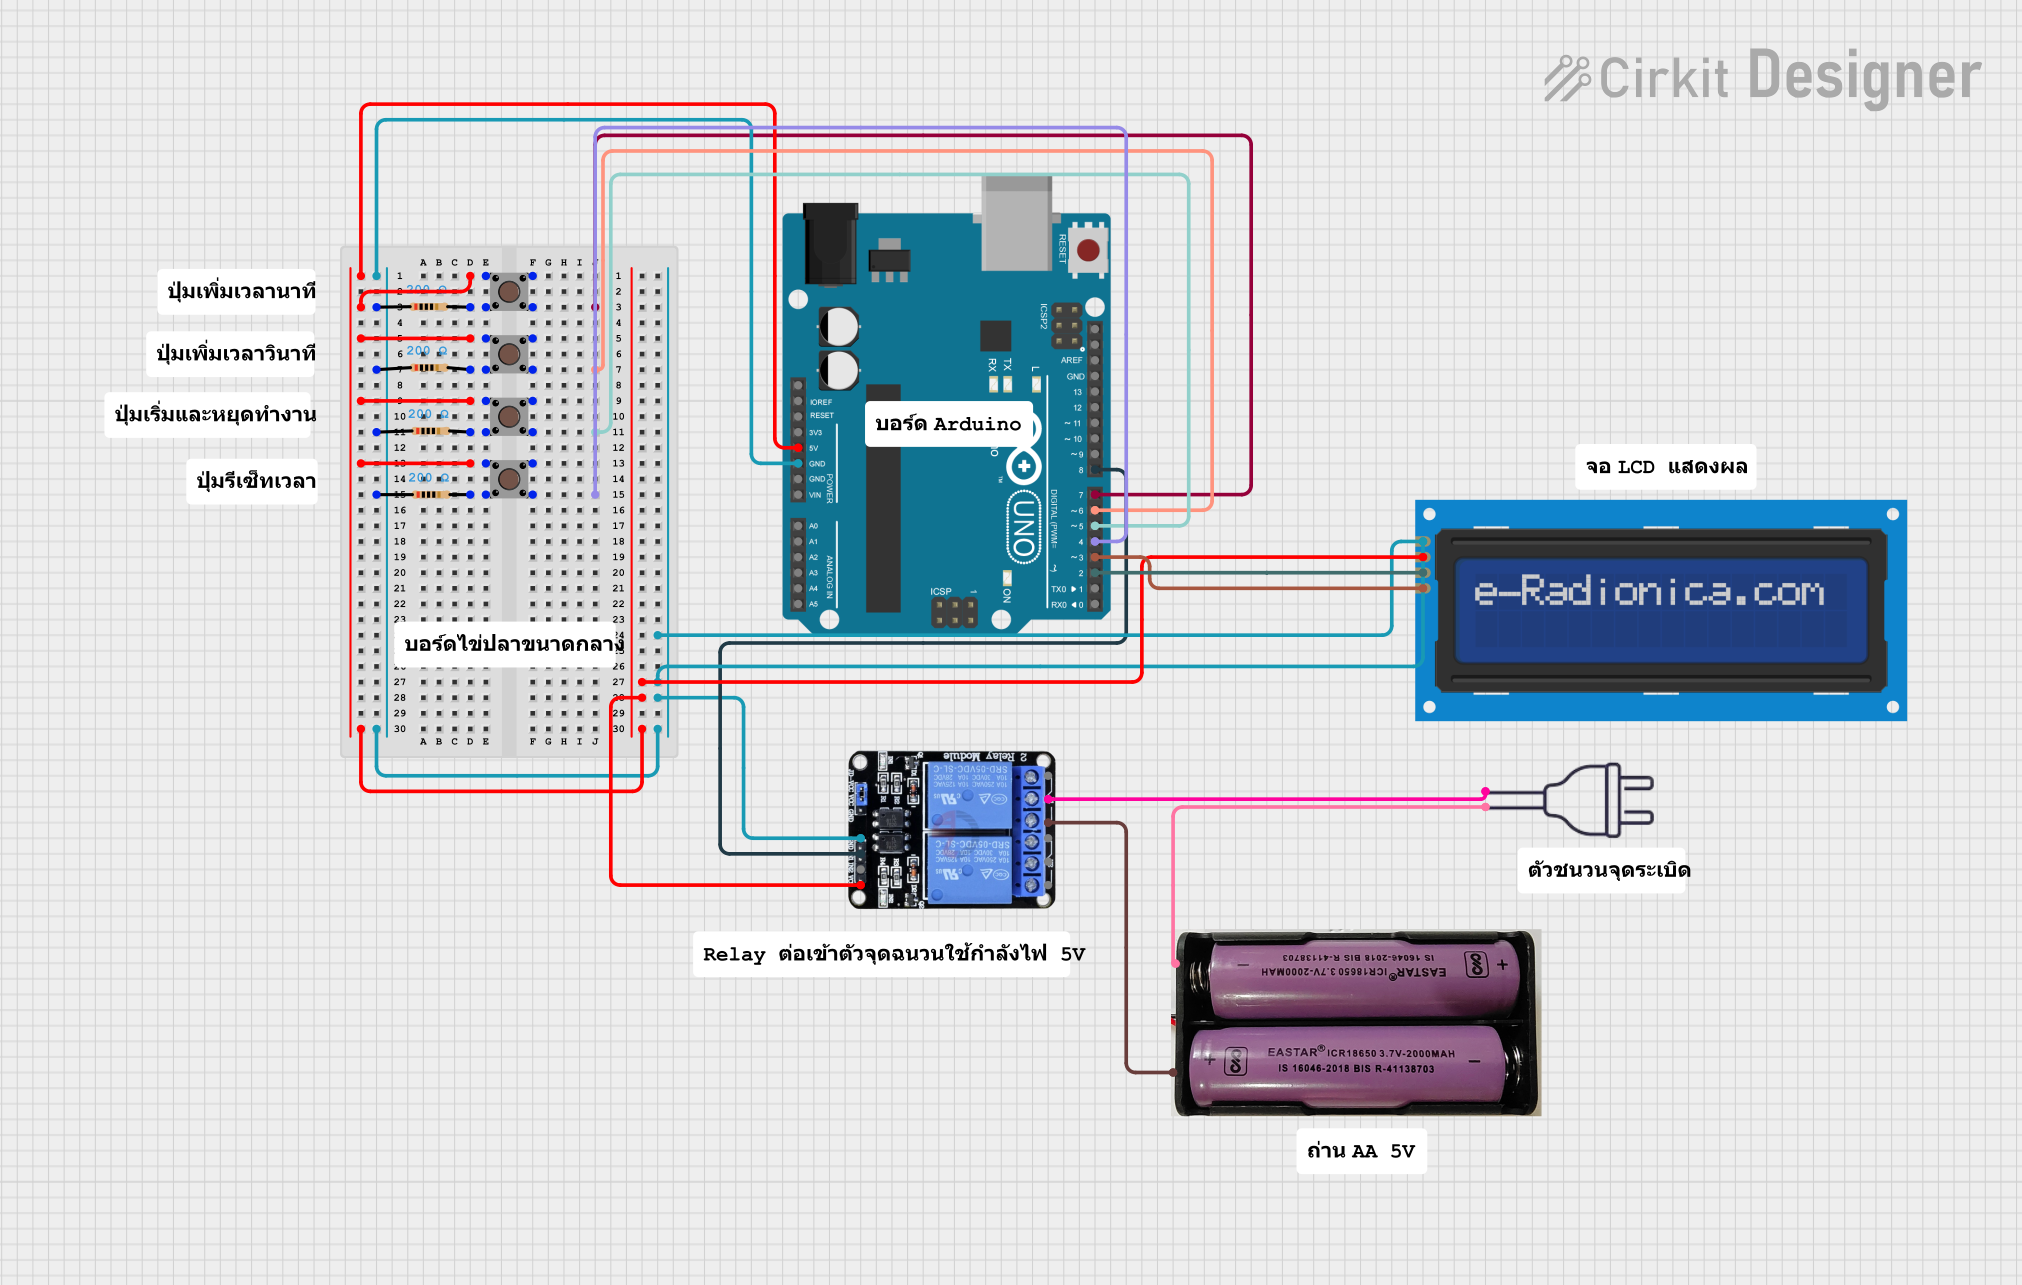
Circuit Documentation
Summary
This circuit is designed to control a relay using an Arduino UNO, pushbuttons, and an LCD screen. The pushbuttons are used to set a countdown timer, which is displayed on the LCD screen. When the countdown reaches zero, the relay is activated. The circuit also includes resistors for current limiting and a power supply for the components.
Component List
Pushbutton
- Pins: Pin 1 (in), Pin 2 (in), Pin 3 (out), Pin 4 (out)
- Description: A simple pushbutton used to provide user input.
- Purpose: Used to set and control the countdown timer.
Resistor
- Pins: pin1, pin2
- Description: A resistor with a resistance of 200 Ohms.
- Purpose: Used for current limiting.
Arduino UNO
- Pins: UNUSED, IOREF, Reset, 3.3V, 5V, GND, Vin, A0, A1, A2, A3, A4, A5, SCL, SDA, AREF, D13, D12, D11, D10, D9, D8, D7, D6, D5, D4, D3, D2, D1, D0
- Description: A microcontroller board based on the ATmega328P.
- Purpose: Controls the entire circuit, reads inputs from pushbuttons, and controls the relay and LCD screen.
Two Channel Relay 5v
- Pins: VCC, IN2, IN1, GND, NC2, C2, NO2, NC1, C1, NO1
- Description: A relay module that can control high voltage devices.
- Purpose: Used to activate an external device when the countdown reaches zero.
LCD screen 16x2 I2C
- Pins: SCL, SDA, VCC, GND
- Description: A 16x2 character LCD screen with I2C interface.
- Purpose: Displays the countdown timer and other messages.
7.4v Power Supply
- Pins: +, -
- Description: A 7.4V power supply.
- Purpose: Provides power to the relay module.
220v Power Supply
- Pins: hot wire, neutral wire
- Description: A 220V power supply.
- Purpose: Provides power to the external device controlled by the relay.
Wiring Details
Pushbutton 1
- Pin 2 (in): Connected to 5V (Arduino UNO)
- Pin 3 (out): Connected to D7 (Arduino UNO)
- Pin 4 (out): Connected to pin2 (Resistor 1)
Pushbutton 2
- Pin 2 (in): Connected to 5V (Arduino UNO)
- Pin 3 (out): Connected to D6 (Arduino UNO)
- Pin 4 (out): Connected to pin2 (Resistor 2)
Pushbutton 3
- Pin 2 (in): Connected to 5V (Arduino UNO)
- Pin 3 (out): Connected to D5 (Arduino UNO)
- Pin 4 (out): Connected to pin2 (Resistor 3)
Pushbutton 4
- Pin 2 (in): Connected to 5V (Arduino UNO)
- Pin 3 (out): Connected to D4 (Arduino UNO)
- Pin 4 (out): Connected to pin2 (Resistor 4)
Resistor 1
- pin1: Connected to GND (Arduino UNO)
- pin2: Connected to Pin 4 (out) (Pushbutton 1)
Resistor 2
- pin1: Connected to GND (Arduino UNO)
- pin2: Connected to Pin 4 (out) (Pushbutton 2)
Resistor 3
- pin1: Connected to GND (Arduino UNO)
- pin2: Connected to Pin 4 (out) (Pushbutton 3)
Resistor 4
- pin1: Connected to GND (Arduino UNO)
- pin2: Connected to Pin 4 (out) (Pushbutton 4)
Arduino UNO
- 5V: Connected to Pin 2 (in) (Pushbutton 1, 2, 3, 4), VCC (LCD screen 16x2 I2C), VCC (Two Channel Relay 5v)
- GND: Connected to pin1 (Resistor 1, 2, 3, 4), GND (LCD screen 16x2 I2C), GND (Two Channel Relay 5v)
- D7: Connected to Pin 3 (out) (Pushbutton 1)
- D6: Connected to Pin 3 (out) (Pushbutton 2)
- D5: Connected to Pin 3 (out) (Pushbutton 3)
- D4: Connected to Pin 3 (out) (Pushbutton 4)
- D8: Connected to IN1 (Two Channel Relay 5v)
- D3: Connected to SCL (LCD screen 16x2 I2C)
- D2: Connected to SDA (LCD screen 16x2 I2C)
Two Channel Relay 5v
- VCC: Connected to 5V (Arduino UNO)
- GND: Connected to GND (Arduino UNO)
- IN1: Connected to D8 (Arduino UNO)
- NC1: Connected to + (7.4v Power Supply)
- C1: Connected to hot wire (220v Power Supply)
LCD screen 16x2 I2C
- SCL: Connected to D3 (Arduino UNO)
- SDA: Connected to D2 (Arduino UNO)
- VCC: Connected to 5V (Arduino UNO)
- GND: Connected to GND (Arduino UNO)
7.4v Power Supply
- +: Connected to NC1 (Two Channel Relay 5v)
- -: Connected to neutral wire (220v Power Supply)
220v Power Supply
- hot wire: Connected to C1 (Two Channel Relay 5v)
- neutral wire: Connected to - (7.4v Power Supply)
Code Documentation
int btn1 = 7;
int btn2 = 6;
int btn3 = 5;
int relayPin = 8;
int counting = 10;
bool countdownActive = false;

void setup() {
  Serial.begin(9600);
  pinMode(btn1, INPUT_PULLUP);
  pinMode(btn2, INPUT_PULLUP);
  pinMode(btn3, INPUT_PULLUP);
  pinMode(relayPin, OUTPUT);
  digitalWrite(relayPin, HIGH);
}

void loop() {
  int button0 = digitalRead(btn1);  // Read button to increase time
  int button1 = digitalRead(btn2);  // Read button to decrease time
  int button2 = digitalRead(btn3);  // Read button to start/stop countdown

  // Call various functions
  handleAddTime(button0);       // Function to increase time
  handleSubtractTime(button1);  // Function to decrease time
  handleCountdown(button2);     // Function to start/stop countdown
  handleCountdownTimer();       // Function to handle countdown
  handleRealyOff();             // Turn off relay
}

void handleAddTime(int button0) {
  if (button0 == HIGH && !countdownActive) {  // If button is pressed
    counting++;                               // Increase time by 1 second
    Serial.print("Time increased to: ");
    Serial.print(counting);
    Serial.println(" seconds");
    delay(200);  // Delay to prevent multiple presses
  }
}

void handleSubtractTime(int button1) {
  if (button1 == HIGH && !countdownActive) {  // If button is pressed
    if (counting > 1) {
      counting--;
      Serial.print("Time decreased to: ");
      Serial.print(counting);
      Serial.println(" seconds");
    } else {
      Serial.println("Cannot decrease time further!");
    }
  }
}

void handleCountdown(int button2) {
  if (button2 == HIGH && !countdownActive && counting > 0) {  // If button is pressed to start countdown
    countdownActive = true;                                   // Start countdown
    Serial.println("Countdown started!!");
    delay(400);                                     // Delay to prevent multiple presses
  } else if (button2 == HIGH && countdownActive) {  // If button is pressed to stop countdown
    countdownActive = false;                        // Stop countdown
    Serial.println("Countdown stopped!!");
    delay(400);  // Delay to prevent multiple presses
  }
}

void handleCountdownTimer() {
  if (countdownActive && counting > 0) {  // If countdown is active
    delay(1000);                          // Delay 1 second
    counting--;                           // Decrease time by 1 second