
Arduino-Controlled Robotics Platform with Ultrasonic Sensing and Dual Motor Drive
View and Edit Project In Cirkit Designer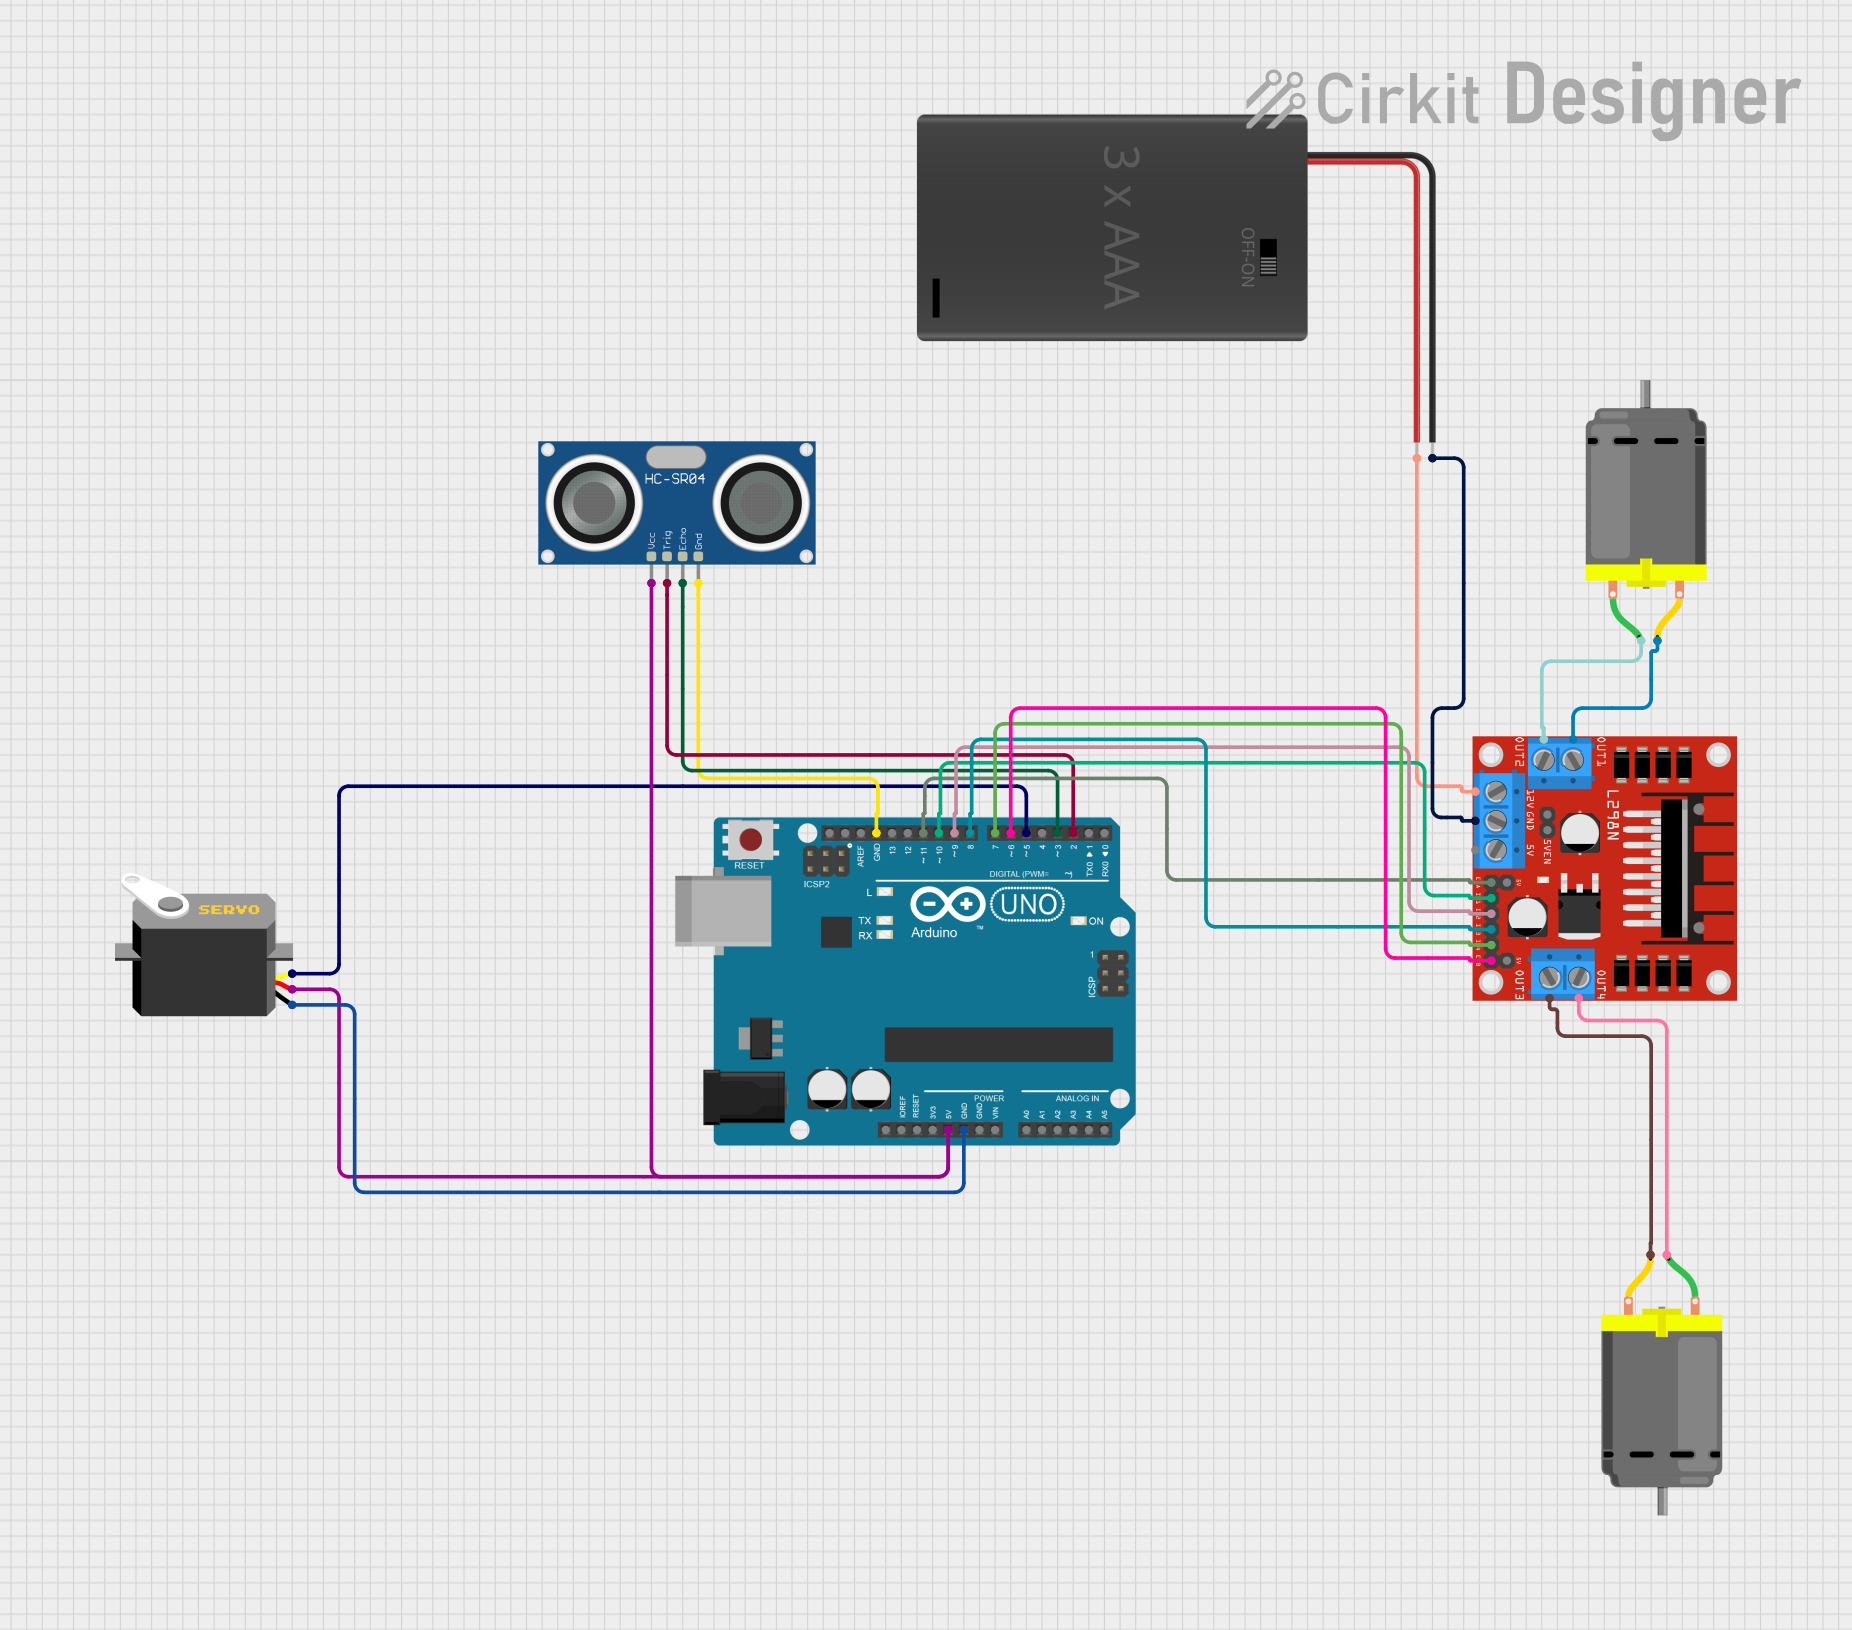
Circuit Documentation
Summary of the Circuit
This circuit is designed to control a servo motor and two DC motors using an Arduino UNO microcontroller. It also includes an HC-SR04 ultrasonic sensor for distance measurement. The Arduino UNO is powered by its onboard voltage regulator, which is connected to a 3xAAA battery pack. The DC motors are driven by an L298N DC motor driver, which is also powered by the battery pack. The servo motor and the ultrasonic sensor are powered directly from the Arduino's 5V output.
Component List
Arduino UNO
- Microcontroller board based on the ATmega328P
- It has 14 digital input/output pins, 6 analog inputs, a 16 MHz quartz crystal, a USB connection, a power jack, an ICSP header, and a reset button.
DC Motor (x2)
- An electric motor that runs on direct current (DC) electricity.
- Typically used for driving mechanical loads.
Servo
- A rotary actuator or linear actuator that allows for precise control of angular or linear position, velocity, and acceleration.
- It consists of a suitable motor coupled to a sensor for position feedback.
L298N DC Motor Driver
- A high current dual full-bridge driver designed to accept standard TTL logic levels and drive inductive loads such as relays, solenoids, DC and stepping motors.
HC-SR04 Ultrasonic Sensor
- An ultrasonic distance sensor that provides 2cm to 400cm of non-contact measurement functionality with a ranging accuracy that can reach up to 3mm.
3xAAA Battery with Switch (bare wire)
- A power source consisting of three AAA batteries in series with a switch.
- Provides a portable power supply for the circuit.
Wiring Details
Arduino UNO
- 5V: Connected to the Servo's VCC and the HC-SR04's VCC.
- GND: Connected to the Servo's GND and the HC-SR04's GND.
- D11: Connected to the L298N's ENA.
- D10: Connected to the L298N's IN1.
- D9: Connected to the L298N's IN2.
- D8: Connected to the L298N's IN3.
- D7: Connected to the L298N's IN4.
- D6: Connected to the L298N's ENB.
- D5: Connected to the Servo's pulse.
- D3: Connected to the HC-SR04's ECHO.
- D2: Connected to the HC-SR04's TRIG.
DC Motor #1
- pin 1: Connected to the L298N's OUT2.
- pin 2: Connected to the L298N's OUT1.
DC Motor #2
- pin 1: Connected to the L298N's OUT4.
- pin 2: Connected to the L298N's OUT3.
Servo
- VCC: Connected to the Arduino UNO's 5V.
- GND: Connected to the Arduino UNO's GND.
- Pulse: Connected to the Arduino UNO's D5.
L298N DC Motor Driver
- ENA, IN1, IN2: Connected to the Arduino UNO's D11, D10, and D9 respectively for Motor #1 control.
- IN3, IN4, ENB: Connected to the Arduino UNO's D8, D7, and D6 respectively for Motor #2 control.
- OUT1, OUT2: Connected to DC Motor #1.
- OUT3, OUT4: Connected to DC Motor #2.
- 12V: Connected to the 3xAAA Battery's POS.
- GND: Connected to the 3xAAA Battery's NEG.
HC-SR04 Ultrasonic Sensor
- VCC: Connected to the Arduino UNO's 5V.
- GND: Connected to the Arduino UNO's GND.
- ECHO: Connected to the Arduino UNO's D3.
- TRIG: Connected to the Arduino UNO's D2.
3xAAA Battery with Switch (bare wire)
- POS: Connected to the L298N's 12V.
- NEG: Connected to the L298N's GND.
Documented Code
Arduino UNO Code (sketch.ino)
void setup() {
  // put your setup code here, to run once:

}

void loop() {
  // put your main code here, to run repeatedly:

}
Note: The provided code is a template and does not contain any functional code to control the motors or read the sensor. It needs to be completed with the appropriate setup and loop code to control the servo, DC motors, and read distance from the HC-SR04 ultrasonic sensor.