Cirkit Designer
Your all-in-one circuit design IDE
Home /
Project Documentation
Arduino UNO-Based RFID and Keypad Access Control System
Circuit Documentation
Summary
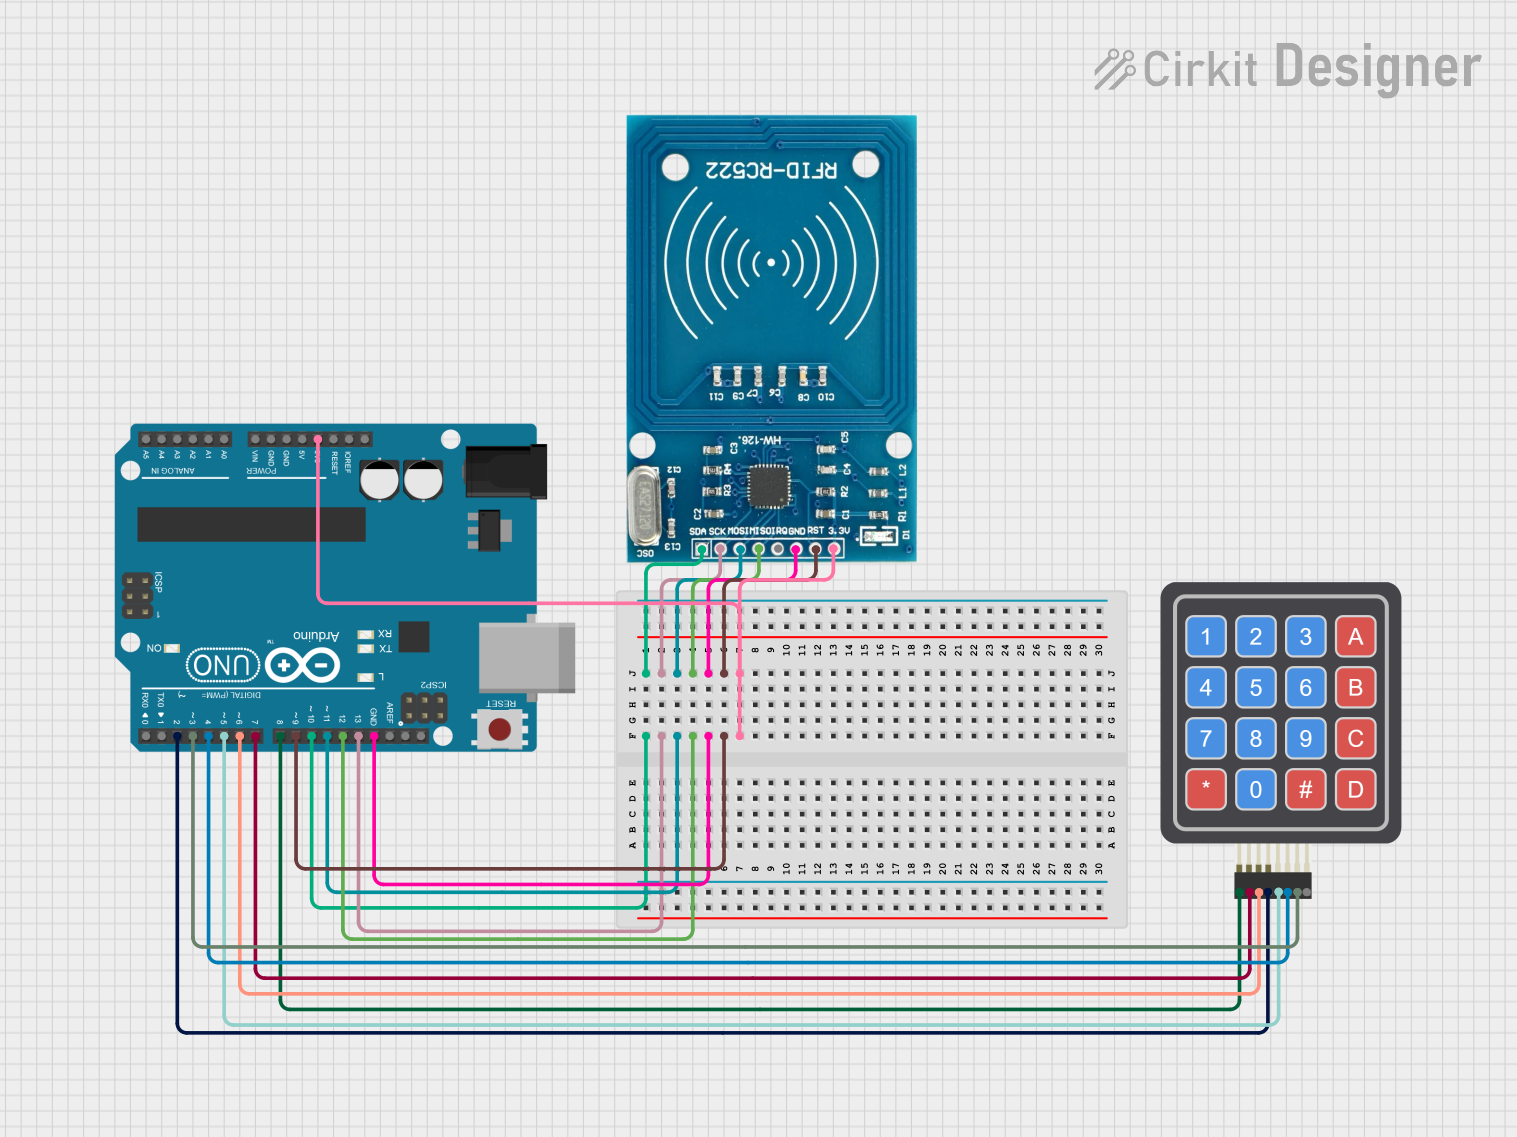
This circuit involves an Arduino UNO microcontroller interfaced with a 4x4 Keypad and an RFID-RC522 module. The Arduino UNO serves as the central controller, reading inputs from the keypad and RFID module to perform various tasks as defined in the embedded code.
Component List
Arduino UNO
- Description: A microcontroller board based on the ATmega328P.
- Pins: UNUSED, IOREF, Reset, 3.3V, 5V, GND, Vin, A0, A1, A2, A3, A4, A5, SCL, SDA, AREF, D13, D12, D11, D10, D9, D8, D7, D6, D5, D4, D3, D2, D1, D0
4x4 Keypad (Simulator)
- Description: A matrix keypad with 4 rows and 4 columns.
- Pins: R1, C4, R2, C2, R3, R4, C1, C3
RFID-RC522
- Description: A low-cost RFID module that operates at 13.56 MHz.
- Pins: VCC (3.3V), RST, GND, IRQ, MISO, MOSI, SCK, SDA
Wiring Details
Arduino UNO
- D10 connected to RFID-RC522 SDA
- D13 connected to RFID-RC522 SCK
- D11 connected to RFID-RC522 MOSI
- D12 connected to RFID-RC522 MISO
- GND connected to RFID-RC522 GND
- D9 connected to RFID-RC522 RST
- 3.3V connected to RFID-RC522 VCC (3.3V)
- D8 connected to 4x4 Keypad R1
- D7 connected to 4x4 Keypad R2
- D6 connected to 4x4 Keypad R3
- D5 connected to 4x4 Keypad C1
- D4 connected to 4x4 Keypad C2
- D3 connected to 4x4 Keypad C3
- D2 connected to 4x4 Keypad R4
4x4 Keypad (Simulator)
- R1 connected to Arduino UNO D8
- R2 connected to Arduino UNO D7
- R3 connected to Arduino UNO D6
- C1 connected to Arduino UNO D5
- C2 connected to Arduino UNO D4
- C3 connected to Arduino UNO D3
- R4 connected to Arduino UNO D2
RFID-RC522
- SDA connected to Arduino UNO D10
- SCK connected to Arduino UNO D13
- MOSI connected to Arduino UNO D11
- MISO connected to Arduino UNO D12
- GND connected to Arduino UNO GND
- RST connected to Arduino UNO D9
- VCC (3.3V) connected to Arduino UNO 3.3V
Code Documentation
Arduino UNO Code
void setup() {
  // put your setup code here, to run once:

}

void loop() {
  // put your main code here, to run repeatedly:

}
This code is a basic template for the Arduino UNO. The setup() function is where you initialize your components and settings, and the loop() function is where the main logic of your program runs repeatedly.
Additional Documentation
This section is reserved for any additional documentation or notes that may be required for understanding the circuit and its operation. Currently, it is empty.