Cirkit Designer
Your all-in-one circuit design IDE
Home /
Project Documentation
Wemos S2 Mini and OV2640 Camera Module Integration
Circuit Documentation
Summary
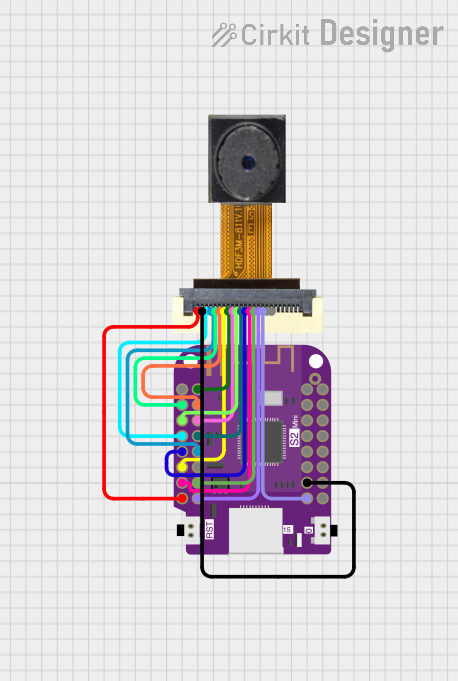
This document provides a detailed overview of a circuit that integrates a Wemos S2 Mini microcontroller with an OV2640 Camera Module. The Wemos S2 Mini is responsible for controlling the camera module and processing the data it captures. The circuit is designed to establish a connection between the camera's various signals and the corresponding GPIO pins on the microcontroller, enabling image capture and data handling functionalities.
Component List
Wemos S2 Mini
- Description: A compact microcontroller based on the ESP32-S2 chip, suitable for a variety of IoT applications.
- Pins: EN, GPIO 3, GPIO 5, GPIO 7, GPIO 9, GPIO 11, GPIO 12, 3.3V, GPIO 1, GPIO 2, GPIO 4, GPIO 6, GPIO 8, GPIO 10, GPIO 13, GPIO 14, VBUS, GND, GPIO 16, GPIO 18, GPIO 33, GPIO 35, GPIO 37, GPIO 39, GPIO 15, GPIO 17, GPIO 21, GPIO 34, GPIO 36, GPIO 38, GPIO 40.
OV2640 Camera Module
- Description: A popular camera module capable of capturing images at a resolution of 2 Megapixels.
- Pins: 3.3V, GND, SIOC, SIOD, VSync, HRef, PCLK, XCLK, D9, D8, D7, D6, D5, D4, D3, D2, RET, PWDN.
Wiring Details
Wemos S2 Mini
- 3.3V connected to OV2640 Camera Module 3.3V
- GND connected to OV2640 Camera Module GND
- GPIO 1 connected to OV2640 Camera Module XCLK
- GPIO 2 connected to OV2640 Camera Module HRef
- GPIO 3 connected to OV2640 Camera Module VSync
- GPIO 4 connected to OV2640 Camera Module D9
- GPIO 5 connected to OV2640 Camera Module D8
- GPIO 6 connected to OV2640 Camera Module D7
- GPIO 7 connected to OV2640 Camera Module SIOC
- GPIO 8 connected to OV2640 Camera Module SIOD
- GPIO 9 connected to OV2640 Camera Module D6
- GPIO 11 connected to OV2640 Camera Module PCLK
- GPIO 12 connected to OV2640 Camera Module D5
- GPIO 13 connected to OV2640 Camera Module D4
- GPIO 14 connected to OV2640 Camera Module D3
- GPIO 15 connected to OV2640 Camera Module D2
OV2640 Camera Module
- 3.3V connected to Wemos S2 Mini 3.3V
- GND connected to Wemos S2 Mini GND
- SIOC connected to Wemos S2 Mini GPIO 7
- SIOD connected to Wemos S2 Mini GPIO 8
- VSync connected to Wemos S2 Mini GPIO 3
- HRef connected to Wemos S2 Mini GPIO 2
- PCLK connected to Wemos S2 Mini GPIO 11
- XCLK connected to Wemos S2 Mini GPIO 1
- D9 connected to Wemos S2 Mini GPIO 4
- D8 connected to Wemos S2 Mini GPIO 5
- D7 connected to Wemos S2 Mini GPIO 6
- D6 connected to Wemos S2 Mini GPIO 9
- D5 connected to Wemos S2 Mini GPIO 12
- D4 connected to Wemos S2 Mini GPIO 13
- D3 connected to Wemos S2 Mini GPIO 14
- D2 connected to Wemos S2 Mini GPIO 15
Documented Code
Wemos S2 Mini Code (sketch.ino)
void setup() {
  // put your setup code here, to run once:

}

void loop() {
  // put your main code here, to run repeatedly:

}
Additional Notes
- The provided code is a template and does not include specific functionality. It needs to be populated with the setup and loop functions to control the OV2640 Camera Module and handle the data accordingly.
- The
setup()function is intended to initialize the camera module and configure the GPIO pins. - The
loop()function should contain the main logic for capturing images and processing them. - The actual implementation will depend on the specific requirements of the application for which this circuit is being used.