
Arduino UNO-Based Smart Water Heater Controller with Keypad and Temperature Sensor
View and Edit Project In Cirkit Designer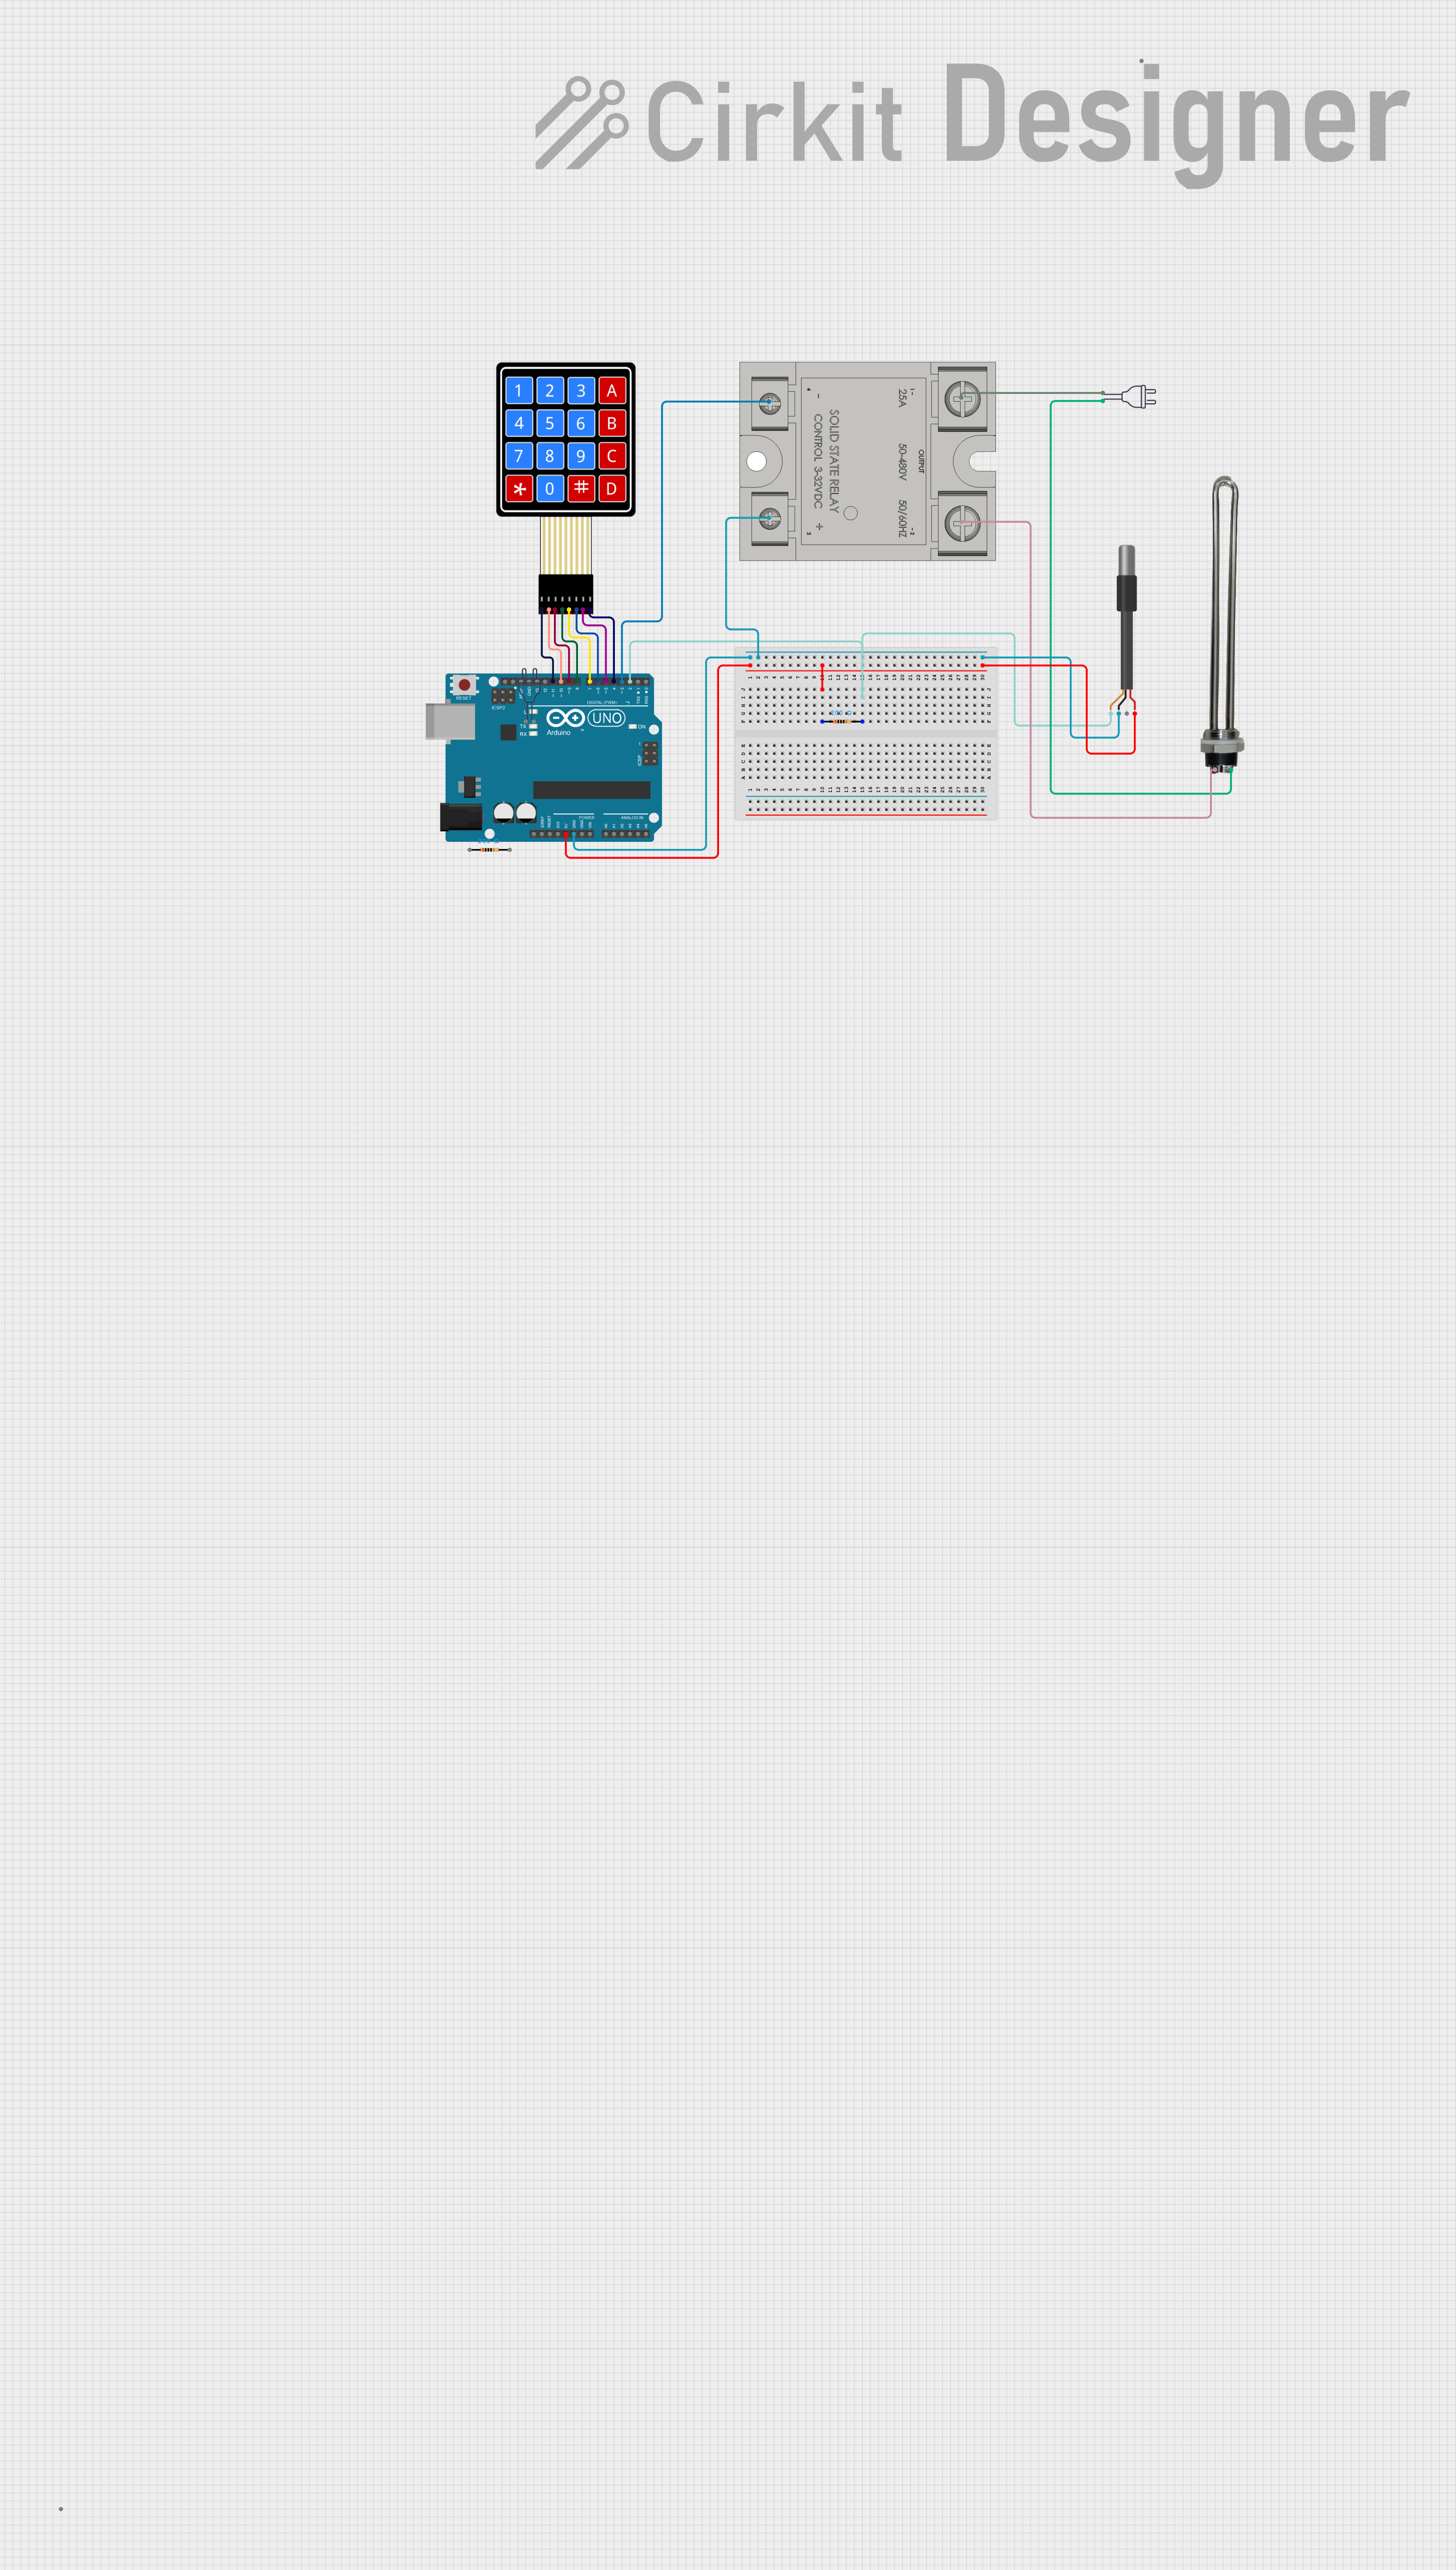
Circuit Documentation
Summary
This circuit is designed to control a water heater using an Arduino UNO microcontroller. It includes a 4x4 membrane matrix keypad for user input, a DS18B20 temperature sensor for monitoring the water temperature, and an SSR-25A solid-state relay to control the water heater. The system is powered by a 220V power source.
Component List
Arduino UNO
- Description: A microcontroller board based on the ATmega328P.
- Pins: UNUSED, IOREF, Reset, 3.3V, 5V, GND, Vin, A0, A1, A2, A3, A4, A5, SCL, SDA, AREF, D13, D12, D11, D10, D9, D8, D7, D6, D5, D4, D3, D2, D1, D0
4X4 Membrane Matrix Keypad
- Description: A 4x4 matrix keypad used for user input.
- Pins: R1, R2, R3, R4, C1, C2, C3, C4
SSR-25A
- Description: A solid-state relay used to control the water heater.
- Pins: -, +, 1-in, 2-out
DS18B20 1-Wire Temperature Sensor Probe Cable
- Description: A temperature sensor used to monitor the water temperature.
- Pins: shield, GND, DQ, VDD
Water Heater
- Description: A water heater controlled by the SSR-25A.
- Pins: V+, V-
Resistor (200 Ohms)
- Description: A resistor with a resistance of 200 Ohms.
- Pins: pin1, pin2
Power 220V
- Description: A 220V power source.
- Pins: hot wire, neutral wire
Wiring Details
Arduino UNO
- 5V connected to pin1 of the Resistor and VDD of the DS18B20 Temperature Sensor.
- GND connected to + of the SSR-25A and GND of the DS18B20 Temperature Sensor.
- D11 connected to R1 of the 4X4 Membrane Matrix Keypad.
- D10 connected to R2 of the 4X4 Membrane Matrix Keypad.
- D9 connected to R3 of the 4X4 Membrane Matrix Keypad.
- D8 connected to R4 of the 4X4 Membrane Matrix Keypad.
- D7 connected to C1 of the 4X4 Membrane Matrix Keypad.
- D6 connected to C2 of the 4X4 Membrane Matrix Keypad.
- D5 connected to C3 of the 4X4 Membrane Matrix Keypad.
- D4 connected to C4 of the 4X4 Membrane Matrix Keypad.
- D3 connected to - of the SSR-25A.
- D2 connected to shield of the DS18B20 Temperature Sensor and pin2 of the Resistor.
4X4 Membrane Matrix Keypad
- R1 connected to D11 of the Arduino UNO.
- R2 connected to D10 of the Arduino UNO.
- R3 connected to D9 of the Arduino UNO.
- R4 connected to D8 of the Arduino UNO.
- C1 connected to D7 of the Arduino UNO.
- C2 connected to D6 of the Arduino UNO.
- C3 connected to D5 of the Arduino UNO.
- C4 connected to D4 of the Arduino UNO.
SSR-25A
- + connected to GND of the Arduino UNO.
- - connected to D3 of the Arduino UNO.
- 1-in connected to hot wire of the Power 220V.
- 2-out connected to V- of the Water Heater.
DS18B20 1-Wire Temperature Sensor Probe Cable
- VDD connected to 5V of the Arduino UNO.
- GND connected to GND of the Arduino UNO.
- shield connected to D2 of the Arduino UNO and pin2 of the Resistor.
Water Heater
- V+ connected to neutral wire of the Power 220V.
- V- connected to 2-out of the SSR-25A.
Resistor (200 Ohms)
- pin1 connected to 5V of the Arduino UNO.
- pin2 connected to shield of the DS18B20 Temperature Sensor and D2 of the Arduino UNO.
Power 220V
- hot wire connected to 1-in of the SSR-25A.
- neutral wire connected to V+ of the Water Heater.
Documented Code
#include <Keypad.h>
#include <Wire.h>
#include <EEPROM.h>
#include <LiquidCrystal_I2C.h>
#include <OneWire.h>
#include <DallasTemperature.h>

#define ONE_WIRE_BUS 2
OneWire oneWire(ONE_WIRE_BUS);
DallasTemperature sensors(&oneWire);
LiquidCrystal_I2C lcd(0x27, 16, 2);

char customKey, mulaiKey;
const byte ROWS = 4;
const byte COLS = 4;
char keys[ROWS][COLS] = {
 {'1', '2', '3', 'A'},
 {'4', '5', '6', 'B'},
 {'7', '8', '9', 'C'},
 {'*', '0', '#', 'D'}
};
byte rowPins[ROWS] = {11,10,9,8};
byte colPins[COLS] = {7,6,5,4};

int x = 0;
int ssr = 3; // alamati pin SSR
float sp;
float diff, temp_now;
float T_cutoff, T_cuton, nilaicd, nilaisp, nilaidiff;
Keypad customKeypad = Keypad(makeKeymap(keys), rowPins, colPins, ROWS, COLS);
void(* resetFunc) (void) = 0; //declare reset function @ address 0

void setup()
{
  Serial.begin(9600);
  lcd.init();
  lcd.backlight();
  pinMode(ssr, OUTPUT);
  sp = 0;
  diff = 0;
  nilaisp = sp;
  nilaidiff = diff;
  T_cutoff = sp + (diff / 2);
  T_cuton = sp - (diff / 2);
  delay(50);
  lcd.clear();

  // Tampilkan pesan "Selamat Datang"
  lcd.setCursor(0, 0);
  lcd.print("SELAMAT DATANG");
  lcd.setCursor(0, 1);
  lcd.print("TUAN ELFANDY");
  delay(3000); // Tampilkan selama 3 detik
  lcd.clear();
}

void loop()
{
 customKey = customKeypad.getKey();
if(x == 0){
 //lcd.clear();
 lcd.setCursor(0,0);
 lcd.print("1.SET ON-OFF");
}
if(x == 1){
 //lcd.clear();
 lcd.setCursor(0,0);
 lcd.print("2.TES");
}
if(x == 2){
 //lcd.clear();
 lcd.setCursor(0,0);
 lcd.print("3.CEK ON-OFF");
} switch(customKey)
 {
 case '0' ... '9':
 break;

 case '#':
 break;
 case '*':
 break;
 case 'A':
 x++;
 break;

 case 'B':
 x--;
 break;

 case 'C':
 break;

 case 'D':
 if(x == 0){
 lcd.clear();
 //analogWrite(ssr,0);
 setsp();
 setdiff();
 }
 if(x == 1){
 lcd.clear();
 mulai();
 }
 if(x == 2){
 lcd.clear();
 //analogWrite(ssr,0);
 cekonoff();
 }
 break;
 }
if(x > 2){
x = 0;
}
if(x < 0){
x = 2;
}
}

void setdiff(){
 lcd.setCursor(0,0);
 lcd.print("SET DIFF ");
 customKey = customKeypad.getKey();
 if(customKey >= '0' && customKey <= '9')
 {
 diff = diff * 10 + (customKey - '0');
 lcd.setCursor(0,1);
 lcd.print(diff);
 T_cutoff = sp + (diff/2);
 T_cuton = sp - (diff/2);
 }

 if(customKey == '*'){
 lcd.clear();
 delay(1000);
 nilaid