Cirkit Designer
Your all-in-one circuit design IDE
Home /
Project Documentation
Arduino UNO-Based Environmental Monitoring System with DHT11, BH1750, and GPS
Circuit Documentation
Summary
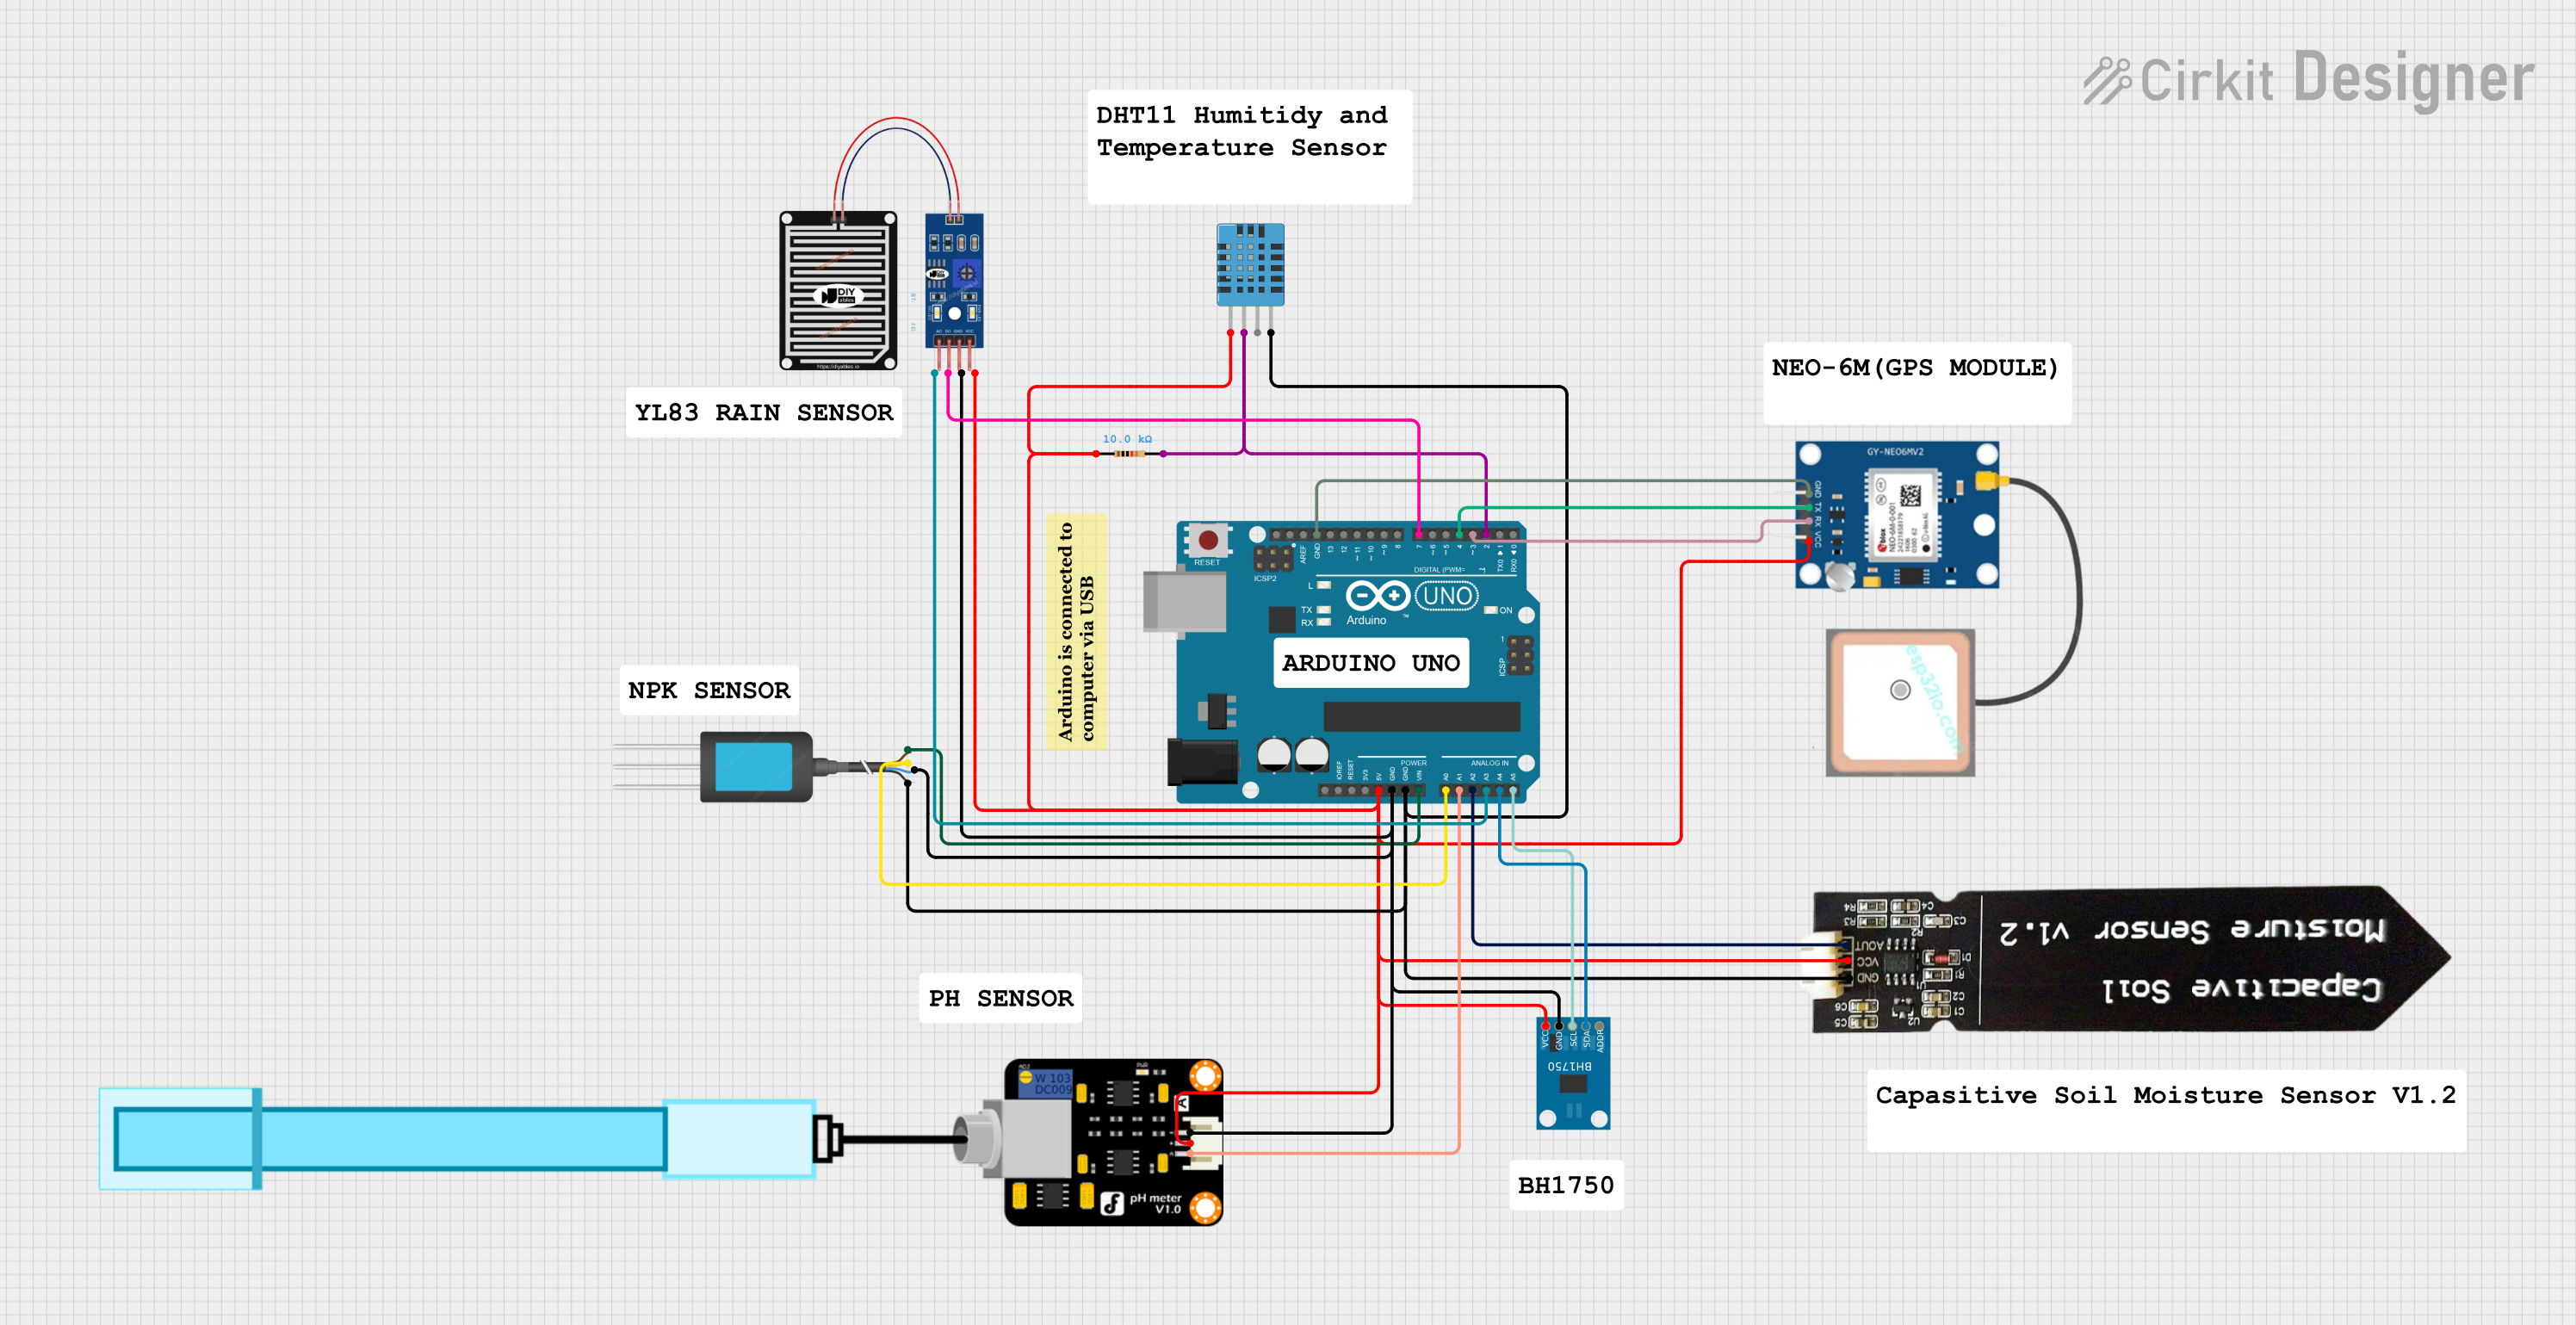
This circuit is designed to collect environmental data using various sensors and an Arduino UNO microcontroller. The sensors include a DHT11 for humidity and temperature, a BH1750 for light intensity, a capacitive soil moisture sensor, an NPK soil sensor, a pH meter, a rain sensor, and a GPS module. The Arduino UNO processes the data from these sensors and can be programmed to perform various tasks based on the sensor readings.
Component List
DHT11 Humidity and Temperature Sensor
- Description: Measures humidity and temperature.
- Pins: VDD, DATA, NULL, GND
Arduino UNO
- Description: Microcontroller board based on the ATmega328P.
- Pins: UNUSED, IOREF, Reset, 3.3V, 5V, GND, Vin, A0, A1, A2, A3, A4, A5, SCL, SDA, AREF, D13, D12, D11, D10, D9, D8, D7, D6, D5, D4, D3, D2, D1, D0
NPK Soil Sensor
- Description: Measures nitrogen, phosphorus, and potassium levels in soil.
- Pins: 12V DC, A, B, GND
PH Meter
- Description: Measures the pH level of a solution.
- Pins: Signal, VCC, GND
Capacitive Soil Moisture Sensor V1.2
- Description: Measures soil moisture levels.
- Pins: GND, VCC, AOUT
BH1750
- Description: Measures light intensity.
- Pins: VCC, GND, SCL, SDA, ADDR
NEO-6M (GPS Module)
- Description: Provides GPS data.
- Pins: GND, TX, RX, VCC
Resistor
- Description: 10k Ohm resistor used for pull-up.
- Pins: pin1, pin2
- Properties: Resistance: 10k Ohms
RAIN SENSOR
- Description: Detects rain.
- Pins: AO, DO, GRD, VCC
Wiring Details
DHT11 Humidity and Temperature Sensor
- VDD connected to 5V on Arduino UNO
- DATA connected to D2 on Arduino UNO via a 10k Ohm resistor
- GND connected to GND on Arduino UNO
Arduino UNO
- 5V connected to VCC of various sensors
- GND connected to GND of various sensors
- Vin connected to 12V DC of NPK Soil Sensor
- A0 connected to A of NPK Soil Sensor
- A1 connected to Signal of PH Meter
- A2 connected to AOUT of Capacitive Soil Moisture Sensor
- A3 connected to AO of RAIN SENSOR
- A4 connected to SDA of BH1750
- A5 connected to SCL of BH1750
- D2 connected to DATA of DHT11 via a 10k Ohm resistor
- D3 connected to RX of NEO-6M (GPS Module)
- D4 connected to TX of NEO-6M (GPS Module)
- D7 connected to DO of RAIN SENSOR
NPK Soil Sensor
- 12V DC connected to Vin on Arduino UNO
- A connected to A0 on Arduino UNO
- B connected to GND on Arduino UNO
- GND connected to GND on Arduino UNO
PH Meter
- Signal connected to A1 on Arduino UNO
- VCC connected to 5V on Arduino UNO
- GND connected to GND on Arduino UNO
Capacitive Soil Moisture Sensor V1.2
- GND connected to GND on Arduino UNO
- VCC connected to 5V on Arduino UNO
- AOUT connected to A2 on Arduino UNO
BH1750
- VCC connected to 5V on Arduino UNO
- GND connected to GND on Arduino UNO
- SCL connected to A5 on Arduino UNO
- SDA connected to A4 on Arduino UNO
NEO-6M (GPS Module)
- GND connected to GND on Arduino UNO
- TX connected to D4 on Arduino UNO
- RX connected to D3 on Arduino UNO
- VCC connected to 5V on Arduino UNO
Resistor
- pin1 connected to 5V on Arduino UNO
- pin2 connected to DATA of DHT11 and D2 on Arduino UNO
RAIN SENSOR
- AO connected to A3 on Arduino UNO
- DO connected to D7 on Arduino UNO
- GRD connected to GND on Arduino UNO
- VCC connected to 5V on Arduino UNO
Documented Code
/**
 * This example demonstrates how to collect temperature and humidity measurements
 * from the Adafruit DHT11 sensor. Measurements are printed out to the serial monitor.
 *
 * - Make sure to first install the following libraries through the Arduino Library Manager:
 *   - DHT Sensor Library (by Adafruit)
 *   - Adafruit Unified Sensor (by Adafruit)
 * - When you open the serial monitor to view measurements from the DHT11, make sure
 * that you select 9600 baud so that the serial monitor can receive data from the Arduino.
 *
 * This example was originally written by Adafruit Industries LLC.
 */

#include <Adafruit_Sensor.h>
#include <DHT.h>
#include <DHT_U.h>

#define DHTPIN 2     // Digital pin connected to the DHT sensor
// Feather HUZZAH ESP8266 note: use pins 3, 4, 5, 12, 13 or 14 --
// Pin 15 can work but DHT must be disconnected during program upload.

// Uncomment the type of sensor in use:
#define DHTTYPE    DHT11     // DHT 11
//#define DHTTYPE    DHT22     // DHT 22 (AM2302)
//#define DHTTYPE    DHT21     // DHT 21 (AM2301)

// See guide for details on sensor wiring and usage:
//   https://learn.adafruit.com/dht/overview

DHT_Unified dht(DHTPIN, DHTTYPE);

uint32_t delayMS;

void setup() {
  Serial.begin(9600);
  // Initialize device.
  dht.begin();
  Serial.println(F("DHTxx Unified Sensor Example"));
  // Print temperature sensor details.
  sensor_t sensor;
  dht.temperature().getSensor(&sensor);
  Serial.println(F("------------------------------------"));
  Serial.println(F("Temperature Sensor"));
  Serial.print  (F("Sensor Type: ")); Serial.println(sensor.name);
  Serial.print  (F("Driver Ver:  ")); Serial.println(sensor.version);
  Serial.print  (F("Unique ID:   ")); Serial.println(sensor.sensor_id);
  Serial.print  (F("Max Value:   ")); Serial.print(sensor.max_value); Serial.println(F("°C"));
  Serial.print  (F("Min Value:   ")); Serial.print(sensor.min_value); Serial.println(F("°C"));
  Serial.print  (F("Resolution:  ")); Serial.print(sensor.resolution); Serial.println(F("°C"));
  Serial.println(F("------------------------------------"));
  // Print humidity sensor details.
  dht.humidity().getSensor(&sensor);
  Serial.println(F("Humidity Sensor"));
  Serial.print  (F("Sensor Type: ")); Serial.println(sensor.name);
  Serial.print  (F("Driver Ver:  ")); Serial.println(sensor.version);
  Serial.print  (F("Unique ID:   ")); Serial.println(sensor.sensor_id);
  Serial.print  (F("Max Value:   ")); Serial.print(sensor.max_value); Serial.println(F("%"));
  Serial.print  (F("Min Value:   ")); Serial.print(sensor.min_value); Serial.println(F("%"));
  Serial.print  (F("Resolution:  ")); Serial.print(sensor.resolution); Serial.println(F("%"));
  Serial.println(F("------------------------------------"));
  // Set delay between sensor readings based on sensor details.
  delayMS = sensor.min_delay / 1000;
}

void loop() {
  // Delay between measurements.
  delay(delayMS);
  // Get temperature event and print its value.
  sensors_event_t event;
  dht.temperature().getEvent(&event);
  if (isnan(event.temperature)) {
    Serial.println(F("Error reading temperature!"));
  }
  else {
    Serial.print(F("Temperature: "));