
Circuit Documentation
Summary
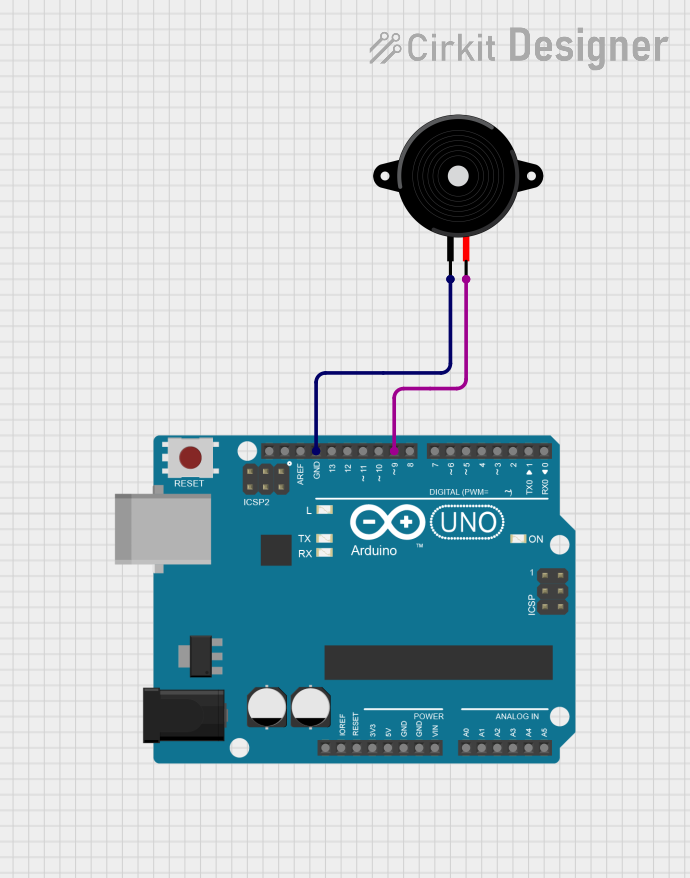
This circuit consists of an Arduino UNO microcontroller and a Piezo Speaker. The Arduino UNO is programmed to play a melody through the Piezo Speaker. The speaker is connected to the Arduino's ground and digital pin 9.
Component List
Arduino UNO
- Description: A microcontroller board based on the ATmega328P.
- Pins: UNUSED, IOREF, Reset, 3.3V, 5V, GND, Vin, A0, A1, A2, A3, A4, A5, SCL, SDA, AREF, D13, D12, D11, D10, D9, D8, D7, D6, D5, D4, D3, D2, D1, D0
- Purpose in Circuit: Acts as the main controller to generate the melody and drive the Piezo Speaker.
Piezo Speaker
- Description: A small speaker that can produce sound when driven by an electrical signal.
- Pins: pin1, pin2
- Purpose in Circuit: Produces sound based on the signals received from the Arduino UNO.
Wiring Details
Arduino UNO
- GND: Connected to pin1 of the Piezo Speaker.
- D9: Connected to pin2 of the Piezo Speaker.
Piezo Speaker
- pin1: Connected to GND of the Arduino UNO.
- pin2: Connected to D9 of the Arduino UNO.
Code Documentation
// Define the notes of the melody
#define NOTE_C4  262
#define NOTE_D4  294
#define NOTE_E4  330
#define NOTE_F4  349
#define NOTE_G4  392
#define NOTE_A4  440
#define NOTE_B4  494
#define NOTE_C5  523

// Define the melody and note durations
int melody[] = {
  NOTE_C4, NOTE_D4, NOTE_E4, NOTE_F4, NOTE_G4, NOTE_A4, NOTE_B4, NOTE_C5
};

int noteDurations[] = {
  8, 8, 8, 8, 8, 8, 8, 8  // Faster note durations
};

void setup() {
  // Initialize pin D9 as an output
  pinMode(9, OUTPUT);
}

void loop() {
  // Iterate over the notes of the melody
  for (int thisNote = 0; thisNote < 8; thisNote++) {
    // Calculate the note duration
    int noteDuration = 1000 / noteDurations[thisNote];
    tone(9, melody[thisNote], noteDuration);

    // Pause for the note's duration plus 10% to distinguish between notes
    int pauseBetweenNotes = noteDuration * 1.10;
    delay(pauseBetweenNotes);

    // Stop the tone
    noTone(9);
  }

  // Add a short delay before repeating the melody
  delay(500);
}
This code defines a simple melody and plays it through the Piezo Speaker connected to pin D9 of the Arduino UNO. The setup function initializes pin D9 as an output, and the loop function iterates over the notes of the melody, playing each note for its specified duration.