
Arduino Nano Controlled Rocket Thruster with Load Cell Feedback and SD Data Logging
View and Edit Project In Cirkit Designer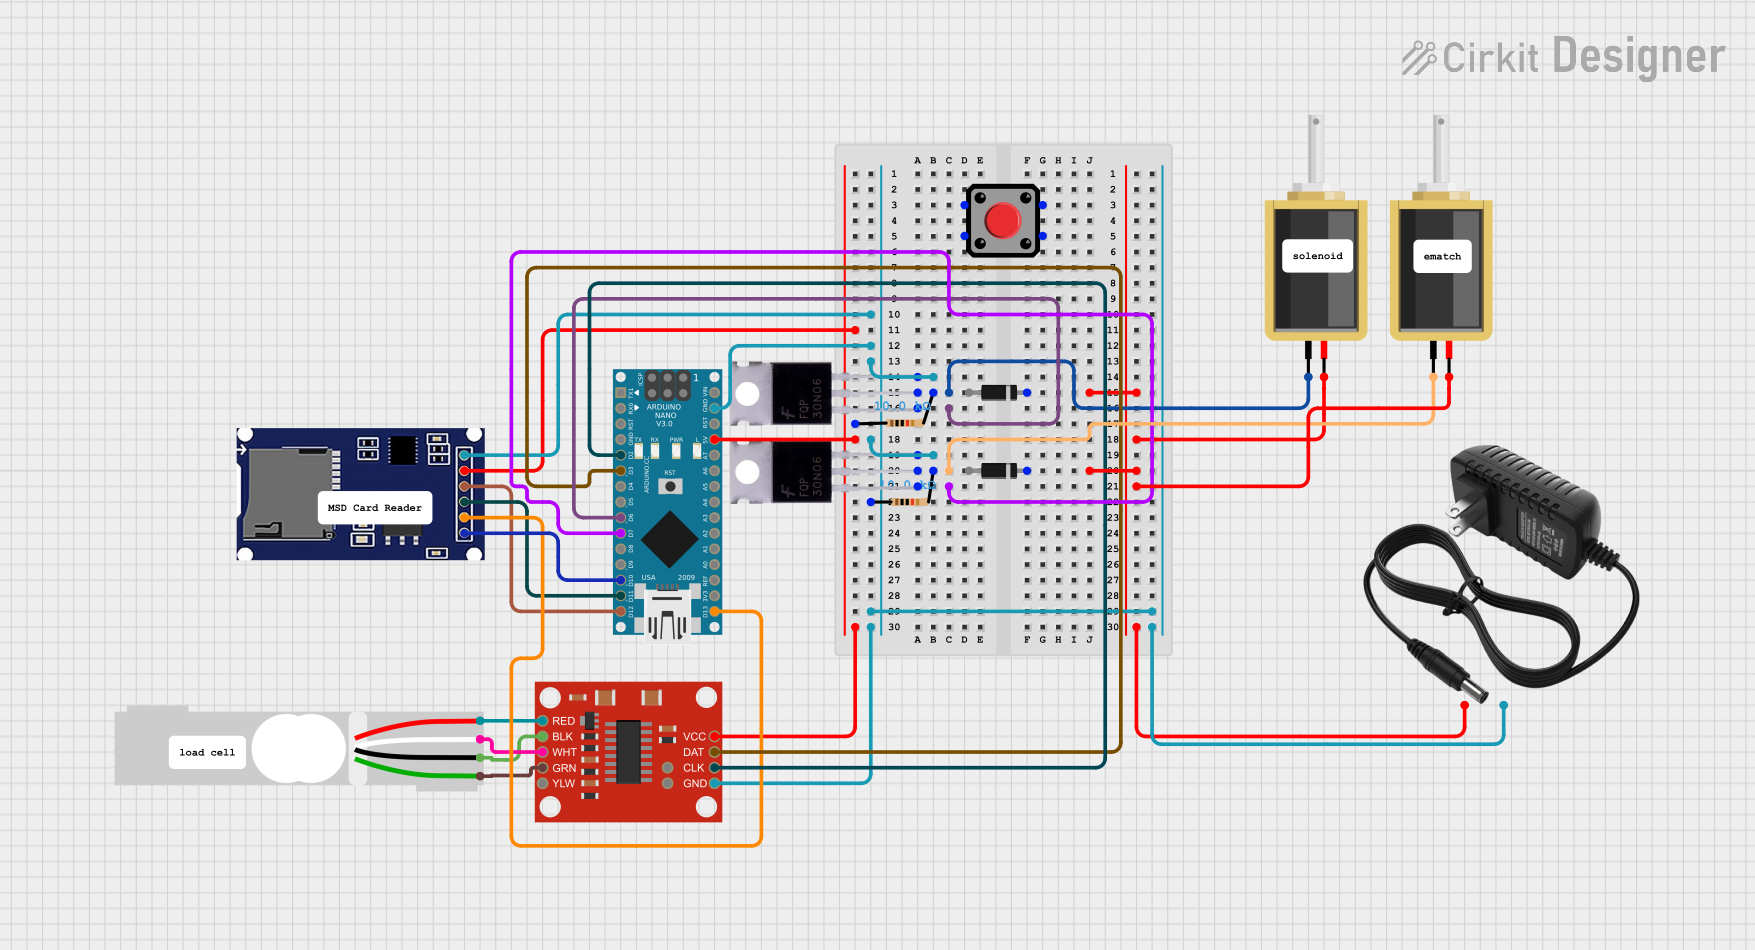
Circuit Documentation
Summary of the Circuit
This circuit is designed to control a rocket thruster using an Arduino Nano microcontroller. The circuit includes a solenoid for controlling the thruster, a load cell with an HX711 amplifier for measuring force, an SD module for data logging, and a power supply. The Arduino Nano is programmed to activate the solenoid, read the load cell data, and log this data to an SD card.
Component List
Solenoid
- Description: A solenoid is an electromagnetic actuator that converts electrical energy into linear motion.
- Purpose: Used to control the rocket thruster.
12v Power Supply
- Description: A power supply that provides a 12V output.
- Purpose: Powers the solenoid and other components in the circuit.
Arduino Nano
- Description: A small, complete, and breadboard-friendly microcontroller board based on the ATmega328P.
- Purpose: Acts as the central controller for the circuit, managing sensor readings, data logging, and actuator control.
SD Module
- Description: A module that allows an Arduino board to read and write data to an SD card.
- Purpose: Used for storing data logged from the load cell.
SparkFun Load Cell Amplifier - HX711
- Description: An amplifier for load cells that allows you to easily read load cells to measure weight.
- Purpose: Amplifies the signal from the load cell for the Arduino to read.
Load Cell - Red/white/black/green
- Description: A transducer that converts force into an electrical signal.
- Purpose: Measures the force exerted by the rocket thruster.
Mosfet
- Description: A type of field-effect transistor that is used to switch or amplify electronic signals.
- Purpose: Controls the high current required by the solenoid.
Diode
- Description: A semiconductor device that allows current to flow in one direction only.
- Purpose: Protects the circuit from reverse current flow.
Resistor
- Description: A passive two-terminal electrical component that implements electrical resistance as a circuit element.
- Purpose: Limits current or divides voltages in the circuit.
Pushbutton
- Description: A simple switch mechanism for controlling some aspect of a machine or a process.
- Purpose: Provides a user interface for manual control.
Wiring Details
Solenoid
- Connected to the drain of a Mosfet for control.
- Connected to the 12v power supply for power.
12v Power Supply
- Provides power to the solenoid and other components.
Arduino Nano
- Controls the Mosfet gates to activate the solenoid.
- Reads data from the HX711 load cell amplifier.
- Interfaces with the SD module for data logging.
SD Module
- Receives power from the Arduino Nano 5V pin.
- Communicates with the Arduino Nano via SPI (CS, SCK, MOSI, MISO).
SparkFun Load Cell Amplifier - HX711
- Receives power from the Arduino Nano 5V pin.
- Communicates with the Arduino Nano using digital pins D2 and D3.
Load Cell
- Interfaced with the HX711 amplifier.
Mosfet
- Source pins connected to the ground.
- Drain pins connected to the solenoid and a resistor.
- Gate pins controlled by the Arduino Nano digital pins D6 and D7.
Diode
- Cathodes connected to the solenoid and the 12v power supply to prevent reverse current flow.
Resistor
- One resistor is connected between the source of a Mosfet and ground.
- Another resistor is connected between the drain of a Mosfet and the 12v power supply.
Pushbutton
- Not detailed in the net list, so no wiring information is available.
Documented Code
/*
 * This Arduino Nano controls a rocket thruster.
 */

#include <SD.h>
#include <SPI.h>
#include "HX711.h"

// Pin definitions
const int LOADCELL_DOUT_PIN = 3;
const int LOADCELL_SCK_PIN = 2;
const int SD_CS_PIN = 10;
const int SOLENOID_PIN = 6;
const int EMATCH_PIN = 7;

// HX711 Load Cell Amplifier
HX711 scale;

// SD card file
File dataFile;

void setup() {
  // Initialize serial communication
  Serial.begin(9600);

  // Initialize the load cell
  scale.begin(LOADCELL_DOUT_PIN, LOADCELL_SCK_PIN);

  // Initialize the SD card
  if (!SD.begin(SD_CS_PIN)) {
    Serial.println("SD card initialization failed!");
    return;
  }
  Serial.println("SD card initialized.");

  // Open the file for writing
  dataFile = SD.open("datalog.txt", FILE_WRITE);
  if (!dataFile) {
    Serial.println("Error opening datalog.txt");
    return;
  }

  // Initialize pins
  pinMode(SOLENOID_PIN, OUTPUT);
  pinMode(EMATCH_PIN, OUTPUT);

  // Start
  digitalWrite(EMATCH_PIN, HIGH);
  delay(100); // delay some arbitrary amount to let the ematch start
  digitalWrite(SOLENOID_PIN, HIGH);

}

void loop() {
  // Read the load cell data
  if (scale.is_ready()) {
    long reading = scale.read();
    Serial.println(reading);

    // Log the data to the SD card
    dataFile.println(reading);
    dataFile.flush();
  } else {
    Serial.println("HX711 not found.");
  }

  delay(100); // Delay for 100ms
}
This code is responsible for initializing the Arduino Nano's peripherals, including the load cell amplifier and the SD card module. It also controls the solenoid and ematch for the rocket thruster. The main loop reads data from the load cell and logs it to the SD card.