
Arduino Mega and UNO-Based NFC/RFID Reader with SD Card Data Logging
View and Edit Project In Cirkit Designer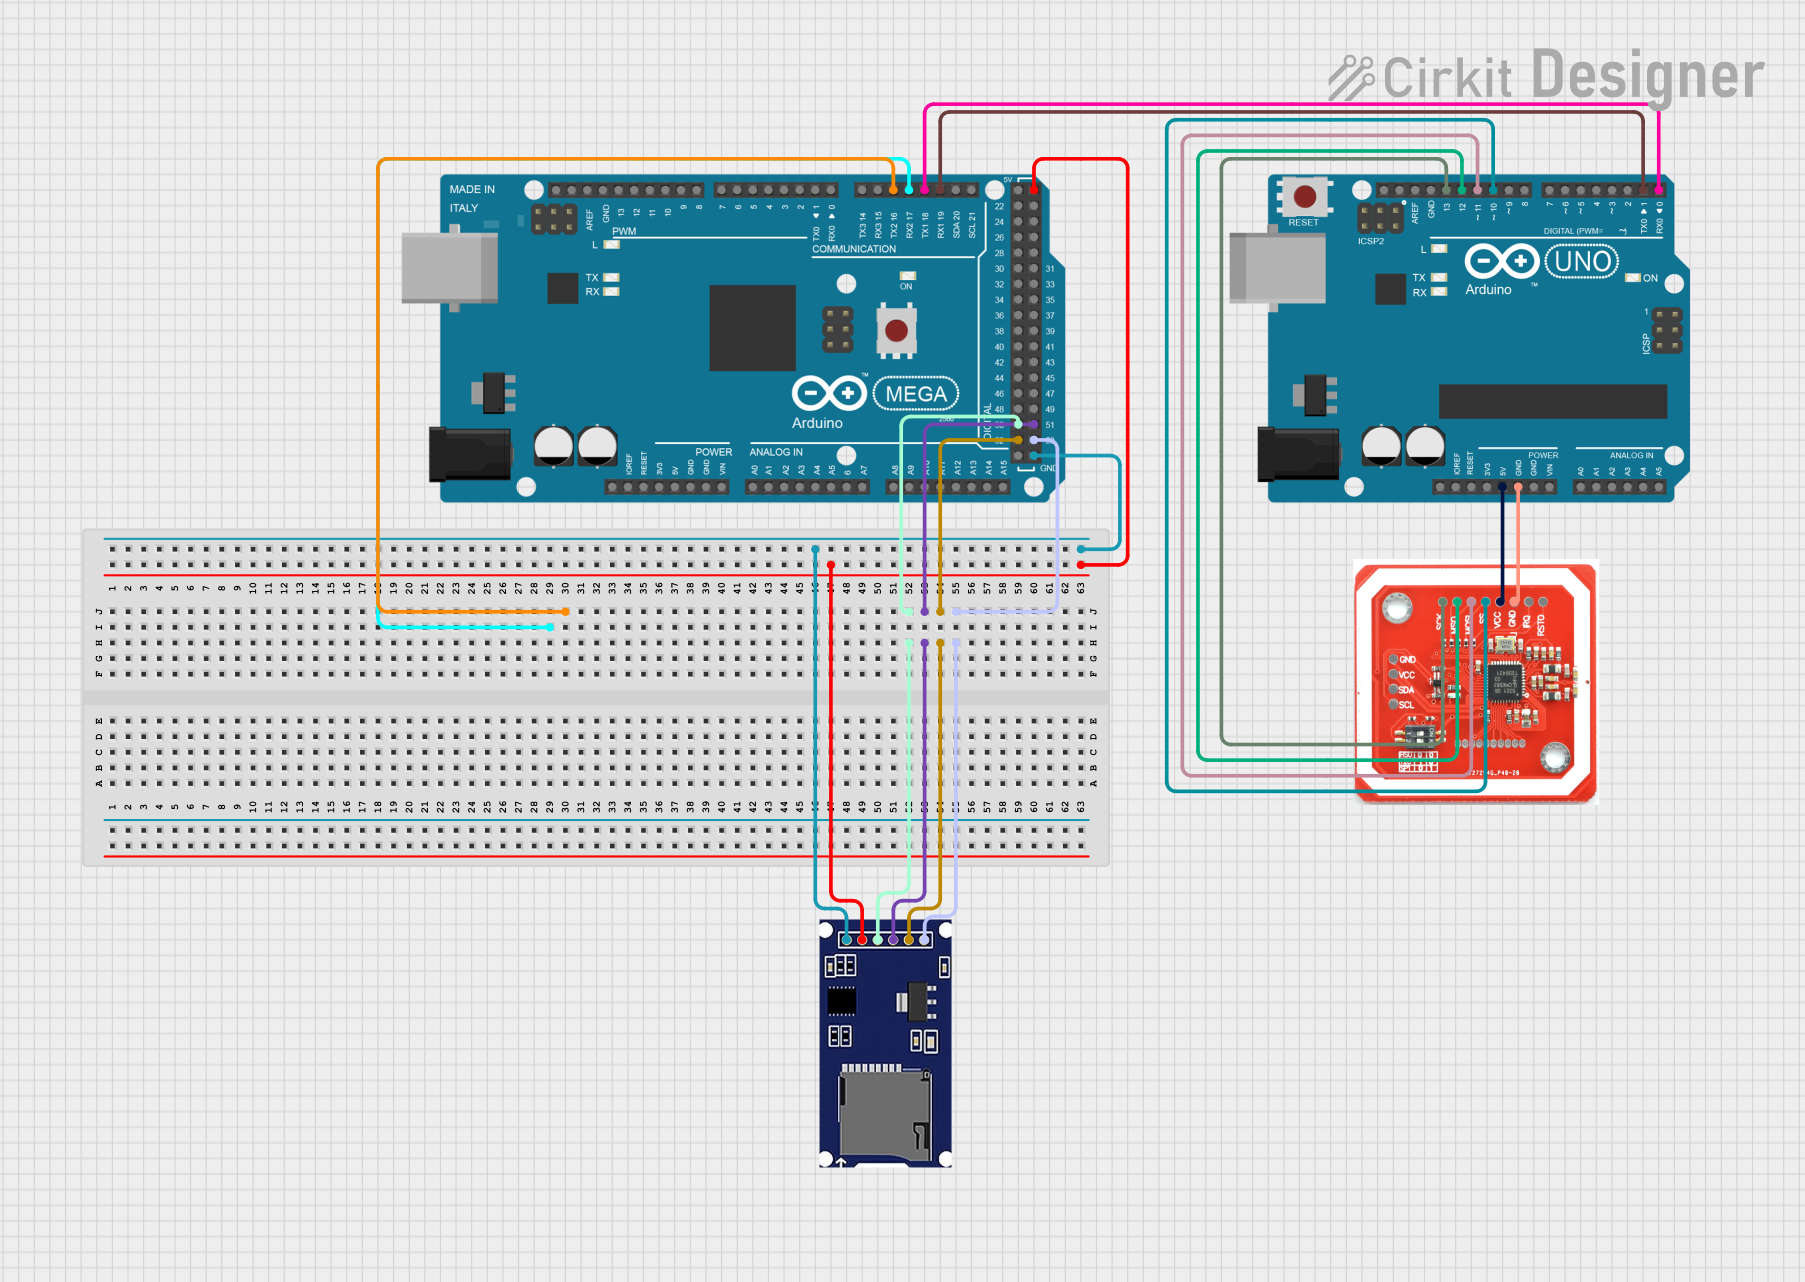
Circuit Documentation
Summary
This circuit involves two microcontrollers, an Arduino Mega 2560 and an Arduino UNO, interfaced with an SD module and an NFC/RFID reader PN532. The Arduino Mega 2560 is primarily responsible for reading analog values from various sensors, while the Arduino UNO handles communication with the NFC/RFID reader. The SD module is used for data storage.
Component List
Arduino Mega 2560
- Description: A microcontroller board based on the ATmega2560.
- Pins: IOREF, RESET, 3V3, 5V, GND, VIN, A0-A15, D21/SCL, D20/SDA, D19/RX1, D18/TX1, D17 PWM/RX2, D16 PWM/TX2, D15/RX3, D14/TX3, D0 RX0, D1 TX0, D2 PWM-D13 PWM, AREF, SDA, SCL, D52, D50, D48, D46, D44, D42, D40, D38, D36, D34, D32, D30, D28, D26, D24, D22, D53, D51, D49, D47, D45, D43, D41, D39, D37, D35, D33, D31, D29, D27, D25, D23.
Arduino UNO
- Description: A microcontroller board based on the ATmega328P.
- Pins: UNUSED, IOREF, Reset, 3.3V, 5V, GND, Vin, A0-A5, SCL, SDA, AREF, D13-D0.
NFC/RFID Reader PN532
- Description: A module used for reading NFC/RFID tags.
- Pins: GND, VCC, SDA, SCL, SCK, MISO, MOSI, SS, IRQ, RSTO.
SD Module
- Description: A module used for interfacing with SD cards for data storage.
- Pins: CS, SCK, MOSI, MISO, VCC, GND.
Wiring Details
Arduino Mega 2560
- D17 PWM/RX2: Not connected.
- D16 PWM/TX2: Not connected.
- D50: Connected to SD module MISO.
- D51: Connected to SD module MOSI.
- D52: Connected to SD module SCK.
- D53: Connected to SD module CS.
- GND: Connected to SD module GND.
- 5V: Connected to SD module VCC.
- D19/RX1: Connected to Arduino UNO D1.
- D18/TX1: Connected to Arduino UNO D0.
Arduino UNO
- D1: Connected to Arduino Mega 2560 D19/RX1.
- D0: Connected to Arduino Mega 2560 D18/TX1.
- 5V: Connected to NFC/RFID reader PN532 VCC.
- GND: Connected to NFC/RFID reader PN532 GND.
- D13: Connected to NFC/RFID reader PN532 SCK.
- D12: Connected to NFC/RFID reader PN532 MISO.
- D11: Connected to NFC/RFID reader PN532 MOSI.
- D10: Connected to NFC/RFID reader PN532 SS.
NFC/RFID Reader PN532
- VCC: Connected to Arduino UNO 5V.
- GND: Connected to Arduino UNO GND.
- SCK: Connected to Arduino UNO D13.
- MISO: Connected to Arduino UNO D12.
- MOSI: Connected to Arduino UNO D11.
- SS: Connected to Arduino UNO D10.
SD Module
- CS: Connected to Arduino Mega 2560 D53.
- SCK: Connected to Arduino Mega 2560 D52.
- MOSI: Connected to Arduino Mega 2560 D51.
- MISO: Connected to Arduino Mega 2560 D50.
- VCC: Connected to Arduino Mega 2560 5V.
- GND: Connected to Arduino Mega 2560 GND.
Documented Code
Arduino Mega 2560 Code
#include <Wire.h>
#include <Adafruit_ADS1X15.h>

// Create an ADS1115 object
Adafruit_ADS1115 ads;  // Use default constructor

void setup() {
  Serial.begin(9600);

  // Initialize the ADS1115 module
  if (!ads.begin(0x48)) {  // Pass the I2C address here
    Serial.println("Failed to initialize ADS1115.");
    while (1);
  }

  Serial.println("ADS1115 initialized.");
}

void loop() {
  // Read analog values from the MQ sensors
  int16_t adc0 = ads.readADC_SingleEnded(0);  // MQ-2 on A0
  int16_t adc1 = ads.readADC_SingleEnded(1);  // MQ-3 on A1
  int16_t adc2 = ads.readADC_SingleEnded(2);  // MQ-7 on A2
  int16_t adc3 = ads.readADC_SingleEnded(3);  // MQ-135 on A3

  // Convert ADC values to voltage (optional, for reference)
  float voltage0 = adc0 * 0.1875 / 1000;  // ADS1115 16-bit, ±6.144V range, 0.1875mV per bit
  float voltage1 = voltage0;  // Same for other channels
  float voltage2 = voltage0;
  float voltage3 = voltage0;

  // Print ADC values and voltage to the Serial Monitor
  Serial.print("MQ-2 (A0) ADC: "); Serial.print(adc0);
  Serial.print(", Voltage: "); Serial.print(voltage0); Serial.println(" V");

  Serial.print("MQ-3 (A1) ADC: "); Serial.print(adc1);
  Serial.print(", Voltage: "); Serial.print(voltage1); Serial.println(" V");

  Serial.print("MQ-7 (A2) ADC: "); Serial.print(adc2);
  Serial.print(", Voltage: "); Serial.print(voltage2); Serial.println(" V");

  Serial.print("MQ-135 (A3) ADC: "); Serial.print(adc3);
  Serial.print(", Voltage: "); Serial.print(voltage3); Serial.println(" V");

  // Add delay for readability
  delay(1000);
}
Arduino UNO Code
void setup() {
  // put your setup code here, to run once:

}

void loop() {
  // put your main code here, to run repeatedly:

}
This documentation provides a comprehensive overview of the circuit, including a summary, detailed component list, wiring details, and documented code for the microcontrollers.