
Arduino Nano Bluetooth-Controlled Relay for LED Bulb Activation
View and Edit Project In Cirkit Designer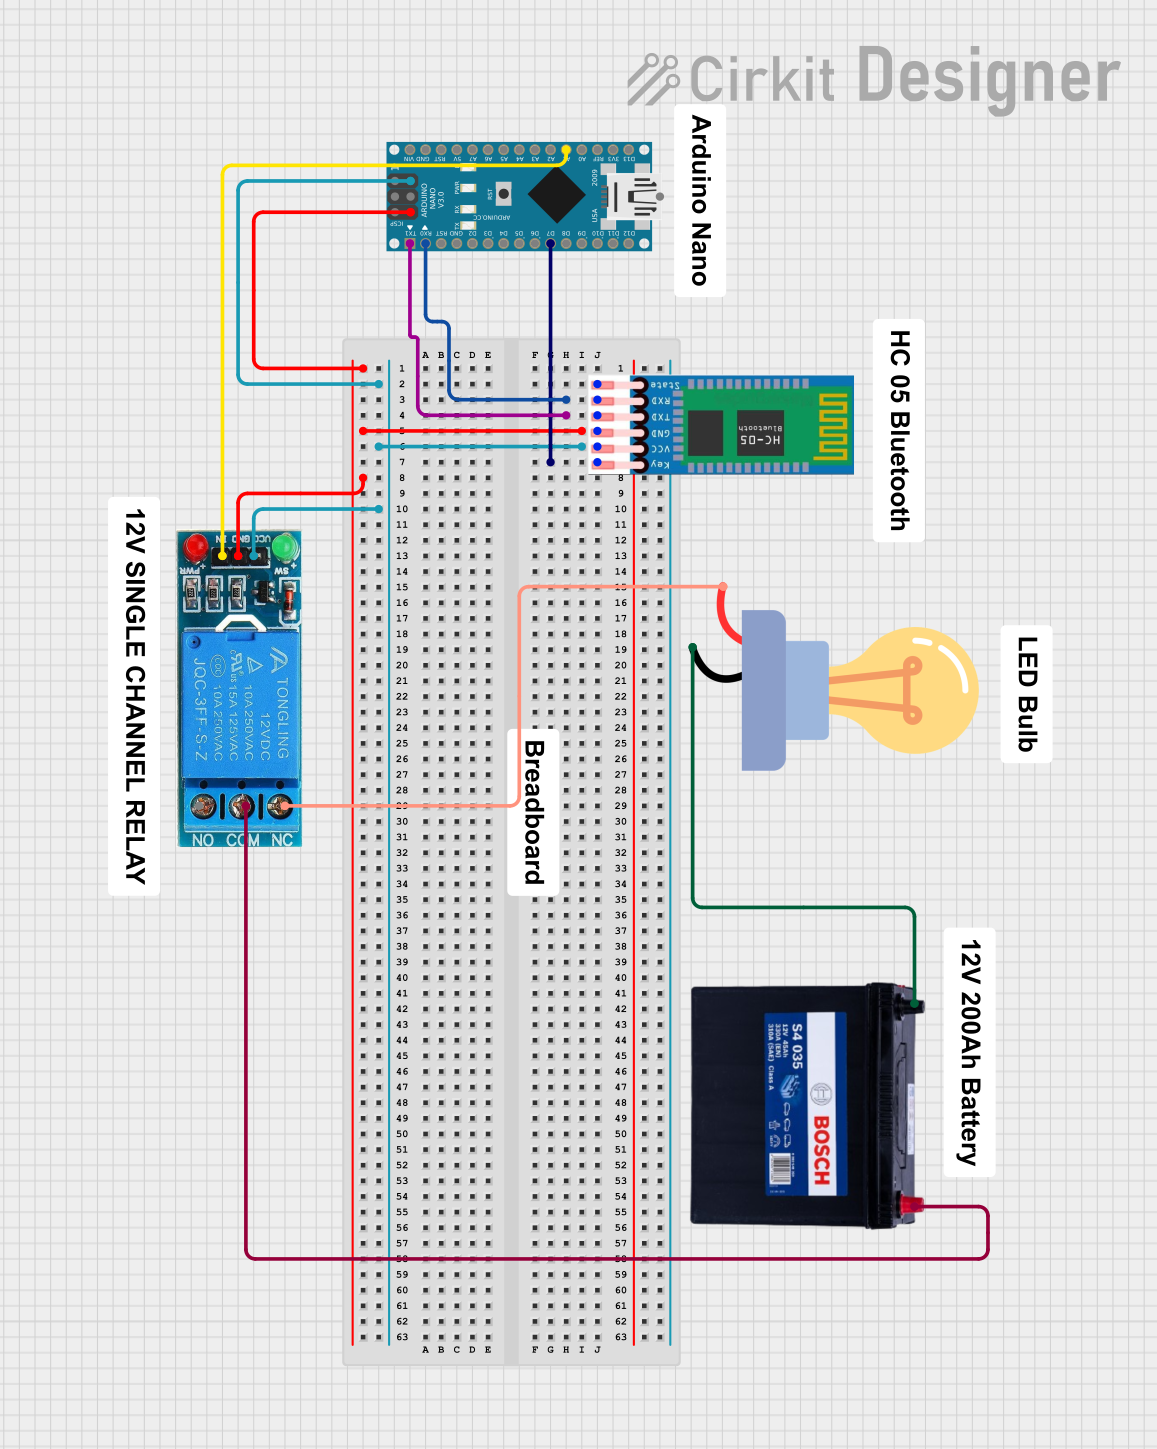
Circuit Documentation
Summary
This circuit integrates an Arduino Nano microcontroller with an HC-05 Bluetooth module, a 12V single-channel relay, a 12V 200Ah battery, and an LED bulb. The Arduino Nano is used as the central processing unit, interfacing with the HC-05 for Bluetooth connectivity. The relay acts as an electrically operated switch that controls the power to the LED bulb, which is powered by the 12V battery. The circuit is designed to control the LED bulb remotely via Bluetooth commands received by the HC-05 and processed by the Arduino Nano.
Component List
Arduino Nano
- Microcontroller board based on the ATmega328P
- Pins: D1/TX, D0/RX, RESET, GND, D2 to D13, VIN, 5V, A0 to A7, AREF, 3V3
HC-05 Bluetooth Module
- Bluetooth to serial port module
- Pins: EN, VCC, GND, TXD, RXD, STATE
12V Single Channel Relay
- Electromechanical switch with one normally closed (NC) and one normally open (NO) contact
- Pins: NC, COM, NO, IN, GND, VCC
12V 200Ah Battery
- High-capacity lead-acid battery
- Pins: GND, 12V
LED Bulb AC
- Light-emitting diode bulb for AC power
- Pins: +, -
Wiring Details
Arduino Nano
- D0/RX connected to HC-05 TXD
- D1/TX connected to HC-05 RXD
- D7 connected to HC-05 EN
- A1 connected to Relay IN
- GND connected to HC-05 GND and Relay GND
- 5V connected to HC-05 VCC and Relay VCC
HC-05 Bluetooth Module
- EN connected to Arduino Nano D7
- VCC connected to Arduino Nano 5V
- GND connected to Arduino Nano GND
- TXD connected to Arduino Nano D0/RX
- RXD connected to Arduino Nano D1/TX
12V Single Channel Relay
- IN connected to Arduino Nano A1
- NC connected to LED Bulb AC +
- COM connected to Battery 12V
- GND connected to Arduino Nano GND
- VCC connected to Arduino Nano 5V
12V 200Ah Battery
- 12V connected to Relay COM
- GND connected to LED Bulb AC -
LED Bulb AC
-
- connected to Relay NC
-
- connected to Battery GND
Documented Code
Arduino Nano Code (sketch.ino)
void setup() {
  // put your setup code here, to run once:

}

void loop() {
  // put your main code here, to run repeatedly:

}
Additional Notes
- The code provided for the Arduino Nano is a template with empty setup and loop functions. The actual functionality needs to be implemented based on the desired behavior of the circuit.
- The HC-05 Bluetooth module should be configured and paired with a Bluetooth controller, such as a smartphone or computer, to receive commands for controlling the relay and, consequently, the LED bulb.
- The relay module should be used according to its specifications, ensuring that the voltage and current ratings are compatible with the LED bulb and the power source (battery).