Arduino Leonardo Controlled OLED Display with Pushbutton Interaction
Circuit Documentation
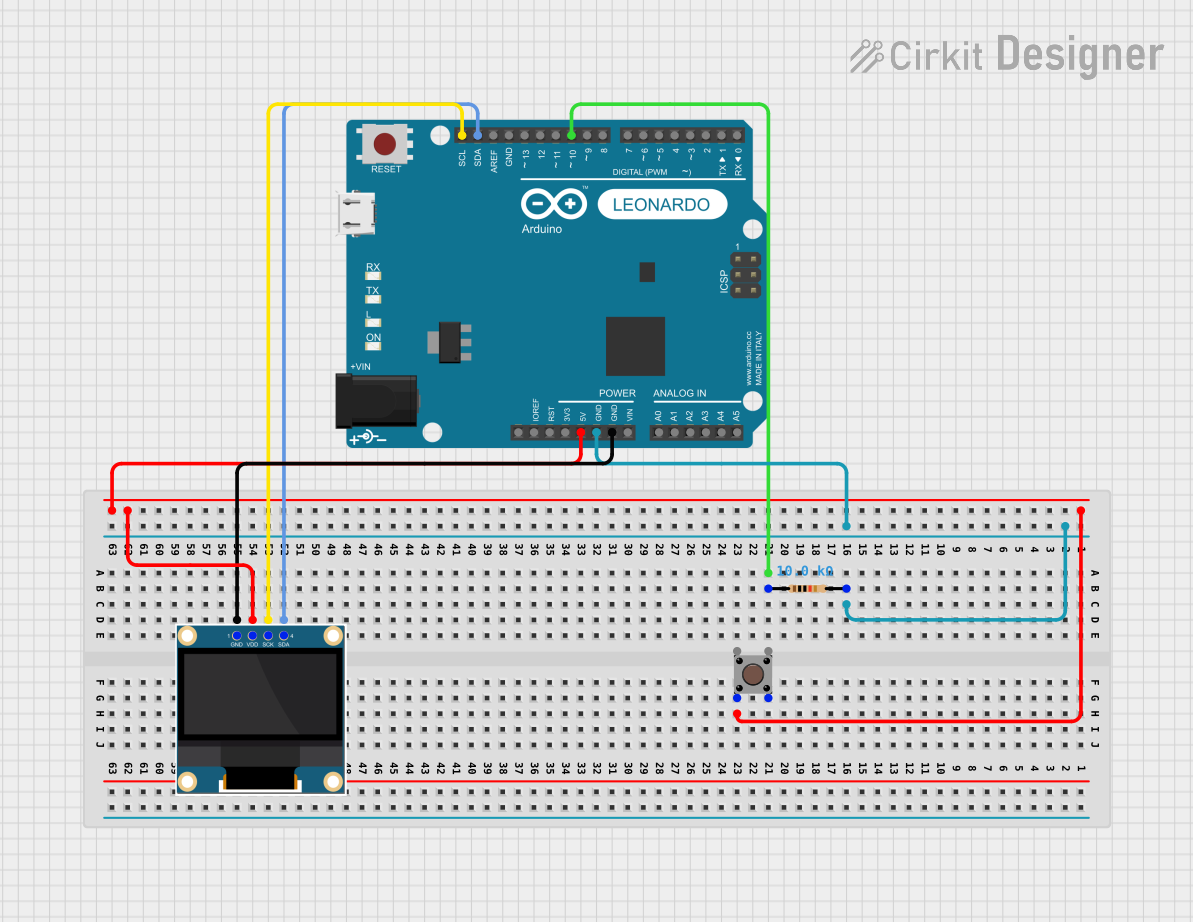
Summary of the Circuit
The circuit in question consists of an Arduino Leonardo microcontroller, a pushbutton, a resistor, and a 0.96" OLED display. The Arduino Leonardo serves as the central processing unit, controlling the OLED display and reading the state of the pushbutton. The resistor is used to provide a pull-down for the pushbutton, ensuring a stable logic level when the button is not pressed. The OLED display is interfaced with the Arduino via I2C communication, using the SDA and SCL lines for data transfer.
Component List
Pushbutton
- Description: A simple pushbutton used to provide user input to the circuit.
- Pins:
- Pin 3 (out)
- Pin 4 (out)
- Pin 1 (in)
- Pin 2 (in)
Resistor
- Description: A resistor with a resistance value of 10,000 Ohms.
- Pins:
- pin1
- pin2
0.96" OLED
- Description: A small OLED display for visual output.
- Pins:
- GND
- VDD
- SCK
- SDA
Arduino Leonardo (Rev3b)
- Description: A microcontroller board based on the ATmega32u4.
- Pins:
- D0/RX
- D1/TX
- D2/SDA
- D3 PWM/SCL
- D4/A6
- D5 PWM
- D6 PWM/A7
- D7
- n.c.
- IOREF
- RESET
- 3V3
- 5V
- GND
- VIN
- A0
- A1
- A2
- A3
- A4
- A5
- D8/A8
- D9 PWM/A9
- D10 PWM/A10
- D11 PWM
- D12/A11
- D13 PWM
- AREF
- SDA
- SCL
Wiring Details
Pushbutton
- Connected to 5V on the Arduino Leonardo (Pin 2 (in) to 5V).
Resistor
- One end (pin2) is connected to GND on the Arduino Leonardo.
- The other end (pin1) is connected to D10 PWM/A10 on the Arduino Leonardo.
0.96" OLED
- GND connected to GND on the Arduino Leonardo.
- VDD connected to 5V on the Arduino Leonardo.
- SCK connected to SCL on the Arduino Leonardo.
- SDA connected to SDA on the Arduino Leonardo.
Arduino Leonardo (Rev3b)
- 5V and GND are used to power the OLED and the pushbutton.
- SDA and SCL are used for I2C communication with the OLED.
- D10 PWM/A10 is used as an input from the pushbutton through the resistor.
Documented Code
#include <Arduino.h>
#include <U8g2lib.h>

#ifdef U8X8_HAVE_HW_SPI
#include <SPI.h>
#endif
#ifdef U8X8_HAVE_HW_I2C
#include <Wire.h>
#endif

U8G2_SH1106_128X64_NONAME_F_SW_I2C u8g2(U8G2_R0, /* clock=*/SCL, /* data=*/SDA, /* reset=*/U8X8_PIN_NONE);

int button = 10; // Button connected to D10
int menu = 1; // Variable to track the menu state

void setup() {
  u8g2.begin(); // Initialize the OLED display
  pinMode(button, INPUT); // Set the button pin as input
  Serial.begin(9600); // Start serial communication
  drawOverview(u8g2); // Draw the initial screen
}

void loop() {
  int pinState = digitalRead(button); // Read the state of the button

  if (pinState == HIGH) { // If the button is pressed
    menu++; // Increment the menu state
    if (menu > 2) {
      menu = 1; // Reset the menu state if it exceeds the number of menus
    }

    // Update the display based on the current menu state
    if (menu == 1) {
      drawOverview(u8g2);
    }
    if (menu == 2) {
      drawPlayerStats(u8g2);
    }
    delay(500); // Debounce delay
  }
}

// Function to draw the overview screen on the OLED
void drawOverview(U8G2 & u8g2) {
  u8g2.clearBuffer();
  u8g2.setFont(u8g2_font_ncenB08_tr);
  u8g2.drawStr(10, 20, "current speed:");
  u8g2.drawStr(10, 35, "12 km/h");

  u8g2.setFont(u8g2_font_baby_tr);
  u8g2.drawStr(10, 55, "EXP:");
  u8g2.drawFrame(10, 60, 100, 4);
  u8g2.drawBox(10, 60, 30, 4);

  u8g2.sendBuffer();
}

// Function to draw the player stats screen on the OLED
void drawPlayerStats(U8G2 & u8g2) {
  u8g2.clearBuffer();
  u8g2.setFont(u8g2_font_baby_tr);
  u8g2.drawStr(10, 20, "Logged in as:");
  u8g2.drawStr(70, 20, "DasSaffe");
  u8g2.drawStr(10, 30, "Profile:");
  u8g2.drawStr(70, 30, "Cycling");
  u8g2.drawStr(10, 40, "Connection:");
  u8g2.drawStr(70, 40, "connected");
  u8g2.sendBuffer();
}
This code is responsible for controlling the OLED display and reading the state of the pushbutton. It includes two main functions for drawing on the display: drawOverview and drawPlayerStats. The loop function checks the state of the pushbutton and updates the display accordingly.