
Arduino UNO Bluetooth-Controlled Robotic Car with Motor Driver and Battery Power
View and Edit Project In Cirkit Designer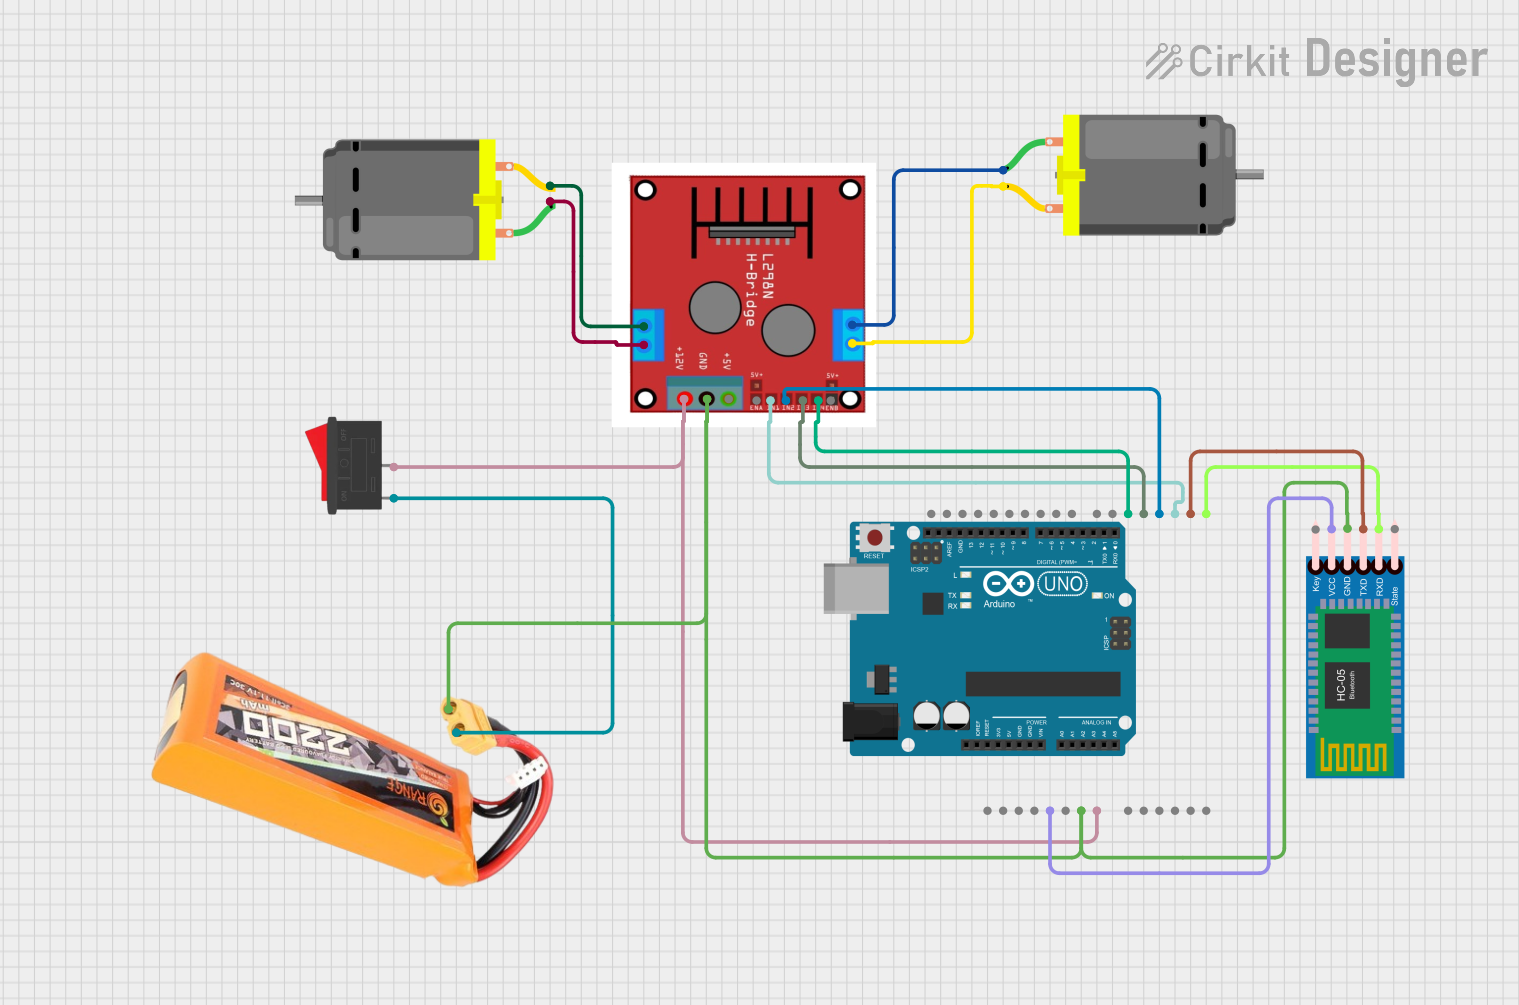
Circuit Documentation
Summary
This circuit is designed to control two DC motors using an Arduino UNO, a Motor Driver (L298N), and an HC-05 Bluetooth Module. The motors can be controlled via Bluetooth commands sent to the Arduino, which then drives the motors through the motor driver. A rocker switch is used to power the circuit using a LiPo battery.
Component List
Arduino UNO
- Description: A microcontroller board based on the ATmega328P.
- Pins: UNUSED, IOREF, Reset, 3.3V, 5V, GND, Vin, A0, A1, A2, A3, A4, A5, SCL, SDA, AREF, D13, D12, D11, D10, D9, D8, D7, D6, D5, D4, D3, D2, D1, D0
Motor Driver (L298N)
- Description: A dual H-Bridge motor driver that allows control of two DC motors.
- Pins: OUT 1, OUT 2, OUT 3, OUT 4, +12V INPUT, GND, +5V OUTPUT, ENA, IN 1, IN 2, IN 3, IN 4, ENB
HC-05 Bluetooth Module
- Description: A Bluetooth module for wireless communication.
- Pins: Key, VCC, TXD, RXD, State, GND
DC Motor (Motor 1)
- Description: A simple DC motor.
- Pins: pin 1, pin 2
DC Motor (Motor 2)
- Description: A simple DC motor.
- Pins: pin 1, pin 2
Rocker Switch
- Description: A switch to control the power supply.
- Pins: 1, 2
LiPo Battery 2200mAH 30c
- Description: A rechargeable lithium polymer battery.
- Pins: VCC, GND
Wiring Details
Arduino UNO
- 5V to VCC of HC-05 Bluetooth Module
- GND to GND of HC-05 Bluetooth Module, Motor Driver (L298N), and LiPo Battery
- Vin to Pin 2 of Rocker Switch
- D5 to IN 4 of Motor Driver (L298N)
- D4 to IN 3 of Motor Driver (L298N)
- D3 to IN 2 of Motor Driver (L298N)
- D2 to IN 1 of Motor Driver (L298N)
- D1 to TXD of HC-05 Bluetooth Module
- D0 to RXD of HC-05 Bluetooth Module
Motor Driver (L298N)
- GND to GND of Arduino UNO, HC-05 Bluetooth Module, and LiPo Battery
- +12V INPUT to Pin 2 of Rocker Switch
- IN 4 to D5 of Arduino UNO
- IN 3 to D4 of Arduino UNO
- IN 2 to D3 of Arduino UNO
- IN 1 to D2 of Arduino UNO
- OUT 1 to Pin 2 of DC Motor (Motor 1)
- OUT 2 to Pin 1 of DC Motor (Motor 1)
- OUT 3 to Pin 1 of DC Motor (Motor 2)
- OUT 4 to Pin 2 of DC Motor (Motor 2)
HC-05 Bluetooth Module
- VCC to 5V of Arduino UNO
- GND to GND of Arduino UNO
- TXD to D1 of Arduino UNO
- RXD to D0 of Arduino UNO
DC Motor (Motor 1)
- Pin 2 to OUT 1 of Motor Driver (L298N)
- Pin 1 to OUT 2 of Motor Driver (L298N)
DC Motor (Motor 2)
- Pin 1 to OUT 3 of Motor Driver (L298N)
- Pin 2 to OUT 4 of Motor Driver (L298N)
Rocker Switch
- Pin 2 to +12V INPUT of Motor Driver (L298N) and Vin of Arduino UNO
- Pin 1 to VCC of LiPo Battery
LiPo Battery 2200mAH 30c
- VCC to Pin 1 of Rocker Switch
- GND to GND of Arduino UNO, HC-05 Bluetooth Module, and Motor Driver (L298N)
Code Documentation
// put your main code here, to run repeatedly:
char m=0;

void setup()
{
  pinMode(9, OUTPUT);
  pinMode(10, OUTPUT);
  pinMode(11, OUTPUT);
  pinMode(12, OUTPUT);
  Serial.begin(9600);
  Serial.println("Setup-Done");
}

void loop()
{
  if (Serial.available()>0)
  {
    m=Serial.read();
    Serial.println(m);
  }
  if (m=='R')
  {
    digitalWrite(9, HIGH);
    digitalWrite(10, LOW);
    digitalWrite(11, HIGH);
    digitalWrite(12, LOW);
    Serial.println("Move-Right");
  }
  else if (m=='L')
  {
    digitalWrite(9, LOW);
    digitalWrite(10, HIGH);
    digitalWrite(11, LOW);
    digitalWrite(12, HIGH);
    Serial.println("Move-Left");
  }
  else if (m=='F')
  {
    digitalWrite(9, HIGH);
    digitalWrite(10, LOW);
    digitalWrite(11, LOW);
    digitalWrite(12, HIGH);
    Serial.println("Move-Farword");
  }
  else if (m=='B')
  {
    digitalWrite(9, LOW);
    digitalWrite(10, HIGH);
    digitalWrite(11, HIGH);
    digitalWrite(12, LOW);
    Serial.println("Move-Back");
  }
  else if (m=='S')
  {
    digitalWrite(9,  LOW);
    digitalWrite(10, LOW);
    digitalWrite(11, LOW);
    digitalWrite(12, LOW);
    Serial.println("STOP");
  }
}
This code is designed to control the movement of the motors based on commands received via Bluetooth. The commands 'R', 'L', 'F', 'B', and 'S' correspond to moving right, left, forward, backward, and stopping, respectively. The Arduino reads the command from the Bluetooth module and sets the motor driver pins accordingly to control the motors.