
Circuit Documentation
Summary
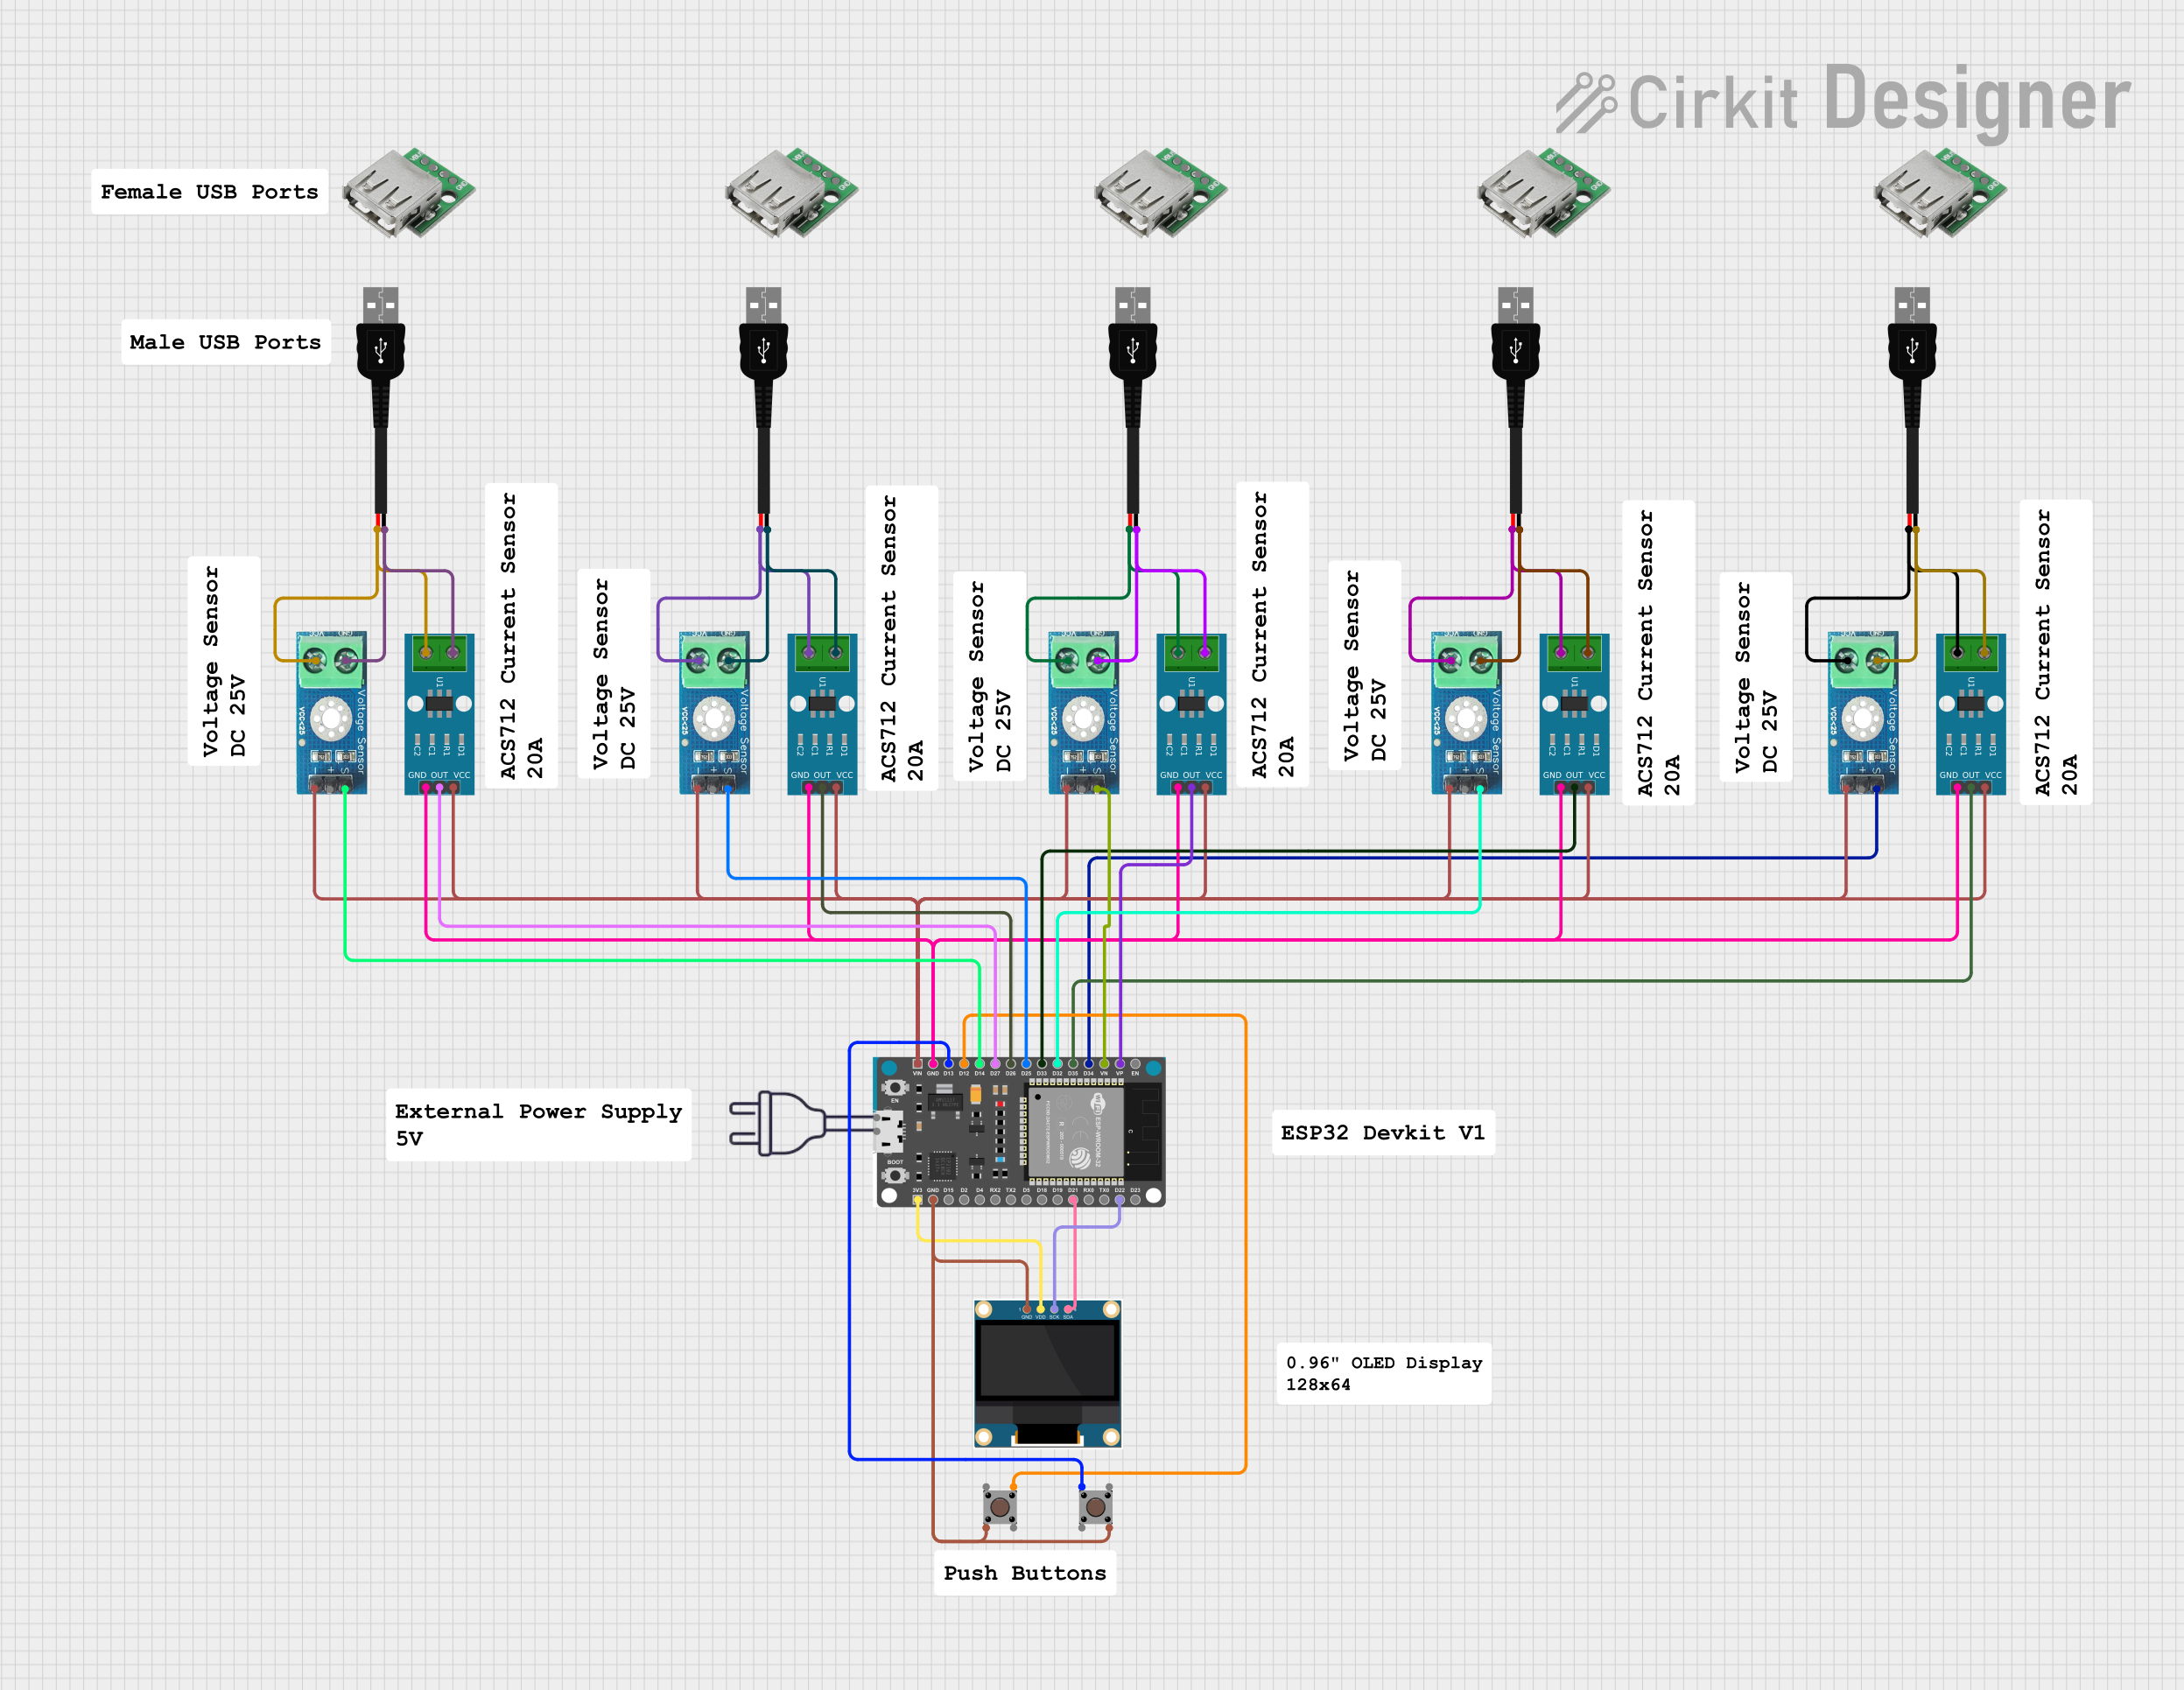
This document provides a detailed overview of a circuit that includes various sensors, pushbuttons, an OLED display, and an ESP32 Devkit V1 microcontroller. The circuit is designed to interface multiple sensors and display data on an OLED screen. The ESP32 Devkit V1 serves as the central microcontroller, managing inputs from sensors and pushbuttons and outputting data to the OLED display.
Component List
Pushbutton
- Pins: Pin 3 (out), Pin 4 (out), Pin 1 (in), Pin 2 (in)
- Description: A simple pushbutton used for user input.
ACS712 Current Sensor 5A 20A 30A
- Pins: 1, 2, GND, OUT, VCC
- Description: A current sensor used to measure current flow.
Voltage Sensor DC 25V
- Pins: +, -, output, gnd, vcc
- Description: A voltage sensor used to measure DC voltage up to 25V.
0.96" OLED
- Pins: GND, VDD, SCK, SDA
- Description: A small OLED display used to show data.
USB male 2 pin connection
- Pins: Negative -, Positive +
- Description: A USB male connector for power supply.
USB Female
- Pins: VCC, GND, -D, +D
- Description: A USB female connector for power supply.
ESP32 Devkit V1
- Pins: 3V3, GND, D15, D2, D4, RX2, TX2, D5, D18, D19, D21, RX0, TX0, D22, D23, EN, VP, VN, D34, D35, D32, D33, D25, D26, D27, D14, D12, D13, VIN
- Description: A development board based on the ESP32 microcontroller.
Wiring Details
Pushbutton
Pin 4 (out) connected to:
- 0.96" OLED GND
- ESP32 Devkit V1 GND
Pin 2 (in) connected to:
- ESP32 Devkit V1 GND
Pin 3 (out) connected to:
- ESP32 Devkit V1 D12
Pin 1 (in) connected to:
- ESP32 Devkit V1 D13
ACS712 Current Sensor 5A 20A 30A
OUT connected to:
- ESP32 Devkit V1 VP
- ESP32 Devkit V1 D35
- ESP32 Devkit V1 D33
- ESP32 Devkit V1 D26
- ESP32 Devkit V1 D27
GND connected to:
- ESP32 Devkit V1 GND
VCC connected to:
- ESP32 Devkit V1 VIN
1 connected to:
- USB male 2 pin connection Negative -
- Voltage Sensor DC 25V gnd
2 connected to:
- USB male 2 pin connection Positive +
- Voltage Sensor DC 25V vcc
Voltage Sensor DC 25V
output connected to:
- ESP32 Devkit V1 VN
- ESP32 Devkit V1 D34
- ESP32 Devkit V1 D32
- ESP32 Devkit V1 D25
- ESP32 Devkit V1 D14
gnd connected to:
- USB male 2 pin connection Negative -
vcc connected to:
- USB male 2 pin connection Positive +
- connected to:
- ACS712 Current Sensor 5A 20A 30A VCC
0.96" OLED
VDD connected to:
- ESP32 Devkit V1 3V3
GND connected to:
- Pushbutton Pin 4 (out)
- ESP32 Devkit V1 GND
SDA connected to:
- ESP32 Devkit V1 D21
SCK connected to:
- ESP32 Devkit V1 D22
USB male 2 pin connection
Negative - connected to:
- Voltage Sensor DC 25V gnd
- ACS712 Current Sensor 5A 20A 30A 1
Positive + connected to:
- Voltage Sensor DC 25V vcc
- ACS712 Current Sensor 5A 20A 30A 2
USB Female
VCC connected to:
- Power supply
GND connected to:
- Ground
-D and +D are not connected in this circuit.
ESP32 Devkit V1
3V3 connected to:
- 0.96" OLED VDD
GND connected to:
- Pushbutton Pin 4 (out)
- 0.96" OLED GND
- ACS712 Current Sensor 5A 20A 30A GND
D21 connected to:
- 0.96" OLED SDA
D22 connected to:
- 0.96" OLED SCK
VP connected to:
- ACS712 Current Sensor 5A 20A 30A OUT
VN connected to:
- Voltage Sensor DC 25V output
D34 connected to:
- Voltage Sensor DC 25V output
D35 connected to:
- ACS712 Current Sensor 5A 20A 30A OUT
D32 connected to:
- Voltage Sensor DC 25V output
D33 connected to:
- ACS712 Current Sensor 5A 20A 30A OUT
D25 connected to:
- Voltage Sensor DC 25V output
D26 connected to:
- ACS712 Current Sensor 5A 20A 30A OUT
D27 connected to:
- ACS712 Current Sensor 5A 20A 30A OUT
D14 connected to:
- Voltage Sensor DC 25V output
D12 connected to:
- Pushbutton Pin 3 (out)
D13 connected to:
- Pushbutton Pin 1 (in)
VIN connected to:
- ACS712 Current Sensor 5A 20A 30A VCC
Code
No code is provided for this circuit.
This document provides a comprehensive overview of the circuit, including a summary, component list, wiring details, and code section. Each component is described, and the wiring details are provided to ensure proper connections.