
Circuit Documentation
Summary of the Circuit
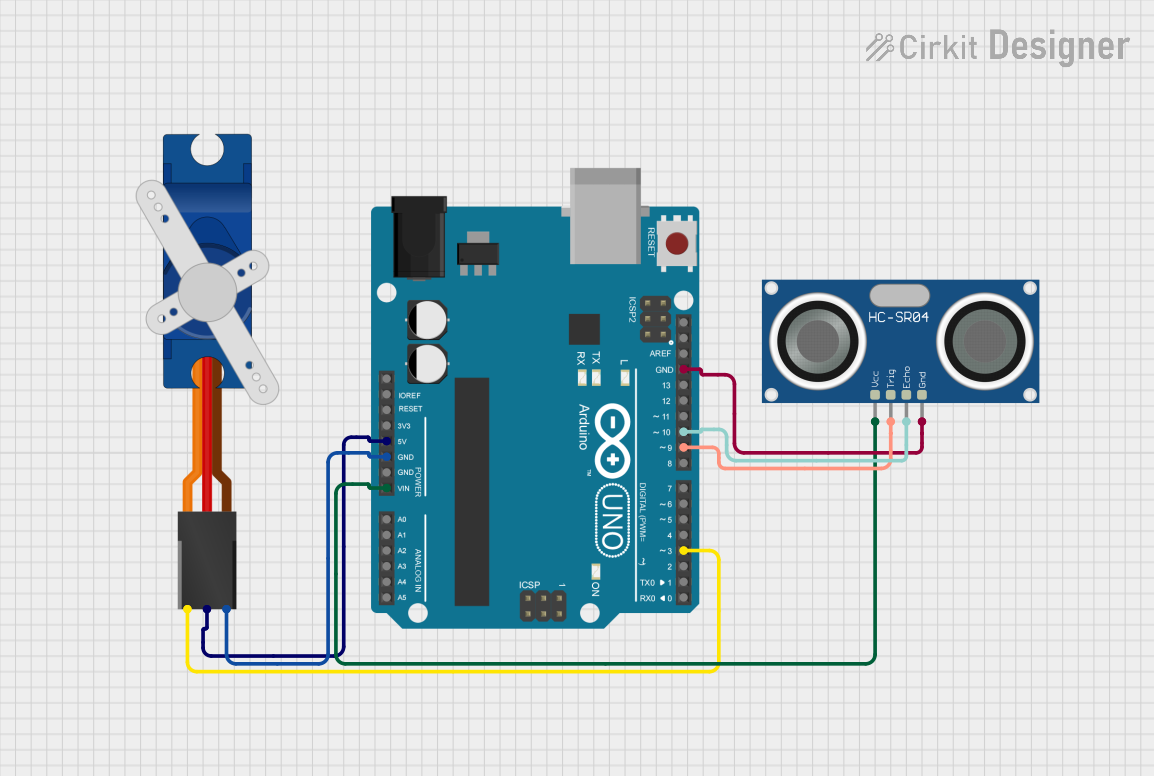
This circuit integrates an Arduino UNO microcontroller with a Tower Pro SG90 servo motor and an HC-SR04 Ultrasonic Sensor. The Arduino UNO serves as the central processing unit, controlling the servo motor based on the distance measurements obtained from the ultrasonic sensor. The servo motor is powered directly from the Arduino's 5V output, and the ultrasonic sensor is powered from the Arduino's Vin pin, which can handle a higher voltage input. The sensor's ECHO and TRIG pins are connected to digital pins on the Arduino for distance measurement signaling.
Component List
Arduino UNO
- Description: A microcontroller board based on the ATmega328P.
- Pins: UNUSED, IOREF, Reset, 3.3V, 5V, GND, Vin, A0-A5, SCL, SDA, AREF, D0-D13.
- Purpose: Acts as the central controller for the circuit, interfacing with the servo motor and ultrasonic sensor.
Tower Pro SG90 Servo
- Description: A small and lightweight servo motor suitable for RC and robotics applications.
- Pins: Signal, +5V, GND.
- Purpose: Receives PWM signals from the Arduino to position the servo arm.
HC-SR04 Ultrasonic Sensor
- Description: An ultrasonic distance sensor capable of measuring distances from 2cm to 400cm.
- Pins: VCC, TRIG, ECHO, GND.
- Purpose: Measures the distance to an object by emitting ultrasonic waves and timing the echo return.
Wiring Details
Arduino UNO
- 5V connected to Tower Pro SG90 servo (+5V)
- GND connected to:
- Tower Pro SG90 servo (GND)
- HC-SR04 Ultrasonic Sensor (GND)
- Vin connected to HC-SR04 Ultrasonic Sensor (VCC)
- D10 connected to HC-SR04 Ultrasonic Sensor (ECHO)
- D9 connected to HC-SR04 Ultrasonic Sensor (TRIG)
- D3 connected to Tower Pro SG90 servo (Signal)
Tower Pro SG90 Servo
- Signal connected to Arduino UNO (D3)
- +5V connected to Arduino UNO (5V)
- GND connected to Arduino UNO (GND)
HC-SR04 Ultrasonic Sensor
- VCC connected to Arduino UNO (Vin)
- TRIG connected to Arduino UNO (D9)
- ECHO connected to Arduino UNO (D10)
- GND connected to Arduino UNO (GND)
Documented Code
Arduino UNO Code (sketch.ino)
void setup() {
  // put your setup code here, to run once:

}

void loop() {
  // put your main code here, to run repeatedly:

}
Note: The provided code is a template and does not contain any functional code to control the servo or read from the ultrasonic sensor. This will need to be implemented based on the specific requirements of the application.
Additional Files
- documentation.txt: This file is currently empty and can be used for additional notes or manual documentation.