
Arduino UNO Battery-Powered Robotic Vehicle with Ultrasonic Sensors
View and Edit Project In Cirkit Designer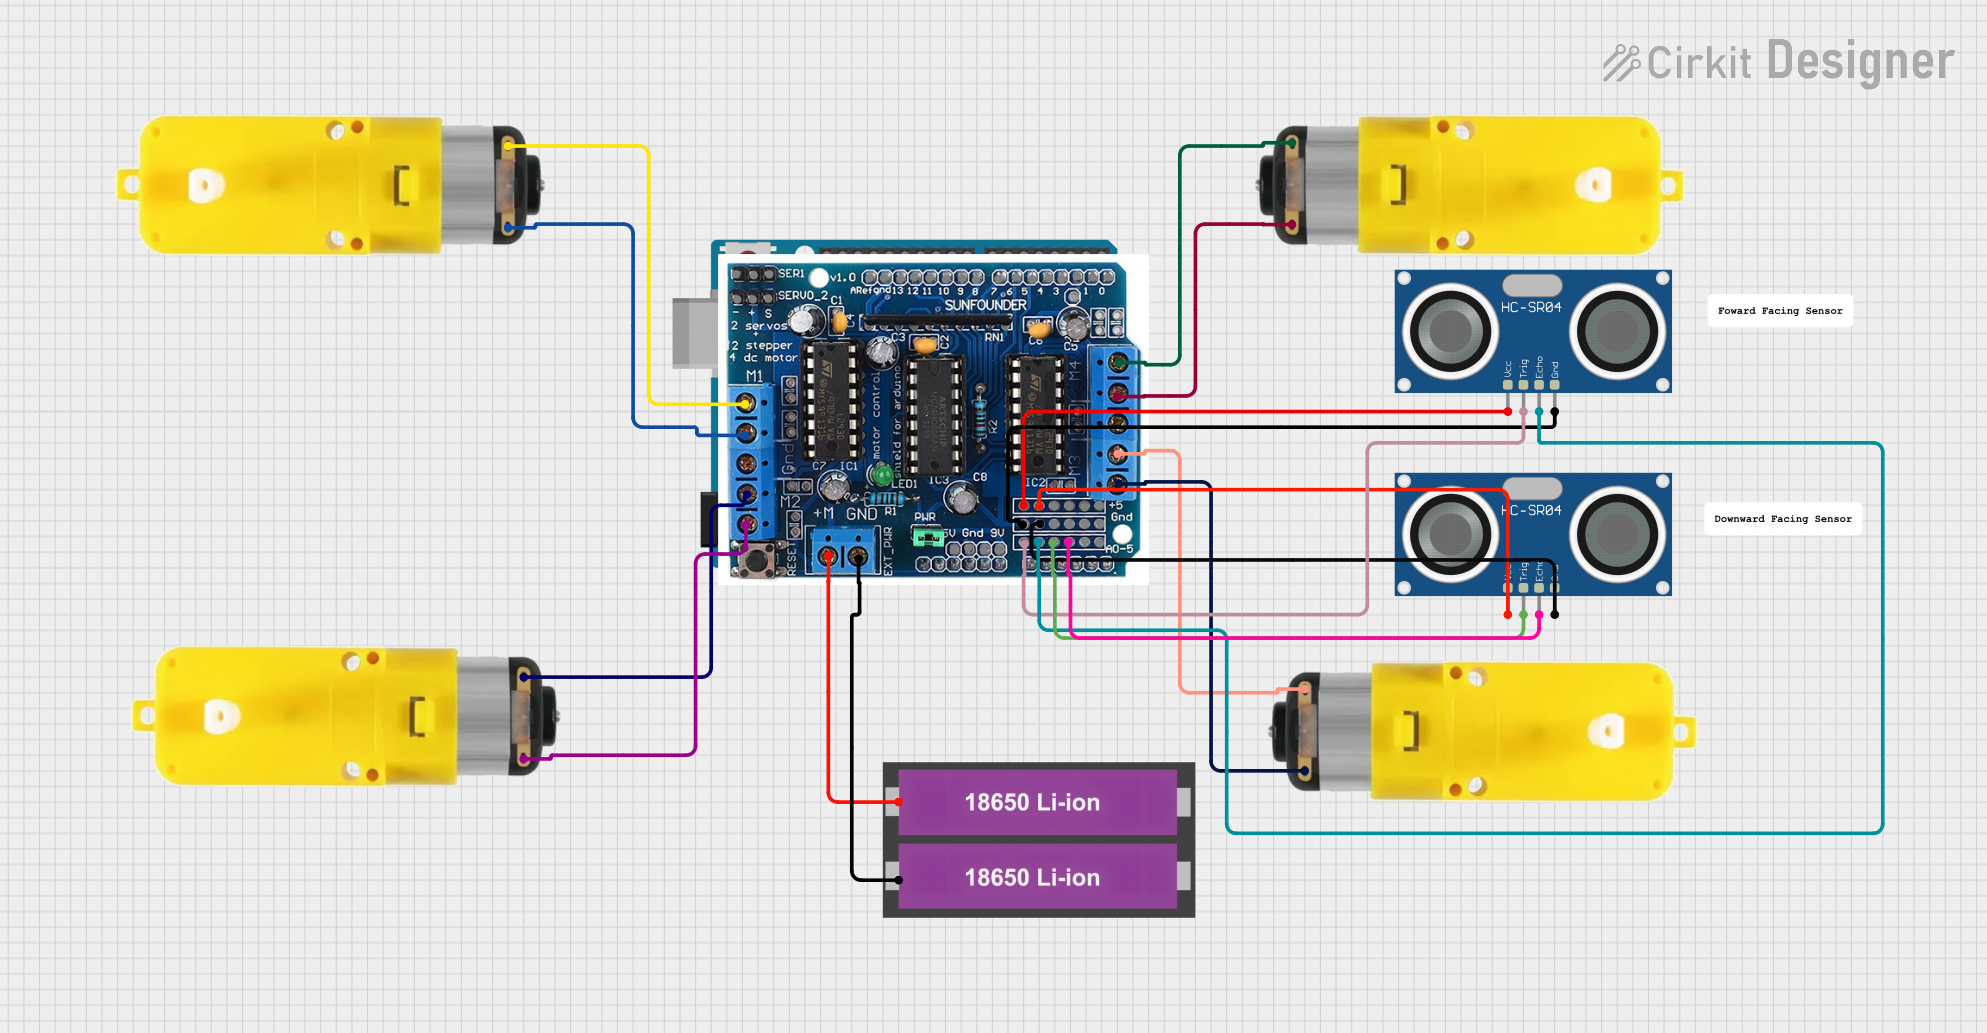
Circuit Documentation
Summary
This circuit involves an Arduino UNO microcontroller, an L293D motor driver shield, multiple motors with reducers, and HC-SR04 ultrasonic sensors. The circuit is powered by two 18650 Li-ion batteries. The Arduino UNO is used to control the motors and read data from the ultrasonic sensors.
Component List
Arduino UNO
- Description: A microcontroller board based on the ATmega328P.
- Pins: UNUSED, IOREF, Reset, 3.3V, 5V, GND, Vin, A0, A1, A2, A3, A4, A5, SCL, SDA, AREF, D13, D12, D11, D10, D9, D8, D7, D6, D5, D4, D3, D2, D1, D0
L293D Motor Driver Shield
- Description: A motor driver shield used to control motors.
- Pins: 5v, GND, A0, A1, A2, A3, A4, A5, M+, M2, M1, M3, M4, 0, 1, 2, 3, 4, 5, 6, 7, 8, 9, 10, 11, 12, gnd, Aref, ser1, Servo2, +, -, 9v
Motor with Reducer
- Description: A motor with a built-in reducer.
- Pins: 3 - 6 VCC, GND
HC-SR04 Ultrasonic Sensor
- Description: An ultrasonic sensor used for distance measurement.
- Pins: VCC, TRIG, ECHO, GND
18650 Li-ion Battery x 2
- Description: Two 18650 Li-ion batteries used to power the circuit.
- Pins: +, -
Wiring Details
Arduino UNO
- No direct connections specified in the net list.
L293D Motor Driver Shield
- 5v: Connected to VCC of both HC-SR04 Ultrasonic Sensors.
- GND: Connected to GND of both HC-SR04 Ultrasonic Sensors and the negative terminal of the 18650 Li-ion Battery.
- A0: Connected to TRIG of the first HC-SR04 Ultrasonic Sensor.
- A1: Connected to ECHO of the first HC-SR04 Ultrasonic Sensor.
- A2: Connected to TRIG of the second HC-SR04 Ultrasonic Sensor.
- A3: Connected to ECHO of the second HC-SR04 Ultrasonic Sensor.
- M+: Connected to the positive terminal of the 18650 Li-ion Battery.
- M2: Connected to 3 - 6 VCC of the second Motor with Reducer.
- M2: Connected to GND of the second Motor with Reducer.
- M1: Connected to 3 - 6 VCC of the first Motor with Reducer.
- M1: Connected to GND of the first Motor with Reducer.
- M3: Connected to 3 - 6 VCC of the third Motor with Reducer.
- M3: Connected to GND of the third Motor with Reducer.
- M4: Connected to 3 - 6 VCC of the fourth Motor with Reducer.
- M4: Connected to GND of the fourth Motor with Reducer.
Motor with Reducer
First Motor
- 3 - 6 VCC: Connected to M1 of the L293D Motor Driver Shield.
- GND: Connected to M1 of the L293D Motor Driver Shield.
Second Motor
- 3 - 6 VCC: Connected to M2 of the L293D Motor Driver Shield.
- GND: Connected to M2 of the L293D Motor Driver Shield.
Third Motor
- 3 - 6 VCC: Connected to M3 of the L293D Motor Driver Shield.
- GND: Connected to M3 of the L293D Motor Driver Shield.
Fourth Motor
- 3 - 6 VCC: Connected to M4 of the L293D Motor Driver Shield.
- GND: Connected to M4 of the L293D Motor Driver Shield.
HC-SR04 Ultrasonic Sensor
First Sensor
- VCC: Connected to 5v of the L293D Motor Driver Shield.
- GND: Connected to GND of the L293D Motor Driver Shield.
- TRIG: Connected to A0 of the L293D Motor Driver Shield.
- ECHO: Connected to A1 of the L293D Motor Driver Shield.
Second Sensor
- VCC: Connected to 5v of the L293D Motor Driver Shield.
- GND: Connected to GND of the L293D Motor Driver Shield.
- TRIG: Connected to A2 of the L293D Motor Driver Shield.
- ECHO: Connected to A3 of the L293D Motor Driver Shield.
18650 Li-ion Battery x 2
- +: Connected to M+ of the L293D Motor Driver Shield.
- -: Connected to GND of the L293D Motor Driver Shield.
Documented Code
Arduino UNO Code (sketch.ino)
void setup() {
  // put your setup code here, to run once:

}

void loop() {
  // put your main code here, to run repeatedly:

}
Additional Documentation (documentation.txt)