
Arduino UNO and ESP8266-01 Wi-Fi Controlled Smart Home Automation System
View and Edit Project In Cirkit Designer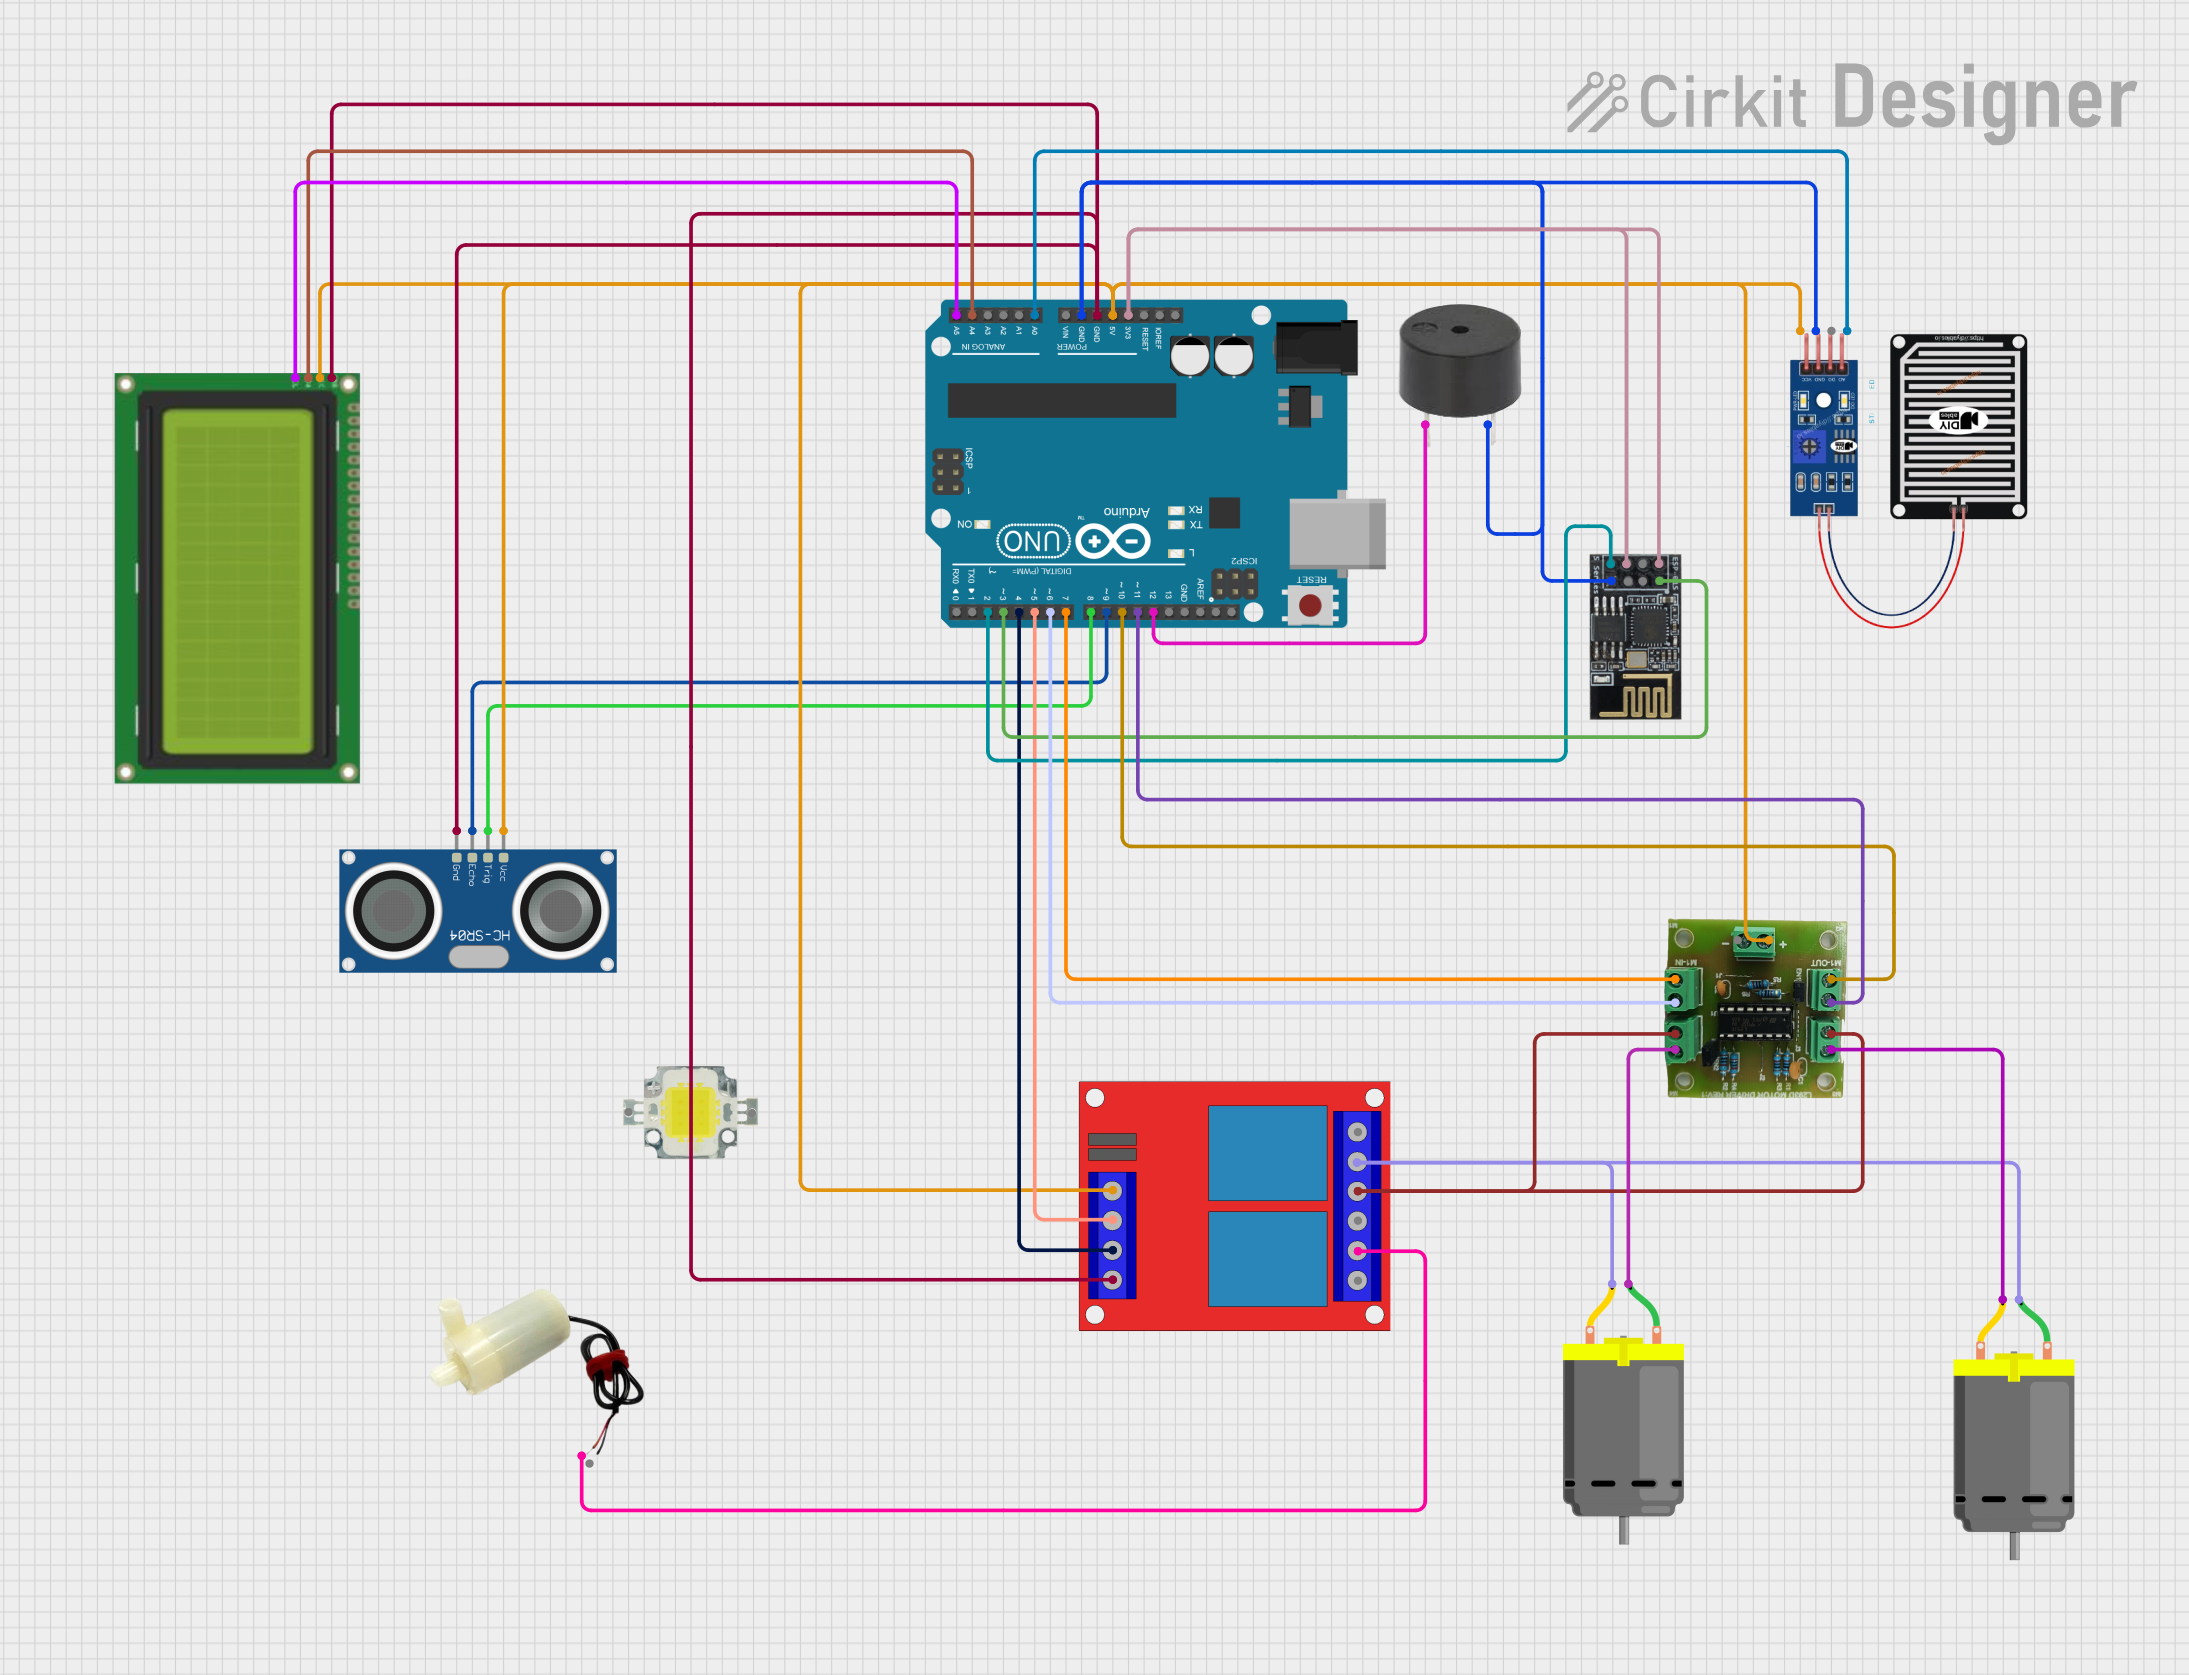
Circuit Documentation
Summary
This document provides a detailed overview of a circuit that includes various components such as a 2 Channel 12v Relay, Wifi module ESP8266-01, DC Motors, a buzzer, a 5v mini water pump, an Arduino UNO, an HC-SR04 Ultrasonic Sensor, a Rain Sensor, an L293D motor driver, and an LCD 20x4 I2C display. The circuit is designed to interface these components with an Arduino UNO microcontroller, which controls and monitors the system.
Component List
2 Channel 12v Relay
- Description: A relay module that allows control of high voltage devices using low voltage signals.
- Pins: 12v +, 12v -, Trigger 1, Trigger 2, NC1, COM1, NO1, NC2, COM2, NO2
Wifi module ESP8266-01
- Description: A WiFi module that provides wireless communication capabilities.
- Pins: RX, GPIO0, GPIO2, GND, +3V3, Reset, CH-PD Chip power down, TX
DC Motor
- Description: A motor that converts electrical energy into mechanical motion.
- Pins: pin 1, pin 2
Buzzer
- Description: An audio signaling device.
- Pins: PIN, GND
5v mini water pump
- Description: A small water pump powered by 5V.
- Pins: positive pin, negative pin
Arduino UNO
- Description: A microcontroller board based on the ATmega328P.
- Pins: UNUSED, IOREF, Reset, 3.3V, 5V, GND, Vin, A0, A1, A2, A3, A4, A5, SCL, SDA, AREF, D13, D12, D11, D10, D9, D8, D7, D6, D5, D4, D3, D2, D1, D0
HC-SR04 Ultrasonic Sensor
- Description: An ultrasonic sensor used for distance measurement.
- Pins: VCC, TRIG, ECHO, GND
Rain Sensor
- Description: A sensor used to detect the presence of rain.
- Pins: AO, DO, GRD, VCC
L293D
- Description: A motor driver IC used to control DC motors.
- Pins: Battery +, Battery -, M1-OUT-A, M1-OUT-B, M2-OUT-B, M2-OUT-A, M1-IN-A, M1-IN-B, M2-IN-A, M2-IN-B
LCD 20x4 I2C
- Description: A 20x4 character LCD display with I2C interface.
- Pins: GND, 5v, SCA, SCL
Power LED 12V 10W 0.8-0.9A
- Description: A high-power LED.
- Pins: +, -
Wiring Details
2 Channel 12v Relay
- 12v +: Connected to Arduino UNO 5V
- 12v -: Connected to Arduino UNO D5
- Trigger 1: Connected to Arduino UNO D4
- Trigger 2: Connected to Arduino UNO GND
- COM1: Connected to DC Motor pin 2 and DC Motor pin 1
- NO1: Connected to L293D M2-OUT-A and L293D M2-IN-A
- COM2: Connected to 5v mini water pump positive pin
Wifi module ESP8266-01
- +3V3: Connected to Arduino UNO 3.3V
- CH-PD Chip power down: Connected to Arduino UNO 3.3V
- GND: Connected to Arduino UNO GND
- RX: Connected to Arduino UNO D3
- TX: Connected to Arduino UNO D2
DC Motor
- pin 1: Connected to L293D M2-IN-B
- pin 2: Connected to L293D M2-OUT-B
Buzzer
- PIN: Connected to Arduino UNO D12
- GND: Connected to Arduino UNO GND
5v mini water pump
- positive pin: Connected to 2 Channel 12v Relay COM2
Arduino UNO
- 3.3V: Connected to Wifi module ESP8266-01 +3V3 and CH-PD Chip power down
- 5V: Connected to L293D Battery +, 2 Channel 12v Relay 12v +, HC-SR04 Ultrasonic Sensor VCC, LCD 20x4 I2C 5v, Rain Sensor VCC
- GND: Connected to 2 Channel 12v Relay Trigger 2, HC-SR04 Ultrasonic Sensor GND, LCD 20x4 I2C GND, Wifi module ESP8266-01 GND, Rain Sensor GRD, Buzzer GND
- A0: Connected to Rain Sensor AO
- A4: Connected to LCD 20x4 I2C SCA
- A5: Connected to LCD 20x4 I2C SCL
- D12: Connected to Buzzer PIN
- D11: Connected to L293D M1-OUT-B
- D10: Connected to L293D M1-OUT-A
- D9: Connected to HC-SR04 Ultrasonic Sensor ECHO
- D8: Connected to HC-SR04 Ultrasonic Sensor TRIG
- D7: Connected to L293D M1-IN-A
- D6: Connected to L293D M1-IN-B
- D5: Connected to 2 Channel 12v Relay 12v -
- D4: Connected to 2 Channel 12v Relay Trigger 1
- D3: Connected to Wifi module ESP8266-01 RX
- D2: Connected to Wifi module ESP8266-01 TX
HC-SR04 Ultrasonic Sensor
- VCC: Connected to Arduino UNO 5V
- TRIG: Connected to Arduino UNO D8
- ECHO: Connected to Arduino UNO D9
- GND: Connected to Arduino UNO GND
Rain Sensor
- AO: Connected to Arduino UNO A0
- GRD: Connected to Arduino UNO GND
- VCC: Connected to Arduino UNO 5V
L293D
- Battery +: Connected to Arduino UNO 5V
- M1-OUT-B: Connected to Arduino UNO D11
- M1-OUT-A: Connected to Arduino UNO D10
- M1-IN-A: Connected to Arduino UNO D7
- M1-IN-B: Connected to Arduino UNO D6
- M2-OUT-A: Connected to 2 Channel 12v Relay NO1
- M2-IN-A: Connected to 2 Channel 12v Relay NO1
- M2-IN-B: Connected to DC Motor pin 1
- M2-OUT-B: Connected to DC Motor pin 2
LCD 20x4 I2C
- GND: Connected to Arduino UNO GND
- 5v: Connected to Arduino UNO 5V
- SCA: Connected to Arduino UNO A4
- SCL: Connected to Arduino UNO A5
Documented Code
Arduino UNO Code (sketch.ino)
void setup() {
  // put your setup code here, to run once:

}

void loop() {
  // put your main code here, to run repeatedly:

}
This code is a basic template for the Arduino UNO. The setup() function is where you initialize your components and settings, and the loop() function is where you place the main code that runs repeatedly.