
Arduino Nano Bluetooth Child Safety Monitor with LCD and Buzzer Alert
View and Edit Project In Cirkit Designer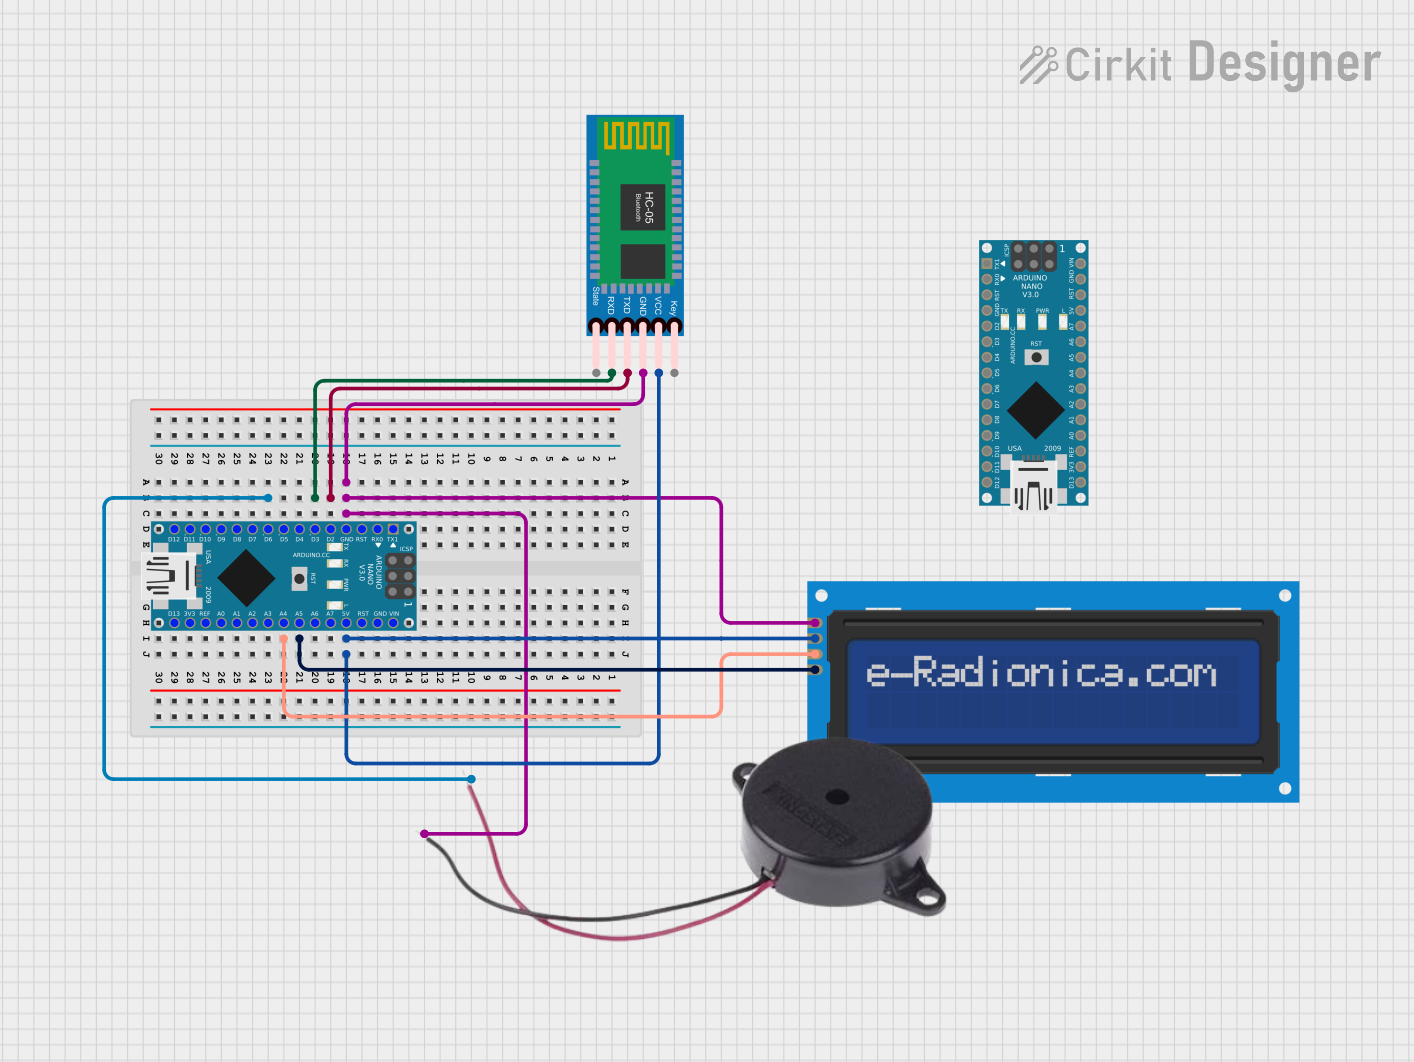
Circuit Documentation
Summary
The circuit in question is designed to interface an Arduino Nano with an HC-05 Bluetooth Module, an I2C LCD screen (16x2), and a Buzzer. The Arduino Nano serves as the central processing unit, controlling the LCD display and the Buzzer based on the data received from the HC-05 Bluetooth Module. The LCD screen is used to display messages, while the Buzzer provides audible alerts. The HC-05 Bluetooth Module enables wireless communication with the Arduino Nano.
Component List
Arduino Nano
- Microcontroller board based on the ATmega328P.
- It has a variety of digital and analog I/O pins.
- Used for controlling the overall operation of the circuit.
HC-05 Bluetooth Module
- Bluetooth module for serial communication.
- It allows for wireless data exchange with the Arduino Nano.
LCD Screen 16x2 I2C
- Alphanumeric liquid crystal display with 16 columns and 2 rows.
- Features an I2C interface for communication, reducing the number of pins required for interfacing with the Arduino Nano.
Buzzer
- An electromechanical component that produces sound.
- Used to provide audible alerts or notifications.
Wiring Details
Arduino Nano
- GND: Connected to the ground pins of the HC-05 Bluetooth Module, LCD screen, and Buzzer.
- 5V: Powers the HC-05 Bluetooth Module and the LCD screen.
- D2: Connected to the TXD pin of the HC-05 Bluetooth Module for serial communication.
- D3: Connected to the RXD pin of the HC-05 Bluetooth Module for serial communication.
- A4 (SDA): Connected to the SDA pin of the LCD screen for I2C data communication.
- A5 (SCL): Connected to the SCL pin of the LCD screen for I2C clock communication.
- D6: Connected to the positive pin of the Buzzer.
HC-05 Bluetooth Module
- GND: Connected to the ground pin of the Arduino Nano.
- VCC: Powered by the 5V output from the Arduino Nano.
- TXD: Sends data to the D2 pin of the Arduino Nano.
- RXD: Receives data from the D3 pin of the Arduino Nano.
LCD Screen 16x2 I2C
- GND: Connected to the ground pin of the Arduino Nano.
- VCC: Powered by the 5V output from the Arduino Nano.
- SDA: Connected to the A4 pin of the Arduino Nano for I2C data communication.
- SCL: Connected to the A5 pin of the Arduino Nano for I2C clock communication.
Buzzer
- NEGATIVE: Connected to the ground pin of the Arduino Nano.
- POSITIVE: Connected to the D6 pin of the Arduino Nano.
Documented Code
Arduino Nano Code
#include <Wire.h>
#include <LiquidCrystal_I2C.h>
#include <SoftwareSerial.h>

#define BT_NAME "BT_Slave"
SoftwareSerial mySerial(2, 3); // RX, TX

LiquidCrystal_I2C lcd(0x27, 16, 2); // I2C address 0x27, 16 columns and 2 rows
const int buzzer = 6;

unsigned long previousMillis = 0;
const long interval = 5000; // 5 seconds for connection timeout

void setup() {
  pinMode(buzzer, OUTPUT);
  lcd.init(); // Initialize the LCD I2C display
  lcd.backlight();
  lcd.setCursor(3, 0); // Move cursor to (3, 0)
  lcd.print("DIYables");
  lcd.setCursor(0, 1); // Move cursor to (0, 1)
  lcd.print("www.diyables.io");
  delay(2000); // Display the welcome message for 2 seconds

  Serial.begin(38400);
  mySerial.begin(38400);
  Serial.println("Arduino receiver");

  // Enter AT mode
  mySerial.print("AT\r\n");
  delay(200);
  mySerial.print("AT+RMAAD\r\n"); // Remove all paired devices
  delay(200);
  mySerial.print("AT+ADDR?\r\n"); // Get the address of the Slave
  delay(200);
  mySerial.print("AT+NAME=" + String(BT_NAME) + "\r\n"); // Set device name
  delay(200);
  mySerial.print("AT+PSWD=\"1234\"\r\n"); // Set password
  delay(200);
  mySerial.print("AT+ROLE?\r\n"); // Check role
  delay(200);
  mySerial.print("AT+UART=38400,0,0\r\n"); // Set UART baud rate
  delay(500);
}

void loop() {
  unsigned long currentMillis = millis();

  if (mySerial.available()) {
    String message = mySerial.readString();
    Serial.println("Received: " + message);

    // Display "CHILD SAFE" on the LCD and turn off the buzzer
    lcd.clear();
    lcd.setCursor(0, 0);
    lcd.print("CHILD SAFE");
    noTone(buzzer);

    // Reset the timer
    previousMillis = currentMillis;
  } else if (currentMillis - previousMillis >= interval) {
    // If no signal is received for 5 seconds, display "CHILD MISSING" and turn on the buzzer
    lcd.clear();
    lcd.setCursor(0, 0);
    lcd.print("CHILD MISSING");
    tone(buzzer, 1000); // Activate buzzer
  }
}
This code is responsible for initializing the LCD screen and the HC-05 Bluetooth Module, as well as handling the communication between the Arduino Nano and the Bluetooth module. It also controls the Buzzer and updates the LCD display based on the received Bluetooth messages.