
Arduino UNO-Based Soil Monitoring System with RS485 and Capacitive Moisture Sensor
View and Edit Project In Cirkit Designer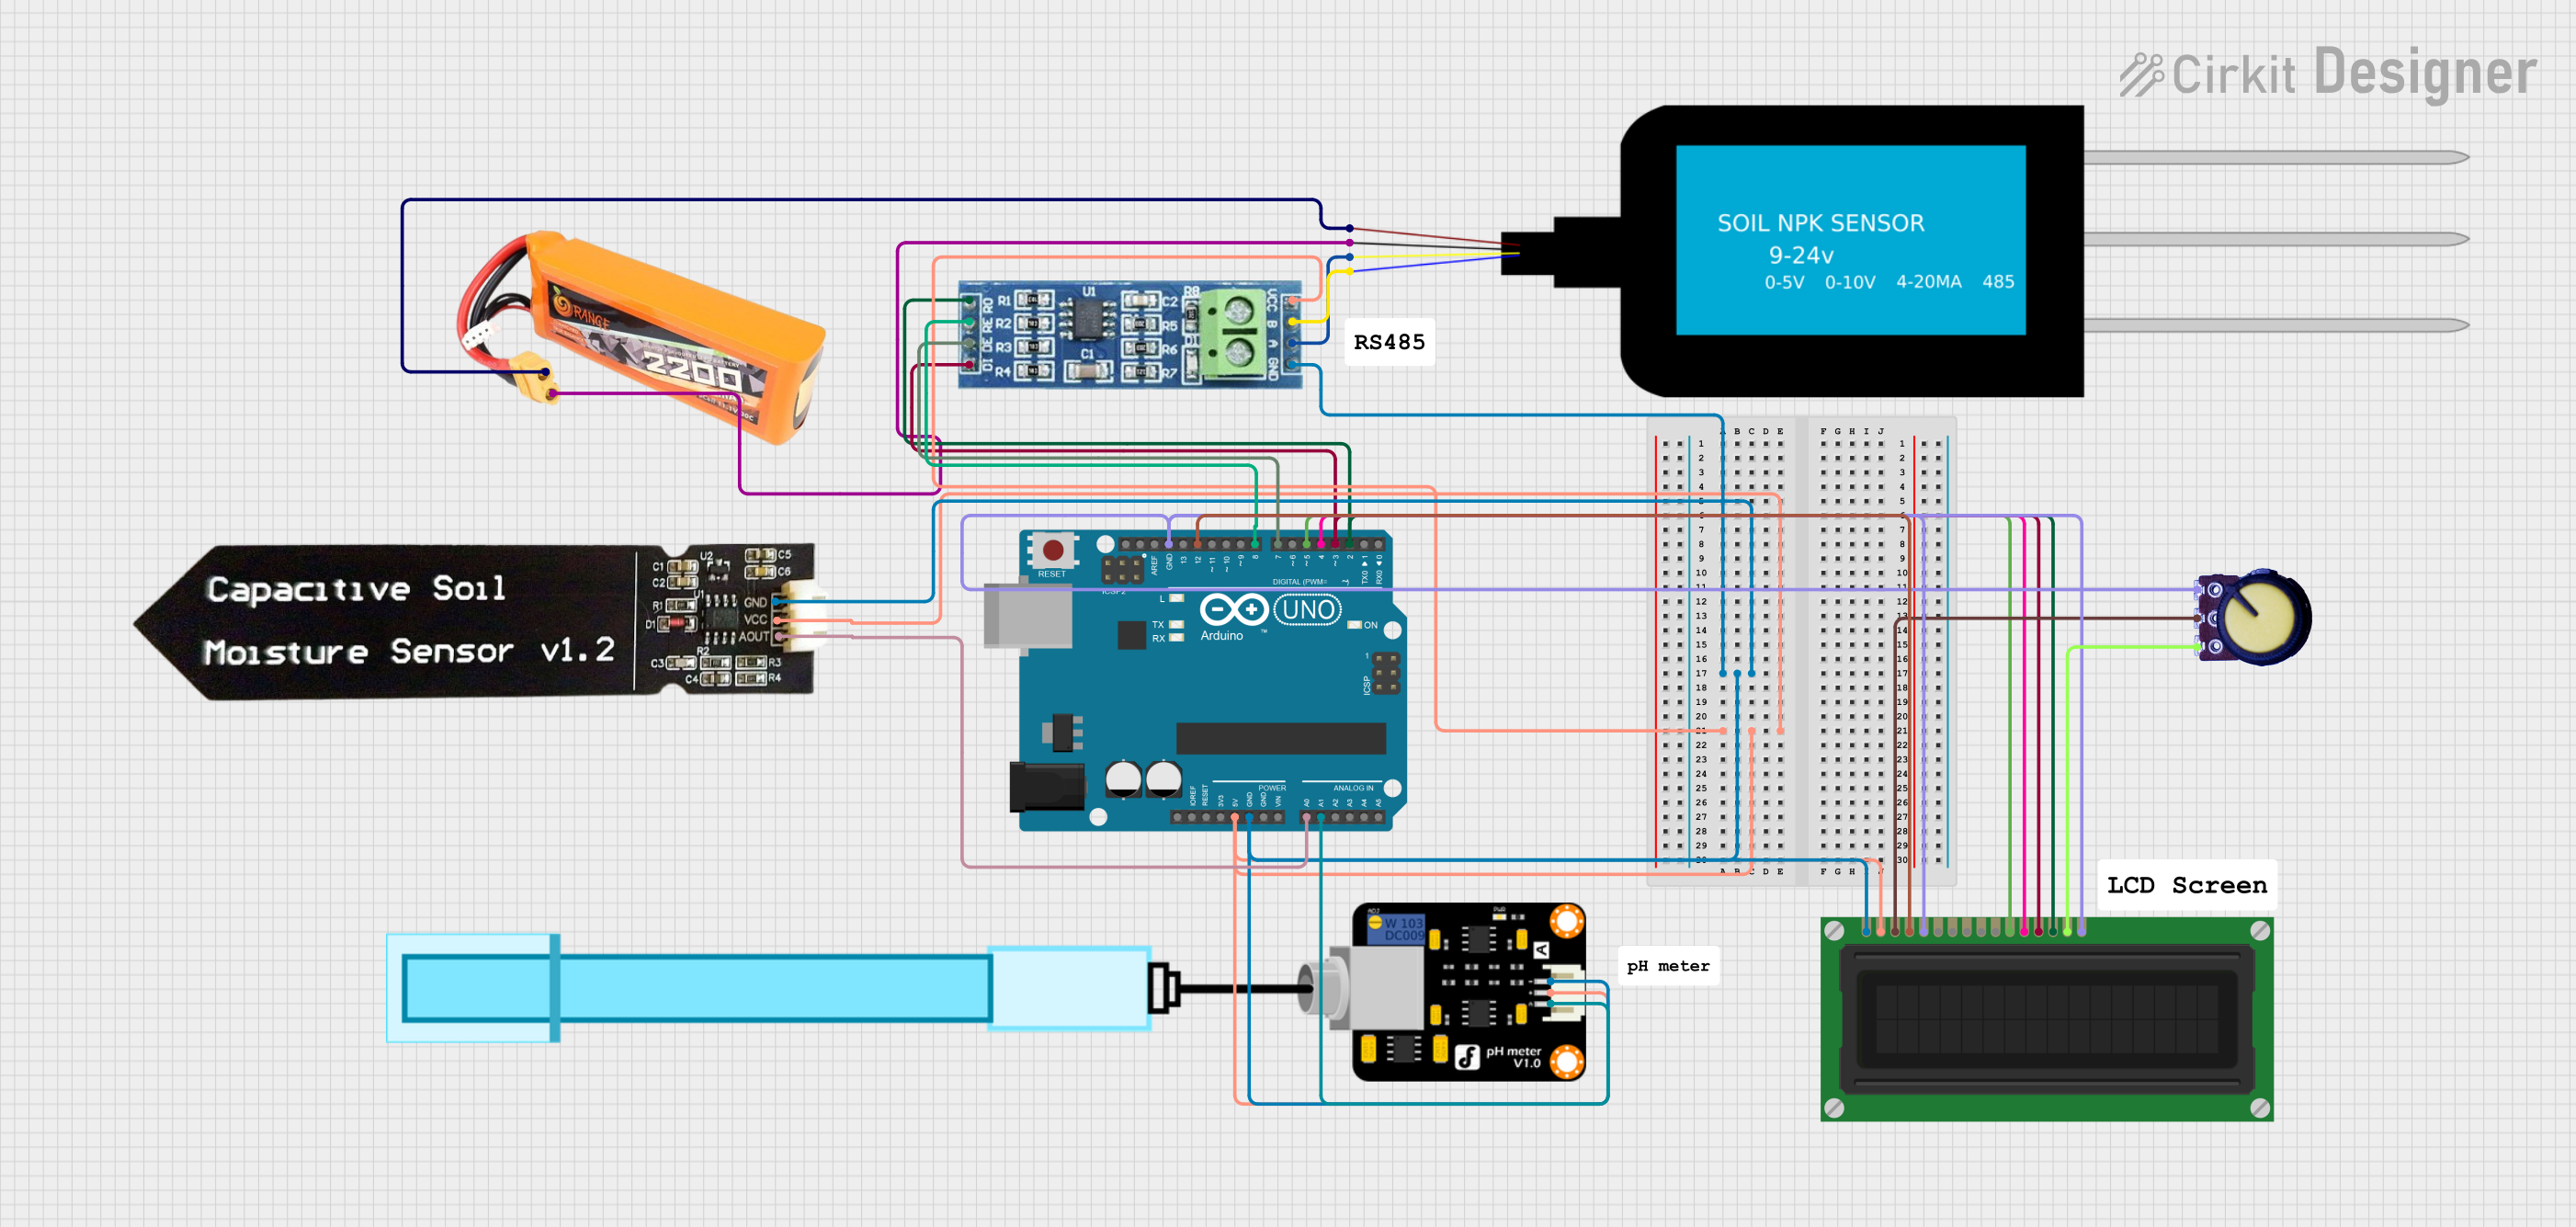
Circuit Documentation
Summary
This circuit is designed to read values from an NPK Soil Sensor using RS485 communication and a Capacitive Soil Moisture Sensor. The sensor values for Nitrogen, Phosphorous, and Potassium are read and printed to the Serial Monitor. The RS485 module is connected to the Arduino UNO. The moisture value is read from the Capacitive Soil Moisture Sensor and printed to the Serial Monitor. Additionally, an LCD Display is used to show the sensor readings, and a potentiometer is used to adjust the contrast of the LCD Display.
Component List
Arduino UNO
- Description: Microcontroller board based on the ATmega328P.
- Pins: UNUSED, IOREF, Reset, 3.3V, 5V, GND, Vin, A0, A1, A2, A3, A4, A5, SCL, SDA, AREF, D13, D12, D11, D10, D9, D8, D7, D6, D5, D4, D3, D2, D1, D0
NPK Soil Sensor
- Description: Sensor to measure Nitrogen, Phosphorous, and Potassium levels in soil.
- Pins: VCC, GND, A, B
Lipo Battery 2200mAH 30c
- Description: Rechargeable lithium polymer battery.
- Pins: VCC, GND
RS485
- Description: Module for RS485 communication.
- Pins: VCC, RO, RE, GND, B, A, DE, DI
Capacitive Soil Moisture Sensor V1.2
- Description: Sensor to measure soil moisture levels.
- Pins: GND, VCC, AOUT
PH Meter
- Description: Sensor to measure pH levels in soil.
- Pins: Signal, VCC, GND
LCD Display (16 pin)
- Description: 16x2 character LCD display.
- Pins: VSS, VDD, VO, RS, R_W, E, DB0, DB1, DB2, DB3, DB4, DB5, DB6, DB7, A, K
Potentiometer
- Description: Variable resistor used to adjust the contrast of the LCD display.
- Pins: GND, Output, VCC
Wiring Details
Arduino UNO
GND connected to:
- Capacitive Soil Moisture Sensor V1.2 (GND)
- RS485 (GND)
- PH Meter (GND)
- LCD Display (VSS)
- Potentiometer (GND)
5V connected to:
- Capacitive Soil Moisture Sensor V1.2 (VCC)
- RS485 (VCC)
- PH Meter (VCC)
- LCD Display (VDD)
A0 connected to:
- Capacitive Soil Moisture Sensor V1.2 (AOUT)
A1 connected to:
- PH Meter (Signal)
D12 connected to:
- LCD Display (RS)
D8 connected to:
- RS485 (RE)
D7 connected to:
- RS485 (DE)
D5 connected to:
- LCD Display (DB4)
D4 connected to:
- LCD Display (DB5)
D3 connected to:
- RS485 (DI)
- LCD Display (DB6)
D2 connected to:
- RS485 (RO)
- LCD Display (DB7)
NPK Soil Sensor
VCC connected to:
- Lipo Battery 2200mAH 30c (VCC)
GND connected to:
- Lipo Battery 2200mAH 30c (GND)
A connected to:
- RS485 (A)
B connected to:
- RS485 (B)
RS485
VCC connected to:
- Arduino UNO (5V)
GND connected to:
- Arduino UNO (GND)
RE connected to:
- Arduino UNO (D8)
DE connected to:
- Arduino UNO (D7)
DI connected to:
- Arduino UNO (D3)
RO connected to:
- Arduino UNO (D2)
A connected to:
- NPK Soil Sensor (A)
B connected to:
- NPK Soil Sensor (B)
Capacitive Soil Moisture Sensor V1.2
GND connected to:
- Arduino UNO (GND)
VCC connected to:
- Arduino UNO (5V)
AOUT connected to:
- Arduino UNO (A0)
PH Meter
Signal connected to:
- Arduino UNO (A1)
VCC connected to:
- Arduino UNO (5V)
GND connected to:
- Arduino UNO (GND)
LCD Display (16 pin)
VSS connected to:
- Arduino UNO (GND)
VDD connected to:
- Arduino UNO (5V)
VO connected to:
- Potentiometer (Output)
RS connected to:
- Arduino UNO (D12)
R_W connected to:
- Arduino UNO (GND)
DB4 connected to:
- Arduino UNO (D5)
DB5 connected to:
- Arduino UNO (D4)
DB6 connected to:
- Arduino UNO (D3)
DB7 connected to:
- Arduino UNO (D2)
A connected to:
- Potentiometer (VCC)
K connected to:
- Arduino UNO (GND)
Potentiometer
GND connected to:
- Arduino UNO (GND)
Output connected to:
- LCD Display (VO)
VCC connected to:
- LCD Display (A)
Code Documentation
#include "SoftwareSerial.h"
#include "Wire.h"

/*
 * This Arduino Sketch reads values from an NPK Soil Sensor using RS485
 * communication and a Capacitive Soil Moisture Sensor. The sensor values for
 * Nitrogen, Phosphorous, and Potassium are read and printed to the Serial
 * Monitor. The RS485 module is connected to the Arduino UNO. The moisture
 * value is read from the Capacitive Soil Moisture Sensor and printed to the
 * Serial Monitor.
 */

#define RE 8
#define DE 7
#define MOISTURE_PIN A0

const byte nitro[] = {0x01, 0x03, 0x00, 0x1e, 0x00, 0x01, 0xe4, 0x0c};
const byte phos[] = {0x01, 0x03, 0x00, 0x1f, 0x00, 0x01, 0xb5, 0xcc};
const byte pota[] = {0x01, 0x03, 0x00, 0x20, 0x00, 0x01, 0x85, 0xc0};

byte values[11];
SoftwareSerial mod(2, 3);

void setup() {
  Serial.begin(9600);
  mod.begin(9600);
  pinMode(RE, OUTPUT);
  pinMode(DE, OUTPUT);
  delay(500);
}

void loop() {
  byte val1, val2, val3;
  val1 = nitrogen();
  delay(250);
  val2 = phosphorous();
  delay(250);
  val3 = potassium();
  delay(250);
  int moisture = analogRead(MOISTURE_PIN);

  Serial.print("Nitrogen: ");
  Serial.print(val1);
  Serial.println(" mg/kg");
  Serial.print("Phosphorous: ");
  Serial.print(val2);
  Serial.println(" mg/kg");
  Serial.print("Potassium: ");
  Serial.print(val3);
  Serial.println(" mg/kg");
  Serial.print("Moisture: ");
  Serial.println(moisture);
  delay(2000);
}

byte nitrogen() {
  digitalWrite(DE, HIGH);
  digitalWrite(RE, HIGH);
  delay(10);
  if (mod.write(nitro, sizeof(nitro)) == 8) {
    digitalWrite(DE, LOW);
    digitalWrite(RE, LOW);
    for (byte i = 0; i < 7; i++) {
      values[i] = mod.read();
      Serial.print(values[i], HEX);
    }
    Serial.println();
  }
  return values[4];
}

byte phosphorous() {
  digitalWrite(DE, HIGH);
  digitalWrite(RE, HIGH);
  delay(10);
  if (mod.write(phos, sizeof(phos)) == 8) {
    digitalWrite(DE, LOW);
    digitalWrite(RE, LOW);
    for (byte i