Arduino-Controlled MP3 Player Circuit
Circuit Documentation
Summary of the Circuit
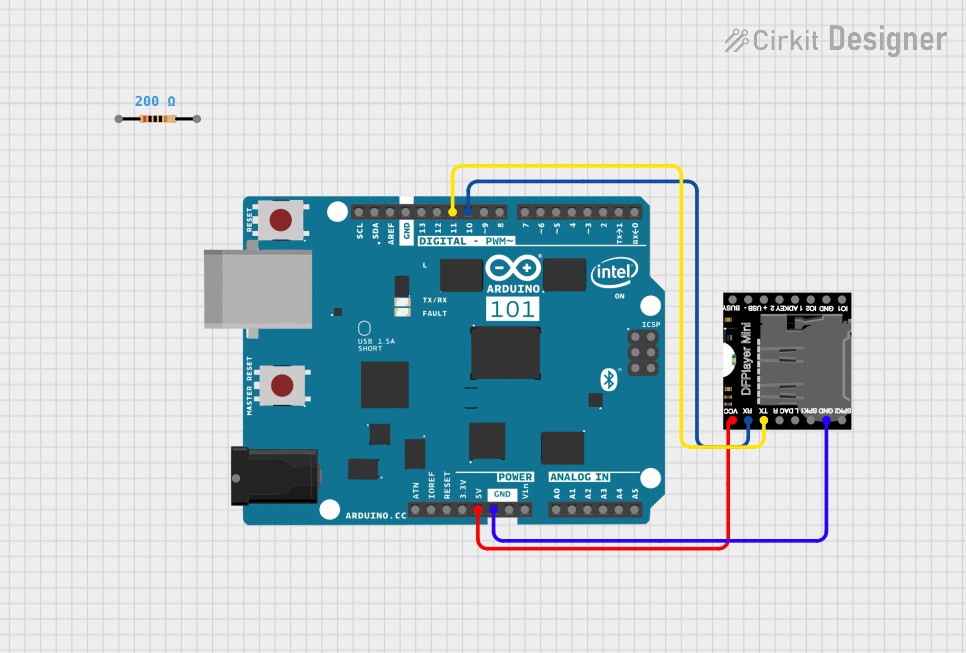
This circuit integrates an Arduino 101 microcontroller board with a DFPlayer Mini MP3 module and includes a resistor. The Arduino 101 is responsible for controlling the DFPlayer Mini, which is an audio playback module. The circuit is designed to send control signals from the Arduino to the DFPlayer Mini to play audio files. Power is supplied to the DFPlayer Mini from the Arduino's 5V output, and the ground is shared between the two devices. The communication between the Arduino and the DFPlayer Mini is established via digital pins configured for serial communication.
Component List
Arduino 101
- Description: A microcontroller board based on the Intel Curie Module, designed for building IoT projects.
- Pins: A5/SCL, A4/SDA, AREF, GND, D13/SCK, D12/MISO, D11 PWM/MOSI, D10 PWM/SS, D9 PWM, D8, D7, D6 PWM, D5 PWM, D4, D3 PWM, D2, D1/TX, D0/RX, AIN, ioref, RESET, 3V3, 5V, VIN, A0, A1, A2, A3, ICSP MISO, ICSP SCK, ICSP MOSI.
Resistor
- Description: A passive two-terminal electrical component that implements electrical resistance as a circuit element.
- Properties: 200 Ohms resistance.
DFPlayer Mini
- Description: A small and low-cost MP3 module that can directly play MP3 files from a microSD card.
- Pins: VCC, BUSY, RX, USB -, TX, USB +, DAC_R, K2/ADC_KEY, DAC_L, K1/ADC_KEY, SPK1, IO 2, GND, SPK2, IO 1.
Wiring Details
Arduino 101
- 5V connected to DFPlayer Mini VCC.
- GND connected to DFPlayer Mini GND.
- D11 PWM/MOSI connected to DFPlayer Mini TX.
- D10 PWM/SS connected to DFPlayer Mini RX.
Resistor
- pin1: (No connection specified)
- pin2: (No connection specified)
DFPlayer Mini
- VCC connected to Arduino 101 5V.
- GND connected to Arduino 101 GND.
- TX connected to Arduino 101 D11 PWM/MOSI.
- RX connected to Arduino 101 D10 PWM/SS.
Documented Code
No code has been provided for the microcontrollers in the circuit. To control the DFPlayer Mini using the Arduino 101, code would need to be written and uploaded to the Arduino. This code would typically initialize serial communication with the DFPlayer Mini, send commands to play audio files, and handle any other required interactions between the Arduino and the DFPlayer Mini.
Please note that the provided documentation is based on the given inputs and assumes that the circuit is designed for basic audio playback functionality. Additional details and functionalities can be documented once the specific requirements and code are provided.