
Arduino-Controlled Line-Following Robot with Ultrasonic Obstacle Detection
View and Edit Project In Cirkit Designer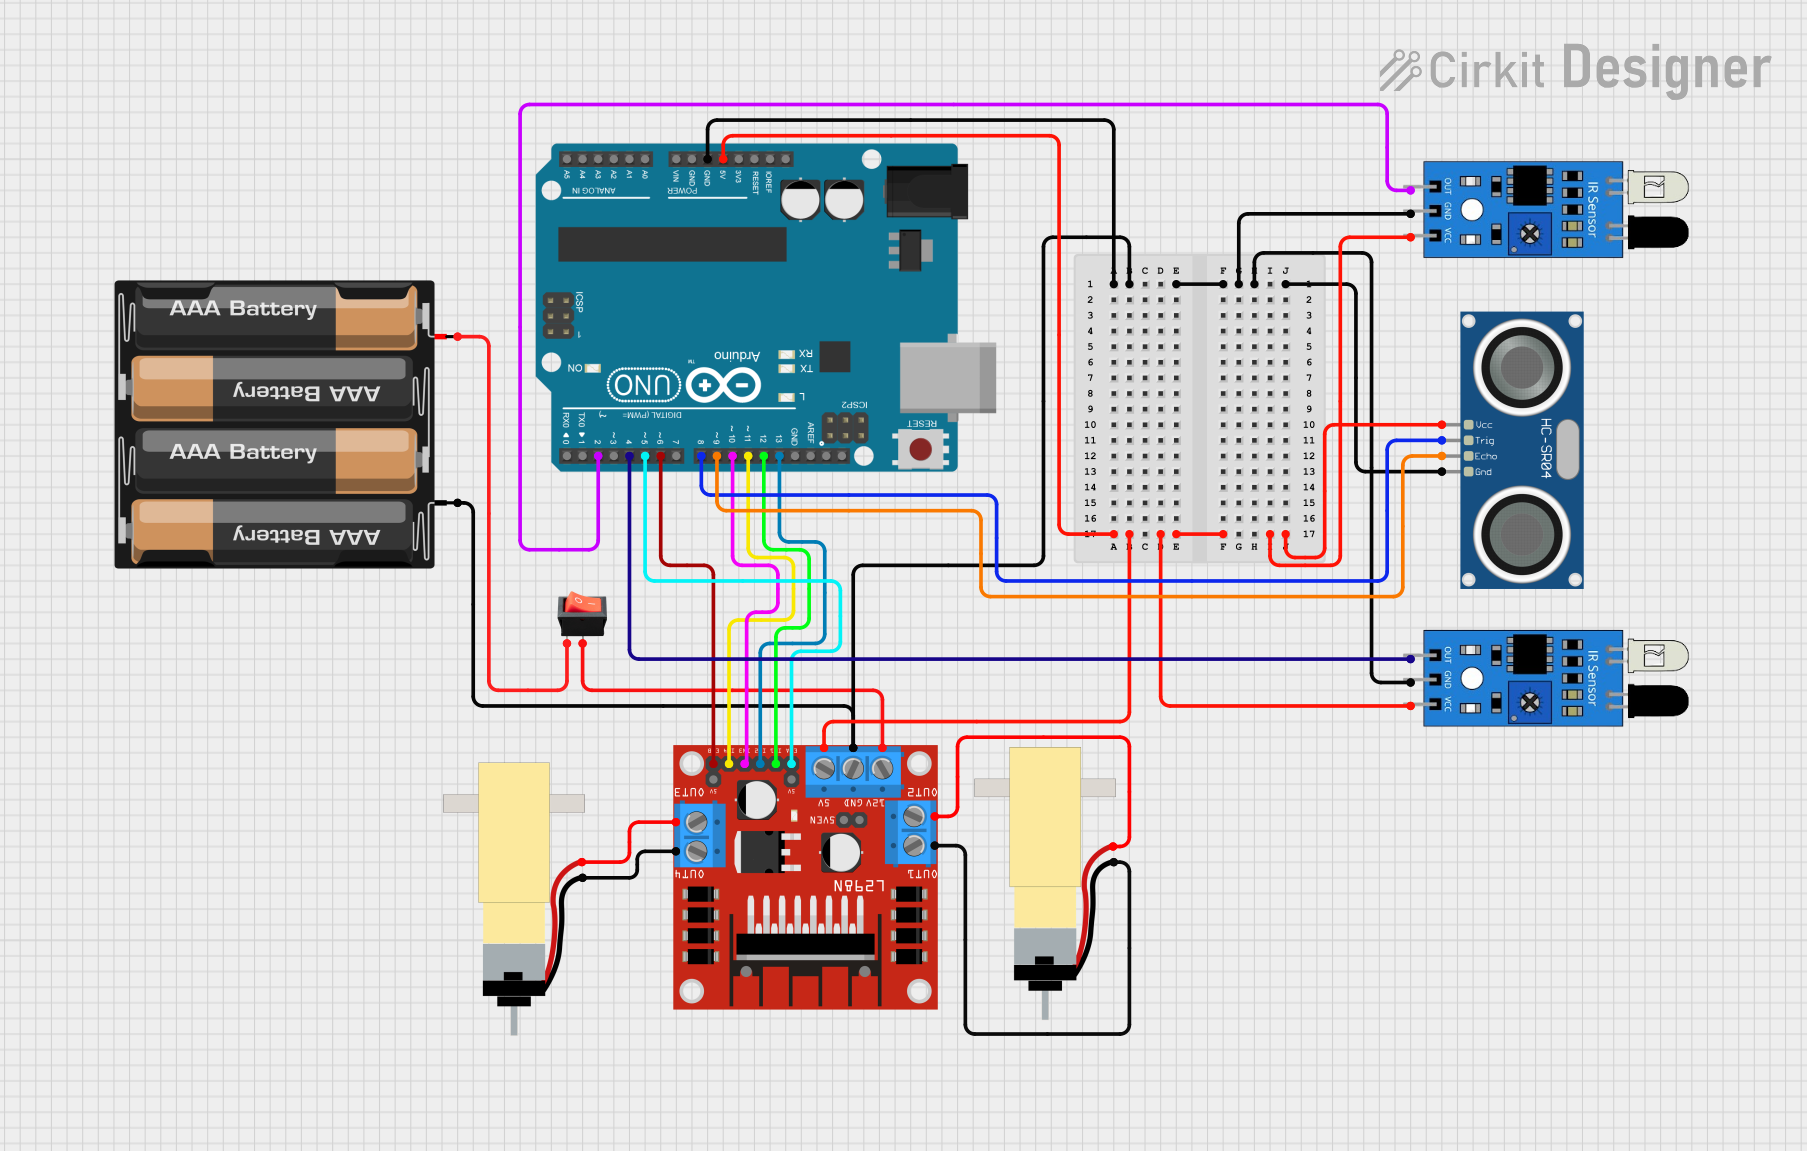
Circuit Documentation
Summary
This circuit is designed to control a pair of hobby gearmotors using an L298N DC motor driver, with an Arduino UNO as the central microcontroller. The system includes ultrasonic distance sensing via an HC-SR04 sensor and line detection using two infrared sensors. A 4 x AAA battery mount provides power, managed by a rocker switch. The Arduino UNO controls the motor driver, reads sensor inputs, and manages the logic for autonomous navigation based on sensor feedback.
Component List
4 x AAA Battery Mount
- Description: Power source for the circuit.
- Purpose: Supplies power to the motor driver and the Arduino UNO.
HC-SR04 Ultrasonic Sensor
- Description: Measures distances using ultrasonic waves.
- Purpose: Provides distance measurements to avoid obstacles.
Arduino UNO
- Description: Microcontroller board based on the ATmega328P.
- Purpose: Acts as the brain of the circuit, controlling motors and reading sensors.
IR Sensor
- Description: Detects the presence of an object based on infrared light.
- Purpose: Used for line detection in navigation.
L298N DC Motor Driver
- Description: Controls the direction and speed of DC motors.
- Purpose: Drives the two hobby gearmotors based on commands from the Arduino UNO.
Rocker Switch
- Description: A simple on/off switch.
- Purpose: Allows power to be cut off or supplied to the circuit.
Hobby Gearmotor with 48:1 Gearbox
- Description: A DC motor with a gearbox for increased torque.
- Purpose: Provides movement to the robot or device.
Wiring Details
4 x AAA Battery Mount
- Connections:
-to L298N DC motor driver GND+to rocker switch input
HC-SR04 Ultrasonic Sensor
- Connections:
VCCto 5V power netGNDto ground netTRIGto Arduino UNO D8ECHOto Arduino UNO D9
Arduino UNO
- Connections:
5VandGNDto respective power nets- Digital pins D2, D4, D5, D6, D8, D9, D10, D11, D12, D13 to various components as per control requirements
IR Sensor
- Connections:
outto Arduino UNO D2 and D4 (for two sensors)gndto ground netvccto 5V power net
L298N DC Motor Driver
- Connections:
GNDto ground net5Vto 5V power net12Vto rocker switch outputIN1,IN2,IN3,IN4to Arduino UNO D12, D13, D10, D11 respectivelyENA,ENBto Arduino UNO D5, D6 respectivelyOUT1,OUT2,OUT3,OUT4to gearmotors
Rocker Switch
- Connections:
inputto battery mount+outputto L298N DC motor driver12V
Hobby Gearmotor with 48:1 Gearbox
- Connections:
pin 1andpin 2to L298N DC motor driverOUT1,OUT2for one motorpin 1andpin 2to L298N DC motor driverOUT3,OUT4for the other motor
Documented Code
// Definición pines EnA y EnB para el control de la velocidad
int VelocidadMotor1 = 6;
int VelocidadMotor2 = 5;

// Definición de los pines de control de giro de los motores In1, In2, In3 e In4
int Motor1A = 13;
int Motor1B = 12;
int Motor2C = 11;
int Motor2D = 10;

// Sensores infrarrojo - izquierdo y derecho
int infraPin  = 2;
int infraPin1 = 4;

// Variables para la captura de los valores: 0 - fondo claro y 1 - línea negra
int valorInfra = 0;
int valorInfra1 = 0;

// Ultrasonicos
#define PIN_TRIG 9
#define PIN_ECHO 8

long duration, distancia;
// Configuración inicial
void setup() {
  Serial.begin(9600);

  delay(1000);
  //configuración del ultrasonico
  pinMode(PIN_TRIG, OUTPUT);
  pinMode(PIN_ECHO, INPUT);
  // Establecemos modo de los pines de los sensores infrarrojo
  pinMode(infraPin, INPUT);
  pinMode(infraPin1, INPUT);

  // Establecemos modo de los pines del control de motores
  pinMode(Motor1A,OUTPUT);
  pinMode(Motor1B,OUTPUT);
  pinMode(Motor2C,OUTPUT);
  pinMode(Motor2D,OUTPUT);
  pinMode(VelocidadMotor1, OUTPUT);
  pinMode(VelocidadMotor2, OUTPUT);

  // Configuramos los dos motores a velocidad 150/255
  analogWrite(VelocidadMotor1, 150);
  analogWrite(VelocidadMotor2, 180);

  // Configuramos sentido de giro
  digitalWrite(Motor1A, LOW);
  digitalWrite(Motor1B, LOW);
  digitalWrite(Motor2C, LOW);
  digitalWrite(Motor2D, LOW);
}

// Ejecución contínua
void loop() {
  // Ultrasonico: Primero, generar un pulso corto de 2-5 microsegundos.
  digitalWrite(PIN_TRIG, LOW);
  delayMicroseconds(5);
  digitalWrite(PIN_TRIG, HIGH);
  // Después de ajustar un nivel de señal alto, esperamos unos 10 microsegundos. En este punto el sensor enviará señales con una frecuencia de 40 kHz.
  delayMicroseconds(10);
  digitalWrite(PIN_TRIG, LOW);
  // Tiempo de retardo de la señal acústica en el sonar.
  duration = pulseIn(PIN_ECHO, HIGH);
  // Ahora es el momento de convertir el tiempo a distancia
  distancia = (duration / 2) / 29.1;
  Serial.print("Distancia al objeto: ");
  Serial.print(distancia);
  Serial.println(" см.");

  // Leemos el valor de los infrarrojo: 0 - fondo claro y 1 - línea negra
  valorInfra = digitalRead(infraPin);
  valorInfra1 = digitalRead(infraPin1);

  Serial.println(valorInfra);
  Serial.println(valorInfra1);
  if (distancia > 10){ //mientras no detecte nada a cierta distancia no se detiene
      // Cuatro escenarios: De frente
      if(valorInfra == 0 && valorInfra1 == 0){
        Serial.println("Ninguno en linea");

        // Modificamos sentido de giro de los motores
        digitalWrite(Motor1A, HIGH);
        digitalWrite(Motor2D, HIGH);
        delay(20);
        digitalWrite(Motor1A, LOW);
        digitalWrite(Motor2D,LOW);
        delay(20);
      }

      // El robot encuentra línea negra con el infrarrojo derecho y hay que corregir girando a la derecha
      if(valorInfra == 0 && valorInfra1 == 1){
        Serial.println("Derecho en linea");

        // Modificamos sentido de giro de los motores
        digitalWrite(Motor1A, LOW);
        digitalWrite(Motor2D,LOW);
        delay(25);
        digitalWrite(Motor1A, HIGH);
        digitalWrite(Motor2D,LOW);
        delay(20);
      }

      // El robot encuentra línea negra con el infrarrojo izquierdo y hay que corregir girando a la izquierda
      if(valorInfra == 1 && valorInfra1 == 0){
        Serial.println("Izquierdo en linea");

        // Modificamos sentido de giro de los motores
        digitalWrite(Motor1A,LOW);
        digitalWrite(Motor2D, LOW);
        delay(25);
        digitalWrite(Motor1A,LOW);
        digitalWrite(Motor2D, HIGH);
        delay(20);
      }

      // Los dos sensores infrarrojos encuentran una línea negra, el final del circuito
      if(valorInfra == 1 && valorInfra1 == 1){
        Serial.println("Ambos en linea");

        // Paramos los motores
        digitalWrite(Motor1A, LOW);
        digitalWrite(Motor1B, LOW);
        digitalWrite