
Arduino UNO-Based Ultrasonic Distance Sensor with OLED Display and SIM900A Communication
View and Edit Project In Cirkit Designer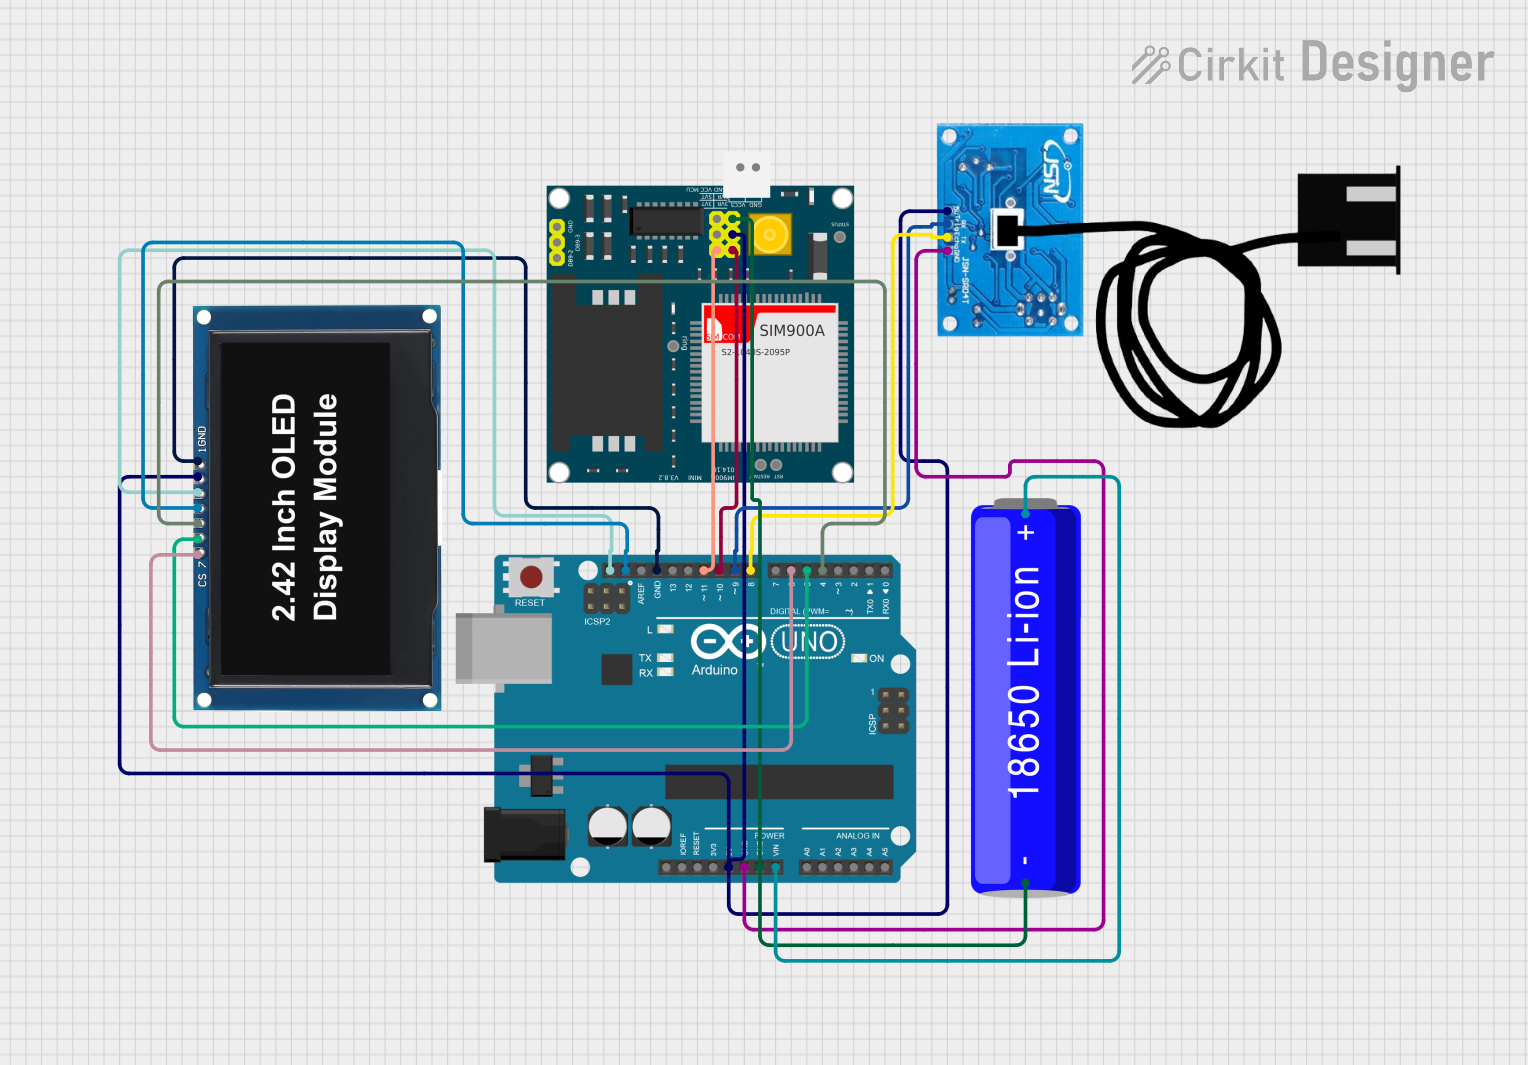
Circuit Documentation
Summary
This circuit integrates an Arduino UNO microcontroller with a JSN-SR04T Ultrasonic Sensor, a SIM900A GSM module, an OLED display, and a 18650 Li-ion Battery. The Arduino UNO serves as the central controller, interfacing with the ultrasonic sensor to measure distance, displaying the measured distance on the OLED display, and transmitting the data via the SIM900A module. The circuit is powered by a 18650 Li-ion Battery.
Component List
JSN-SR04T Ultrasonic Sensor
- Description: Ultrasonic distance sensor
- Pins: 5V, Trig, Echo, GND
Arduino UNO
- Description: Microcontroller board based on the ATmega328P
- Pins: UNUSED, IOREF, Reset, 3.3V, 5V, GND, Vin, A0, A1, A2, A3, A4, A5, SCL, SDA, AREF, D13, D12, D11, D10, D9, D8, D7, D6, D5, D4, D3, D2, D1, D0
18650 Li-ion Battery
- Description: Rechargeable lithium-ion battery
- Pins: -, +
SIM900A
- Description: GSM/GPRS module for communication
- Pins: GND, DB9-3 (RXD), DB9-2 (TXD), 5V, 3VR, 5VR, 3VT, 5VT, VCC, Ring, RESTART, RESET, STATUS
OLED Display 2.42
- Description: 2.42-inch OLED display
- Pins: GND, VCC, SCK, SDA, RES, DC, CS
Wiring Details
JSN-SR04T Ultrasonic Sensor
- 5V connected to Arduino UNO 5V
- Trig connected to Arduino UNO D9
- Echo connected to Arduino UNO D8
- GND connected to Arduino UNO GND
Arduino UNO
- 5V connected to JSN-SR04T Ultrasonic Sensor 5V, OLED Display VCC, SIM900A 5VR
- GND connected to JSN-SR04T Ultrasonic Sensor GND, OLED Display GND, SIM900A GND, 18650 Li-ion Battery -
- Vin connected to 18650 Li-ion Battery +
- D9 connected to JSN-SR04T Ultrasonic Sensor Trig
- D8 connected to JSN-SR04T Ultrasonic Sensor Echo
- SCL connected to OLED Display SCK
- SDA connected to OLED Display SDA
- D11 connected to SIM900A 3VT
- D10 connected to SIM900A 3VR
- D6 connected to OLED Display CS
- D5 connected to OLED Display DC
- D4 connected to OLED Display RES
18650 Li-ion Battery
- + connected to Arduino UNO Vin
- - connected to Arduino UNO GND, SIM900A GND
SIM900A
- 5VR connected to Arduino UNO 5V
- GND connected to Arduino UNO GND, 18650 Li-ion Battery -
- 3VT connected to Arduino UNO D11
- 3VR connected to Arduino UNO D10
OLED Display 2.42
- VCC connected to Arduino UNO 5V
- GND connected to Arduino UNO GND
- SCK connected to Arduino UNO SCL
- SDA connected to Arduino UNO SDA
- CS connected to Arduino UNO D6
- DC connected to Arduino UNO D5
- RES connected to Arduino UNO D4
Code Documentation
Arduino UNO Code
#include <Wire.h>
#include <Adafruit_GFX.h>
#include <Adafruit_SSD1306.h>

#define TRIG_PIN 9
#define ECHO_PIN 8
#define RX_PIN 10
#define TX_PIN 11
#define OLED_RESET 4
Adafruit_SSD1306 display(OLED_RESET);

void setup() {
  // Initialize Serial Monitor
  Serial.begin(9600);

  // Initialize Ultrasonic Sensor
  pinMode(TRIG_PIN, OUTPUT);
  pinMode(ECHO_PIN, INPUT);

  // Initialize SIM900A
  Serial1.begin(9600, SERIAL_8N1, RX_PIN, TX_PIN);

  // Initialize OLED Display
  display.begin(SSD1306_SWITCHCAPVCC, 0x3C);
  display.display();
  delay(2000);
  display.clearDisplay();
}

void loop() {
  // Ultrasonic Sensor Code
  long duration, distance;
  digitalWrite(TRIG_PIN, LOW);
  delayMicroseconds(2);
  digitalWrite(TRIG_PIN, HIGH);
  delayMicroseconds(10);
  digitalWrite(TRIG_PIN, LOW);
  duration = pulseIn(ECHO_PIN, HIGH);
  distance = (duration / 2) / 29.1;

  // Display distance on OLED
  display.clearDisplay();
  display.setTextSize(1);
  display.setTextColor(WHITE);
  display.setCursor(0,0);
  display.print("Distance: ");
  display.print(distance);
  display.println(" cm");
  display.display();

  // Send data via SIM900A
  Serial1.print("Distance: ");
  Serial1.print(distance);
  Serial1.println(" cm");

  delay(1000);
}
This code initializes the ultrasonic sensor, SIM900A module, and OLED display. It measures the distance using the ultrasonic sensor, displays the distance on the OLED, and sends the distance data via the SIM900A module. The loop continuously performs these tasks with a delay of 1 second between each iteration.