
Arduino UNO Bluetooth-Controlled Audio Player with I2C LCD Display
View and Edit Project In Cirkit Designer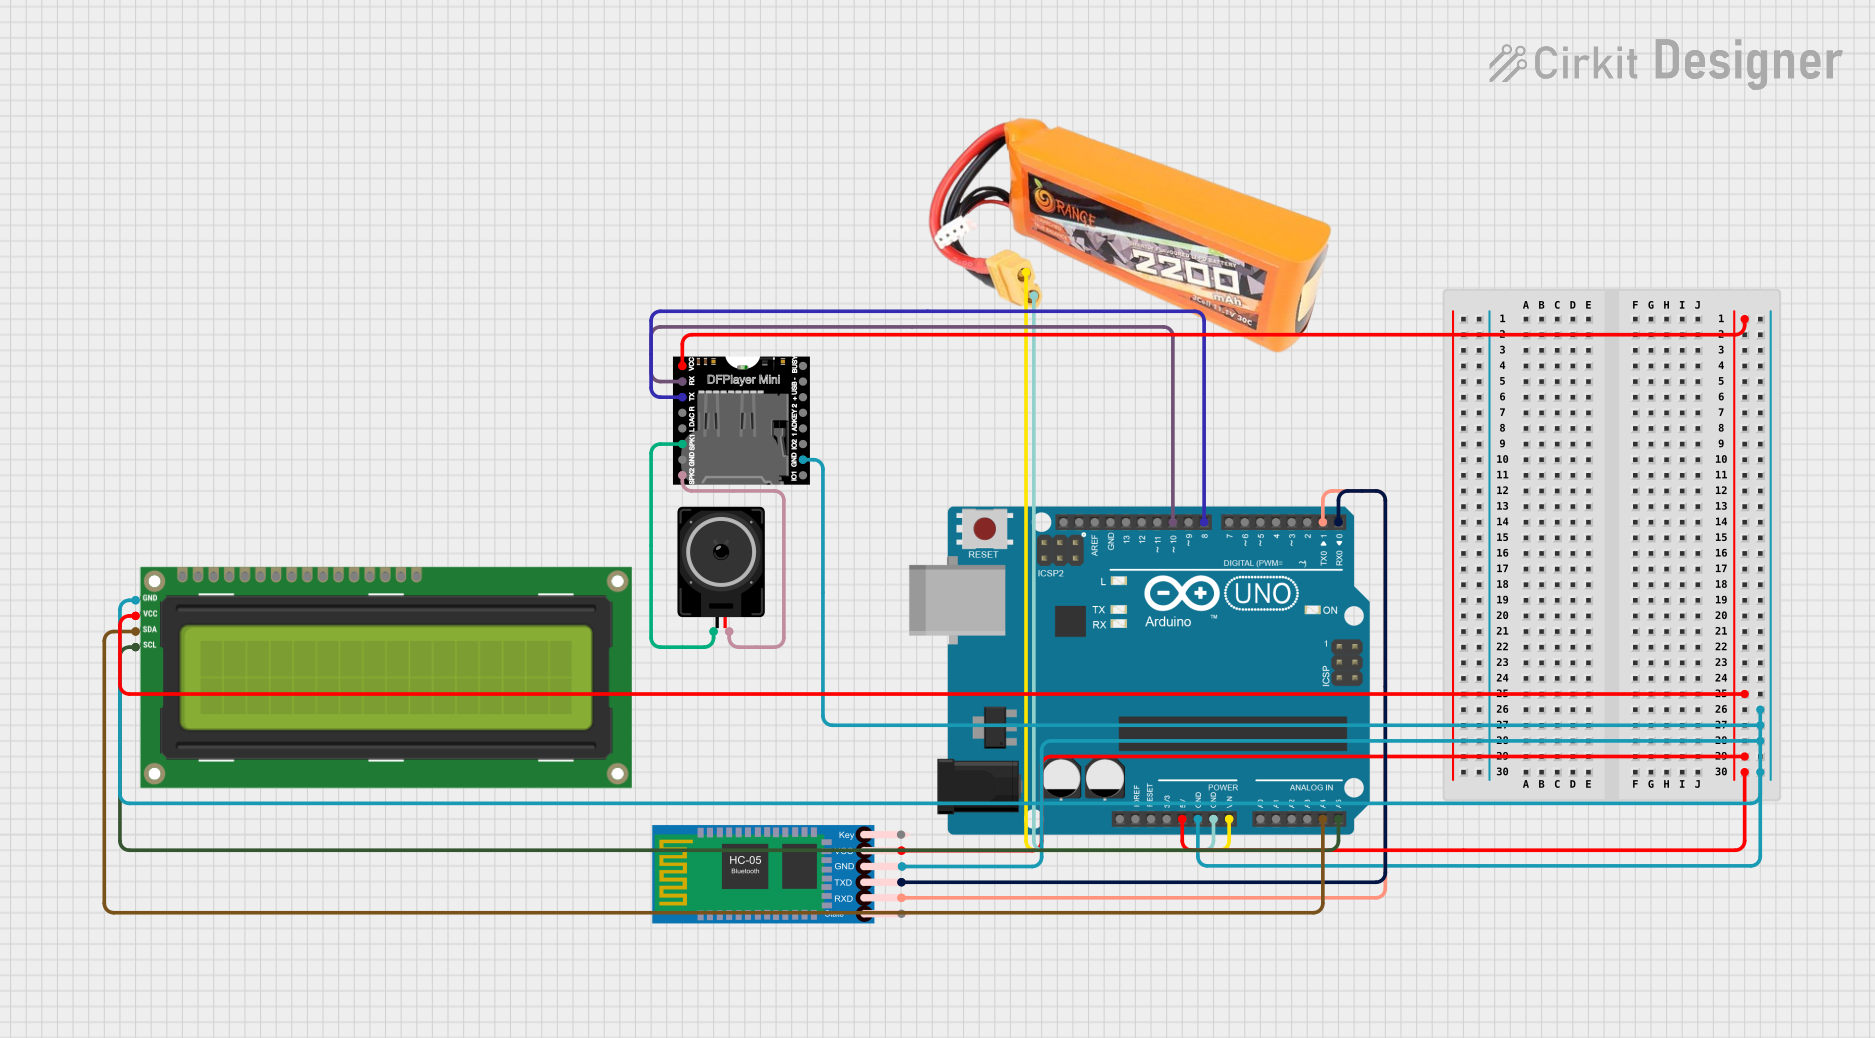
Circuit Documentation
Summary
This circuit integrates an Arduino UNO with a variety of components including a lipo battery, HC-05 Bluetooth Module, DFPlayer MINI, a Loudspeaker, and an I2C LCD 16x2 Screen. The Arduino UNO serves as the central microcontroller, interfacing with the Bluetooth module for wireless communication, the DFPlayer MINI for audio playback, and the LCD screen for display purposes. The lipo battery provides power to the system, and the loudspeaker is used for audio output from the DFPlayer MINI.
Component List
Arduino UNO
A microcontroller board based on the ATmega328P. It has digital input/output pins, analog inputs, a USB connection for programming the board, a power jack, an ICSP header, and a reset button.
Lipo Battery 2200mAH 30C
A rechargeable battery that provides a power source for the circuit.
HC-05 Bluetooth Module
A Bluetooth module that allows for wireless communication with other Bluetooth-enabled devices.
DFPlayer MINI
A small and low-cost MP3 module that can directly play MP3 files stored on a microSD card.
Loudspeaker
An electroacoustic transducer that converts an electrical audio signal into a corresponding sound.
I2C LCD 16x2 Screen
A 16x2 character LCD display that uses the I2C communication protocol for displaying text and characters.
Wiring Details
Arduino UNO
- 5V: Provides power to the DFPlayer MINI, I2C LCD 16x2 Screen, and HC-05 Bluetooth Module.
- GND: Common ground for the DFPlayer MINI, I2C LCD 16x2 Screen, HC-05 Bluetooth Module, and lipo battery.
- Vin: Connected to the VCC of the lipo battery for power input.
- A4 (SDA): Connected to the SDA pin of the I2C LCD 16x2 Screen for I2C data.
- A5 (SCL): Connected to the SCL pin of the I2C LCD 16x2 Screen for I2C clock.
- D10: Connected to the RX pin of the DFPlayer MINI for serial communication.
- D8: Connected to the TX pin of the DFPlayer MINI for serial communication.
- D1 (TX): Connected to the RXD pin of the HC-05 Bluetooth Module for serial communication.
- D0 (RX): Connected to the TXD pin of the HC-05 Bluetooth Module for serial communication.
Lipo Battery 2200mAH 30C
- VCC: Connected to the Vin pin of the Arduino UNO.
- GND: Connected to the GND pin of the Arduino UNO.
HC-05 Bluetooth Module
- VCC: Powered by the 5V output from the Arduino UNO.
- GND: Common ground with the Arduino UNO.
- TXD: Connected to the D0 (RX) pin of the Arduino UNO.
- RXD: Connected to the D1 (TX) pin of the Arduino UNO.
DFPlayer MINI
- VCC: Powered by the 5V output from the Arduino UNO.
- GND: Common ground with the Arduino UNO.
- RX: Connected to the D10 pin of the Arduino UNO.
- TX: Connected to the D8 pin of the Arduino UNO.
- SPK1: Connected to pin1 of the Loudspeaker.
- SPK2: Connected to pin2 of the Loudspeaker.
Loudspeaker
- Pin1: Connected to the SPK1 pin of the DFPlayer MINI.
- Pin2: Connected to the SPK2 pin of the DFPlayer MINI.
I2C LCD 16x2 Screen
- VCC (5V): Powered by the 5V output from the Arduino UNO.
- GND: Common ground with the Arduino UNO.
- SDA: Connected to the A4 (SDA) pin of the Arduino UNO.
- SCL: Connected to the A5 (SCL) pin of the Arduino UNO.
Documented Code
Arduino UNO Code (sketch.ino)
void setup() {
  // put your setup code here, to run once:

}

void loop() {
  // put your main code here, to run repeatedly:

}
This code is a template for the Arduino UNO and does not contain any functional code. It consists of two primary functions: setup(), which runs once when the microcontroller is reset or powered on, and loop(), which runs continuously after setup() has completed. The user is expected to fill in these functions with the code necessary to control the connected components.