
Circuit Documentation
Summary
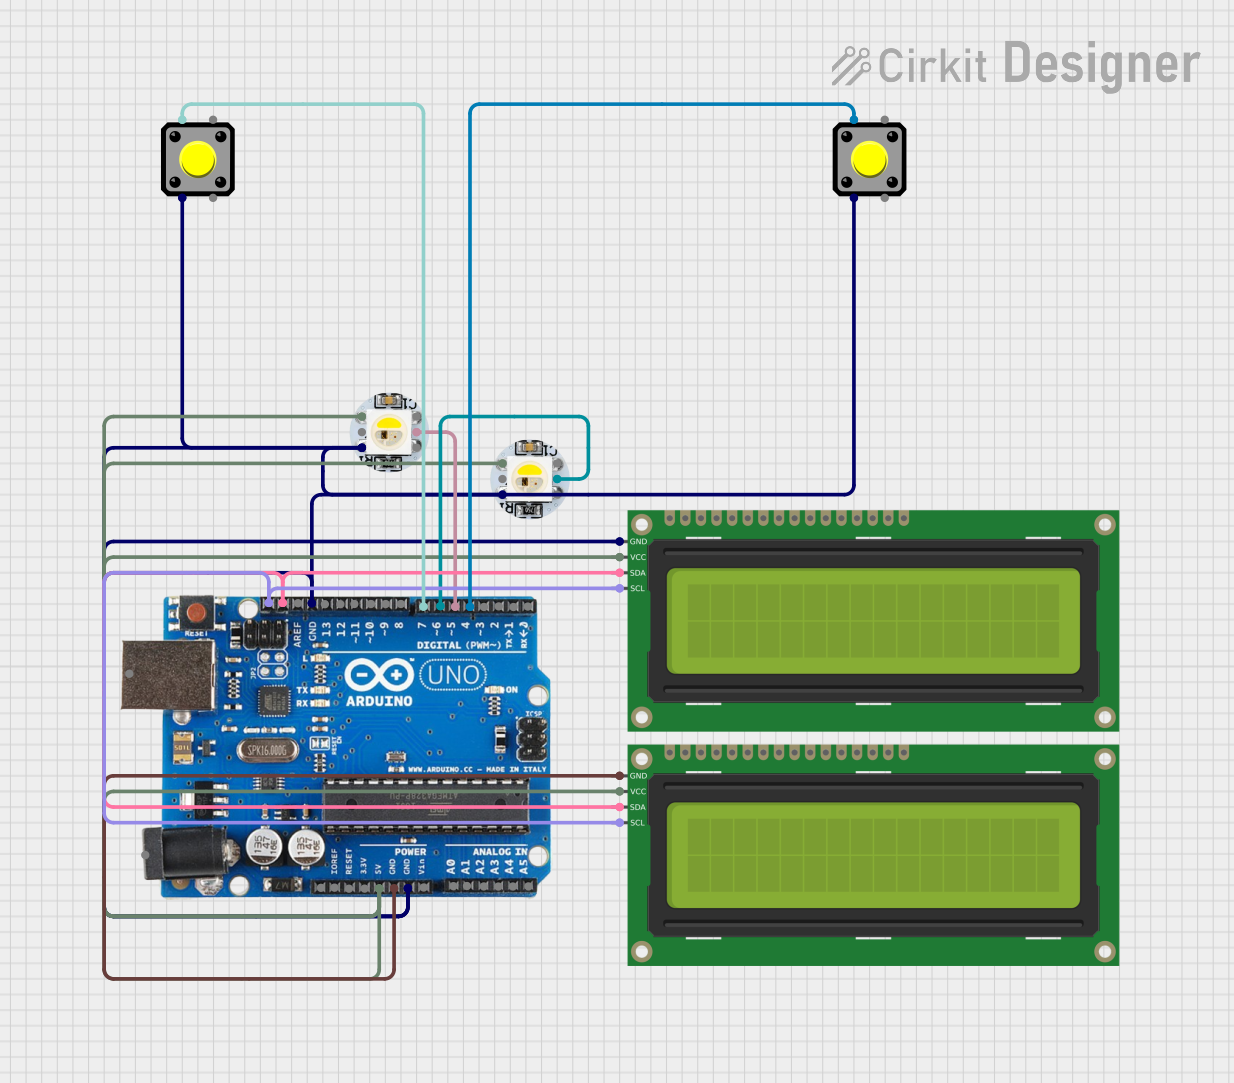
This circuit consists of an Arduino Uno R3 microcontroller, two WS2812B White LEDs, two 16x2 I2C LCDs, and two pushbuttons. The Arduino Uno controls the LEDs and LCDs, and it reads input from the pushbuttons. The circuit is designed to run a simple game where the user presses buttons to score points based on the color displayed by the LEDs.
Component List
WS2812B White LED
- Description: Individually addressable RGB LED.
- Pins: 5V, GND, DIn, DOut
16x2 I2C LCD
- Description: 16x2 character LCD with I2C interface.
- Pins: GND, VCC, SDA, SCL
Arduino Uno R3
- Description: Microcontroller board based on the ATmega328P.
- Pins: D8, D9, D10, D11, D12, D13, GND, AREF, SDA, SCL, D0/RX, D1/Tx, D2, D3, D4, D5, 6, D7, A5/SCL, A4/SDA, A3, A2, A1, A0, Vin, 5V, 3.3V, RESET, IOREF, NONE, USB Jack, Power Jack
Pushbutton
- Description: Simple pushbutton switch.
- Pins: Pin 2, Pin 1, Pin 3, Pin 4
Wiring Details
WS2812B White LED
LED 1
- 5V: Connected to 5V (Arduino Uno R3)
- GND: Connected to GND (Arduino Uno R3)
- DIn: Connected to D5 (Arduino Uno R3)
- DOut: Not connected
LED 2
- 5V: Connected to 5V (Arduino Uno R3)
- GND: Connected to GND (Arduino Uno R3)
- DIn: Connected to 6 (Arduino Uno R3)
- DOut: Not connected
16x2 I2C LCD
LCD 1
- GND: Connected to GND (Arduino Uno R3)
- VCC: Connected to 5V (Arduino Uno R3)
- SDA: Connected to SDA (Arduino Uno R3)
- SCL: Connected to SCL (Arduino Uno R3)
LCD 2
- GND: Connected to GND (Arduino Uno R3)
- VCC: Connected to 5V (Arduino Uno R3)
- SDA: Connected to SDA (Arduino Uno R3)
- SCL: Connected to SCL (Arduino Uno R3)
Arduino Uno R3
- 5V: Connected to 5V (WS2812B White LED 1, WS2812B White LED 2, 16x2 I2C LCD 1, 16x2 I2C LCD 2)
- GND: Connected to GND (WS2812B White LED 1, WS2812B White LED 2, 16x2 I2C LCD 1, 16x2 I2C LCD 2, Pushbutton 1, Pushbutton 2)
- D5: Connected to DIn (WS2812B White LED 1)
- D4: Connected to Pin 1 (Pushbutton 1)
- 6: Connected to DIn (WS2812B White LED 2)
- D7: Connected to Pin 1 (Pushbutton 2)
- SDA: Connected to SDA (16x2 I2C LCD 1, 16x2 I2C LCD 2)
- SCL: Connected to SCL (16x2 I2C LCD 1, 16x2 I2C LCD 2)
Pushbutton
Pushbutton 1
- Pin 1: Connected to D4 (Arduino Uno R3)
- Pin 2: Connected to GND (Arduino Uno R3)
- Pin 3: Not connected
- Pin 4: Not connected
Pushbutton 2
- Pin 1: Connected to D7 (Arduino Uno R3)
- Pin 2: Connected to GND (Arduino Uno R3)
- Pin 3: Not connected
- Pin 4: Not connected
Code Documentation
#include <Adafruit_NeoPixel.h>
#include <Wire.h>
#include <LiquidCrystal_I2C.h>

// Define pins
#define LED_PIN 6
#define BUTTON_RED_PIN 4
#define BUTTON_GREEN_PIN 7

// Define number of LEDs
#define NUM_LEDS 2

// Create NeoPixel object
Adafruit_NeoPixel strip = Adafruit_NeoPixel(NUM_LEDS, LED_PIN, NEO_GRB + NEO_KHZ800);

// Create LCD object
LiquidCrystal_I2C lcd(0x27, 16, 2);

// Variables for game
int score = 0;
unsigned long startTime;
unsigned long gameTime = 30000; // 30 seconds
bool gameRunning = false;
int currentColor = 0; // 0 = none, 1 = red, 2 = green

void setup() {
  // Initialize LED strip
  strip.begin();
  strip.show();

  // Initialize LCD
  lcd.begin();
  lcd.backlight();

  // Initialize buttons
  pinMode(BUTTON_RED_PIN, INPUT_PULLUP);
  pinMode(BUTTON_GREEN_PIN, INPUT_PULLUP);

  // Display start message
  lcd.setCursor(0, 0);
  lcd.print("Press button");
  lcd.setCursor(0, 1);
  lcd.print("to start");
}

void loop() {
  if (!gameRunning) {
    if (digitalRead(BUTTON_RED_PIN) == LOW || digitalRead(BUTTON_GREEN_PIN) == LOW) {
      startGame();
    }
  } else {
    unsigned long currentTime = millis();
    if (currentTime - startTime >= gameTime) {
      endGame();
    } else {
      updateGame();
    }
  }
}

void startGame() {
  gameRunning = true;
  score = 0;
  startTime = millis();
  lcd.clear();
  lcd.setCursor(0, 0);
  lcd.print("Time: 30");
  lcd.setCursor(0, 1);
  lcd.print("Score: 0");
  nextColor();
}

void endGame() {
  gameRunning = false;
  strip.clear();
  strip.show();
  lcd.clear();
  lcd.setCursor(0, 0);
  lcd.print("Game Over!");
  lcd.setCursor(0, 1);
  lcd.print("Score: ");
  lcd.print(score);
}

void updateGame() {
  unsigned long currentTime = millis();
  int remainingTime = (gameTime - (currentTime - startTime)) / 1000;
  lcd.setCursor(5, 0);
  lcd.print(remainingTime);

  if (digitalRead(BUTTON_RED_PIN) == LOW && currentColor == 1) {
    score++;
    nextColor();
  } else if (digitalRead(BUTTON_GREEN_PIN) == LOW && currentColor == 2) {
    score++;
    nextColor();
  }

  lcd.setCursor(7, 1);
  lcd.print(score);
}

void nextColor() {
  currentColor = random(1, 3); // 1 = red, 2 = green
  strip.clear();
  if (currentColor == 1) {
    strip.setPixelColor(0, strip.Color(255, 0, 0));
  } else {
    strip.setPixelColor(0, strip.Color(0, 255, 0));
  }
  strip.show();
}
This code initializes the components and runs a simple game where the user presses buttons to score points based on the color displayed by the LEDs. The game runs for 30 seconds, and the score is displayed on the LCD.