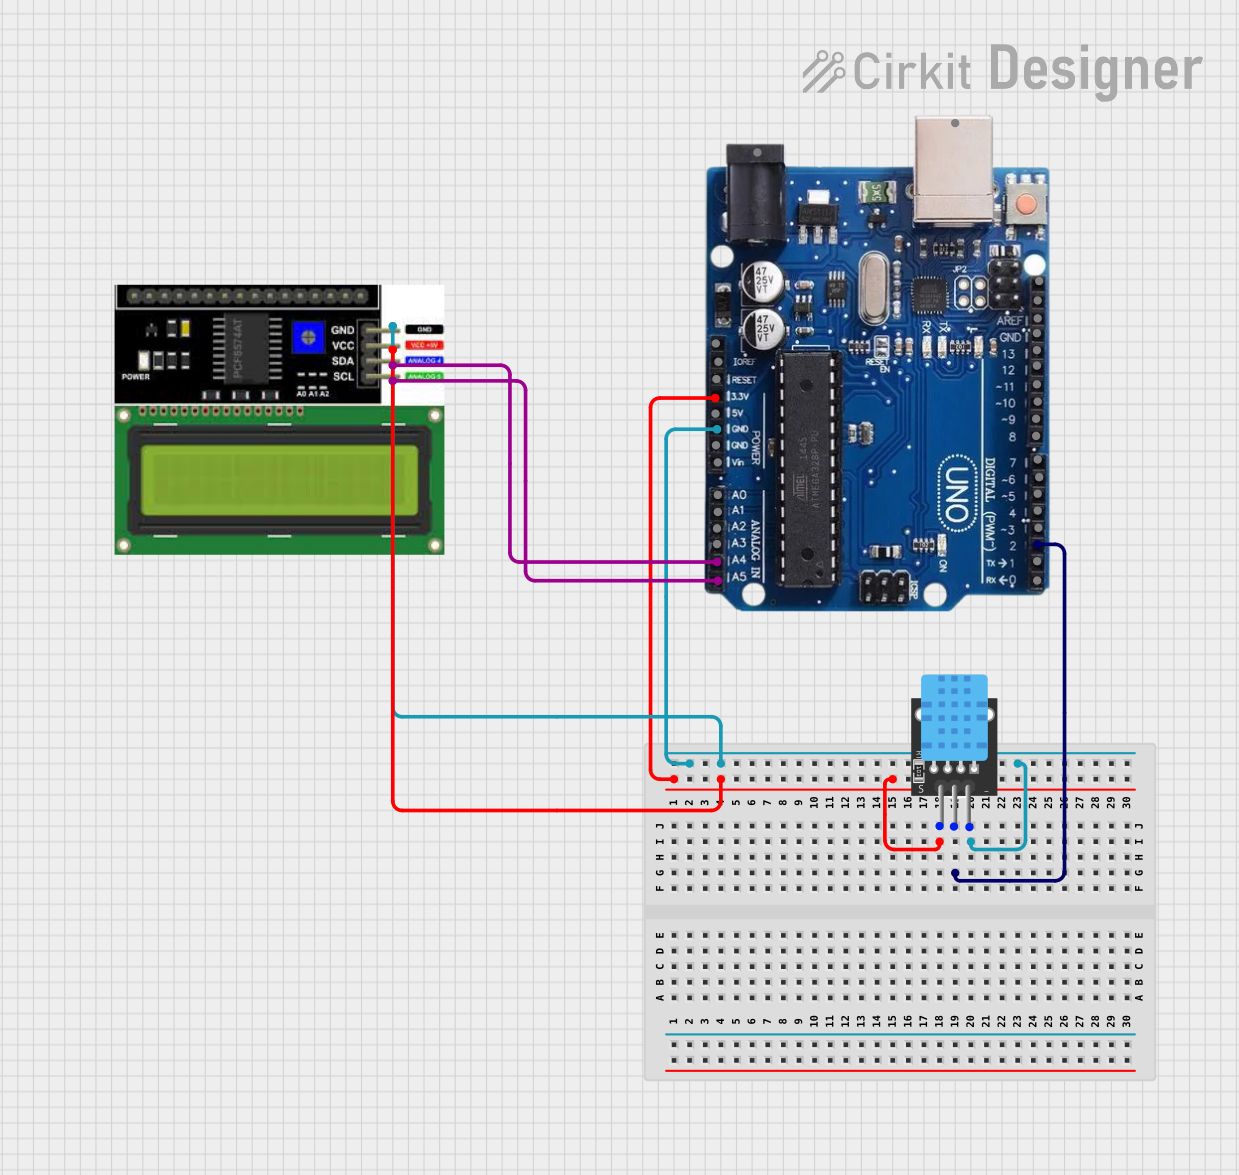
Arduino Uno R3 with DHT11 Sensor and LCD I2C Display Temperature and Humidity Monitor

Circuit Documentation
Summary
This circuit integrates a DHT11 temperature and humidity sensor, an Arduino Uno R3 microcontroller, and an LCD I2C display to create a digital thermometer and hygrometer. The Arduino Uno R3 reads the temperature and humidity data from the DHT11 sensor and displays the values on the LCD screen. The LCD uses the I2C communication protocol to minimize the wiring complexity and pin usage on the Arduino.
Component List
DHT11 Temperature and Humidity Sensor
- Pins: 5V, S (Signal), GND
- Description: The DHT11 is a basic, ultra low-cost digital temperature and humidity sensor. It uses a capacitive humidity sensor and a thermistor to measure the surrounding air and outputs a digital signal on the data pin.
Arduino Uno R3 Microcontroller
- Pins: USB Port, Power Jack, IOREF, RESET, 3.3V, 5V, GND, VIN, Analog Pins (A0-A5), Digital Pins (0-13), I2C Pins (SDA, SCL), AREF
- Description: The Arduino Uno R3 is a microcontroller board based on the ATmega328P. It has 14 digital input/output pins, 6 analog inputs, a 16 MHz quartz crystal, a USB connection, a power jack, an ICSP header, and a reset button.
LCD I2C Display
- Pins: GND, VCC, SDA, SCL
- Description: This is a liquid crystal display that can show 2 lines of 16 characters each. It has an integrated I2C interface which makes it easy to communicate with microcontrollers like the Arduino Uno.
Wiring Details
DHT11 Temperature and Humidity Sensor
- 5V: Connected to the 5V output from the Arduino Uno.
- S (Signal): Connected to digital pin 2 on the Arduino Uno.
- GND: Connected to the ground pin on the Arduino Uno.
Arduino Uno R3 Microcontroller
- 5V: Provides power to the DHT11 sensor and the LCD display.
- GND: Common ground for the circuit.
- Digital Pin 2: Receives the signal from the DHT11 sensor.
- Analog Pin A4 (SDA): Connected to the SDA pin on the LCD display for I2C communication.
- Analog Pin A5 (SCL): Connected to the SCL pin on the LCD display for I2C communication.
LCD I2C Display
- GND: Connected to the ground pin on the Arduino Uno.
- VCC: Connected to the 5V output from the Arduino Uno.
- SDA: Connected to the SDA pin (A4) on the Arduino Uno for I2C communication.
- SCL: Connected to the SCL pin (A5) on the Arduino Uno for I2C communication.
Documented Code
Arduino Uno R3 Microcontroller Code
#include <Wire.h>
#include <LiquidCrystal_I2C.h>
#include "DHT.h"

#define DHTPIN 2          // Define the pin connected to the DHT sensor
#define DHTTYPE DHT11     // Define the type of DHT sensor

DHT dht(DHTPIN, DHTTYPE); // Initialize the DHT sensor

LiquidCrystal_I2C lcd(0x27,16,2); // Initialize the LCD display with I2C address 0x27

void setup() {
  dht.begin(); // Start the DHT sensor
  lcd.init();  // Initialize the LCD
  lcd.backlight(); // Turn on the backlight
  lcd.clear(); // Clear the display

  // Set the cursor to the beginning of the first line
  lcd.setCursor(0,0);
  lcd.print("Temp:"); // Print "Temp:" on the first line
  // Set the cursor to the beginning of the second line
  lcd.setCursor(0,1);
  lcd.print("Humid:"); // Print "Humid:" on the second line
}

void loop() {
  delay(1500); // Wait for 1.5 seconds between readings

  // Read humidity and temperature values
  float h = dht.readHumidity();
  float t = dht.readTemperature();

  // Check if any reads failed and exit early (to try again).
  if (isnan(h) || isnan(t)) {
    return;
  }

  // Set the cursor to the position after "Temp:" on the first line
  lcd.setCursor(7, 0);
  lcd.print(t); // Print the temperature value
  // Set the cursor to the position after "Humid:" on the second line
  lcd.setCursor(7, 1);
  lcd.print(h); // Print the humidity value
}
This code is responsible for initializing the DHT11 sensor and the LCD display, reading temperature and humidity data from the sensor, and displaying the values on the LCD. The setup() function runs once when the microcontroller is powered on or reset, and the loop() function runs continuously, updating the display with new sensor readings every 1.5 seconds.