
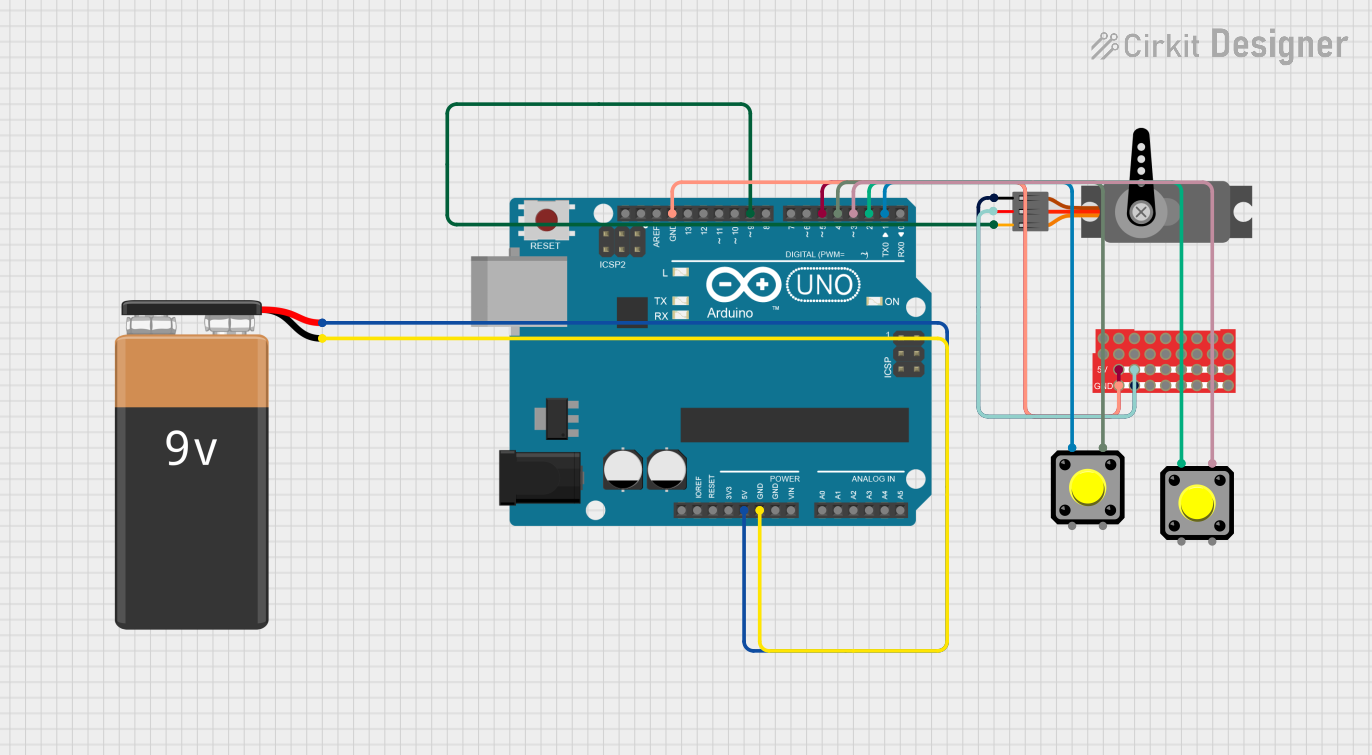
Circuit Documentation
Summary
This circuit involves an Arduino UNO microcontroller, a 9V battery, a servo motor, a ProtoSnap Pro Mini Protoboard, and two pushbuttons. The Arduino UNO is powered by the 9V battery and controls the servo motor. The ProtoSnap Pro Mini Protoboard is used for additional connections, and the pushbuttons are used to control the speed of the servo motor.
Component List
Arduino UNO
- Description: A microcontroller board based on the ATmega328P.
- Pins: UNUSED, IOREF, Reset, 3.3V, 5V, GND, Vin, A0, A1, A2, A3, A4, A5, SCL, SDA, AREF, D13, D12, D11, D10, D9, D8, D7, D6, D5, D4, D3, D2, D1, D0
9V Battery
- Description: A standard 9V battery used to power the circuit.
- Pins: -, +
Servo
- Description: A servo motor used for precise control of angular position.
- Pins: GND, VCC, PWM
ProtoSnap - Pro Mini - Protoboard
- Description: A prototyping board used for making additional connections.
- Pins: pin1, pin10, pin2, pin11, pin19, pin27, pin3, pin12, pin20, pin28, pin4, pin13, pin21, pin29, pin5, pin14, pin22, pin30, pin6, pin15, pin23, pin31, pin7, pin16, pin24, pin32, pin8, pin17, pin25, pin33, pin9, pin18, pin26, pin34
Pushbutton (1)
- Description: A pushbutton used to control the speed of the servo motor.
- Pins: Pin 2, Pin 1, Pin 3, Pin 4
Pushbutton (2)
- Description: Another pushbutton used to control the speed of the servo motor.
- Pins: Pin 2, Pin 1, Pin 3, Pin 4
Wiring Details
Arduino UNO
- 5V connected to + of the 9V Battery
- GND connected to - of the 9V Battery
- GND connected to pin27 of the ProtoSnap - Pro Mini - Protoboard
- D9 connected to PWM of the Servo
- D5 connected to pin19 of the ProtoSnap - Pro Mini - Protoboard
- D4 connected to Pin 4 of Pushbutton (1)
- D3 connected to Pin 4 of Pushbutton (2)
- D2 connected to Pin 1 of Pushbutton (2)
- D1 connected to Pin 1 of Pushbutton (1)
9V Battery
- + connected to 5V of the Arduino UNO
- - connected to GND of the Arduino UNO
Servo
- PWM connected to D9 of the Arduino UNO
- GND connected to pin28 of the ProtoSnap - Pro Mini - Protoboard
- VCC connected to pin20 of the ProtoSnap - Pro Mini - Protoboard
ProtoSnap - Pro Mini - Protoboard
- pin27 connected to GND of the Arduino UNO
- pin19 connected to D5 of the Arduino UNO
- pin28 connected to GND of the Servo
- pin20 connected to VCC of the Servo
Pushbutton (1)
- Pin 4 connected to D4 of the Arduino UNO
- Pin 1 connected to D1 of the Arduino UNO
Pushbutton (2)
- Pin 4 connected to D3 of the Arduino UNO
- Pin 1 connected to D2 of the Arduino UNO
Code Documentation
Arduino UNO Code
#include <Servo.h>          //include the servo library

int Faster = 2; //this is the faster button. CHANGE THIS!!! make this the actual number its plugged into.
int Slower = 3; //this is the slower button. AGAIN PLZ CHANGE PLZZZZZZ

int MaxSpeed = 1000;
int Speed = 2000; //starts at 2 seconds delay initially. speed off motor can be the delay, but it shouldn't be below 1000(value of Too fast). the higher the speed, the lower this variable will be.

Servo myservo; //create servo object

void setup()
{
  pinMode(Slower, INPUT_PULLUP);
  pinMode(Faster, INPUT_PULLUP);
  myservo.attach(9);        //the servo plugged into pin 9
}

void loop()
{
  FasterButton();
  SlowerButton();
  Go();
}

void FasterButton()
{
  if((digitalRead(Faster) == LOW) && (Speed > MaxSpeed)) //less in value the speed, the faster it goes. MaxSpeed littlest value "Speed" can have.
  {
    Speed -= 500;
    delay(500);
  }
}

void SlowerButton()
{
  if(digitalRead(Slower) == LOW)
  {
    Speed += 500;
    delay(500);
  }
}

void Go()
{
  myservo.write(20);
  delay(Speed);
  myservo.write(160); //idk why last time it didn't work but this is for degree position so this is what im putting
  delay(Speed); //goes back and forth FOREVA
}
This code controls the servo motor using two pushbuttons. The Faster button decreases the delay between servo movements, making the servo move faster, while the Slower button increases the delay, making the servo move slower. The servo is connected to pin 9 of the Arduino UNO.