Cirkit Designer
Your all-in-one circuit design IDE
Home /
Project Documentation
Arduino UNO Based Soil Moisture Sensing System
Circuit Documentation
Summary
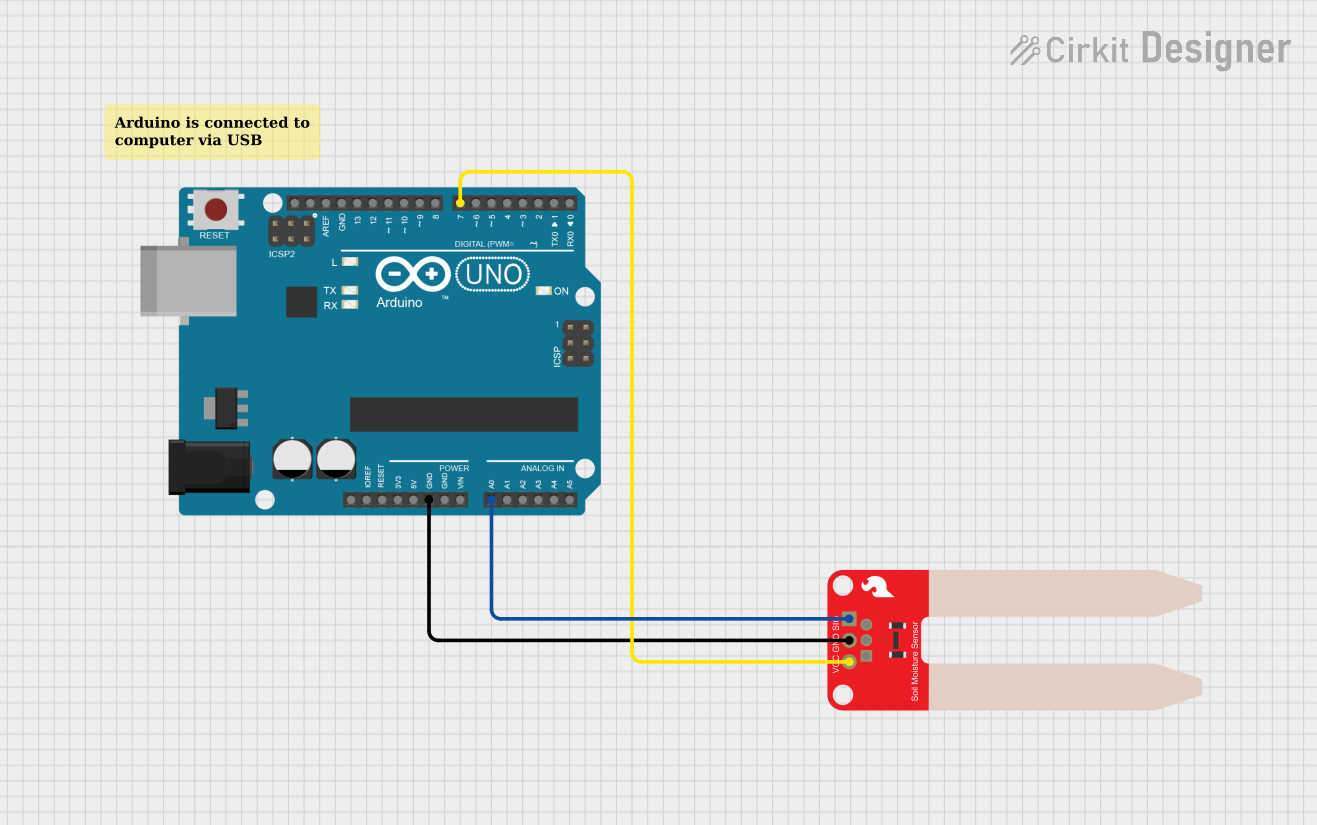
This circuit integrates an Arduino UNO microcontroller with a SparkFun Soil Moisture Sensor to measure the moisture content of the soil. The sensor's output is read by the Arduino through an analog input. The Arduino is programmed to power the sensor using a digital pin to prevent corrosion, read the moisture level, and output the reading to the serial monitor.
Component List
Arduino UNO
- Description: A microcontroller board based on the ATmega328P.
- Pins: UNUSED, IOREF, Reset, 3.3V, 5V, GND, Vin, A0-A5, SCL, SDA, AREF, D0-D13.
- Purpose: Acts as the central processing unit for the circuit, reading sensor data and controlling power to the sensor.
SparkFun Soil Moisture Sensor
- Description: A simple breakout for measuring the moisture in soil and similar materials.
- Pins: VCC, GND, SIG.
- Purpose: Measures the moisture content of the soil.
Comment
- Description: A placeholder for additional notes or comments within the circuit design.
- Pins: None.
- Purpose: Documentation and annotation purposes.
Wiring Details
Arduino UNO
- A0: Connected to the SIG pin of the SparkFun Soil Moisture Sensor.
- GND: Common ground with the SparkFun Soil Moisture Sensor.
- D7: Provides power to the VCC pin of the SparkFun Soil Moisture Sensor.
SparkFun Soil Moisture Sensor
- SIG: Connected to the A0 pin of the Arduino UNO to send the analog moisture level.
- GND: Connected to the common ground on the Arduino UNO.
- VCC: Powered by the D7 pin of the Arduino UNO to prevent sensor corrosion.
Documented Code
/**
 * This example collects soil moisture measurements from the Sparkfun soil
 * moisture sensor and prints them out to the serial monitor.
 *
 * - When you open the serial monitor, make sure that you select 9600 baud.
 *
 * This example was originally developed by Sparkfun.
 */

// Value for storing moisture value
int val = 0;
// Declare a variable for the soil moisture sensor pin
int soilPin = A0;
// Variable for Soil moisture Power
int soilPower = 7;

// Rather than powering the sensor through the 3.3V or 5V pins,
// we'll use a digital pin to power the sensor. This will
// prevent corrosion of the sensor as it sits in the soil.

void setup()
{
    Serial.begin(9600);

    // Set D7 as an OUTPUT
    pinMode(soilPower, OUTPUT);
    // Set to LOW so no power is flowing through the sensor
    digitalWrite(soilPower, LOW);
}

void loop()
{
    Serial.print("Soil Moisture = ");
    // get soil moisture value from the function below and print it
    Serial.println(readSoil());

    // This 1 second timeframe is used so you can test the sensor and see it change in real-time.
    // For in-plant applications, you will want to take readings much less frequently.
    // take a reading every second
    delay(1000);
}

// This is a function used to get the soil moisture content
int readSoil()
{
    // turn D7 "On"
    digitalWrite(soilPower, HIGH);
    // wait 10 milliseconds
    delay(10);
    // Read the SIG value from sensor
    val = analogRead(soilPin);
    // turn D7 "Off"
    digitalWrite(soilPower, LOW);
    // return current moisture value
    return val;
}
The code is designed to minimize corrosion of the soil moisture sensor by controlling the power supply through a digital pin (D7). The sensor is powered on only during the moisture reading and then immediately powered off. The soil moisture value is read from the analog pin A0 and printed to the serial monitor every second.