
Arduino Nano RP2040 Connect Wireless Transmitter with nRF24L01 and Battery Power
View and Edit Project In Cirkit Designer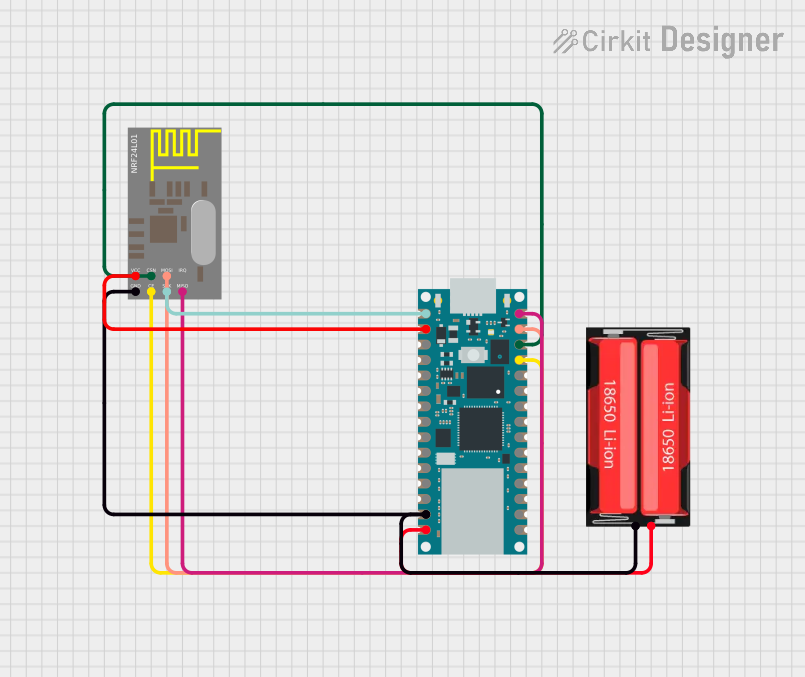
Circuit Documentation
Summary
This document provides a detailed overview of a circuit that includes an Arduino Nano RP2040 Connect microcontroller, an nRF24L01 wireless transceiver module, and a 18650 Li-Ion battery. The Arduino Nano RP2040 Connect is used to control the nRF24L01 module for wireless communication, and the entire system is powered by the 18650 Li-Ion battery.
Component List
Arduino Nano RP2040 Connect
- Description: A microcontroller board based on the RP2040 microcontroller.
- Pins: D12~/MISO, D11/MOSI, D10~, D9~, D8, D7, D6~, D5~, D4, D3~, D2, GND, RESET, RX, TX, VIN, +5V, A7, A6, A5, A4, A3, A2, A1, A0, AREF, 3V3, D13~
nRF24L01
- Description: A wireless transceiver module for communication over the 2.4 GHz band.
- Pins: GND, VCC, CE, CSN, SCK, MOSI, MISO, IRQ
18650 Li-Ion
- Description: A rechargeable lithium-ion battery.
- Pins: Positive, Negative
Wiring Details
Arduino Nano RP2040 Connect
- D12~/MISO connected to nRF24L01 MISO
- D11/MOSI connected to nRF24L01 MOSI
- D10~ connected to nRF24L01 CSN
- D9~ connected to nRF24L01 CE
- VIN connected to 18650 Li-Ion Positive
- GND connected to 18650 Li-Ion Negative and nRF24L01 GND
- 3V3 connected to nRF24L01 VCC
- D13~ connected to nRF24L01 SCK
nRF24L01
- MISO connected to Arduino Nano RP2040 Connect D12~/MISO
- MOSI connected to Arduino Nano RP2040 Connect D11/MOSI
- CSN connected to Arduino Nano RP2040 Connect D10~
- CE connected to Arduino Nano RP2040 Connect D9~
- GND connected to Arduino Nano RP2040 Connect GND and 18650 Li-Ion Negative
- VCC connected to Arduino Nano RP2040 Connect 3V3
- SCK connected to Arduino Nano RP2040 Connect D13~
18650 Li-Ion
- Positive connected to Arduino Nano RP2040 Connect VIN
- Negative connected to Arduino Nano RP2040 Connect GND and nRF24L01 GND
Code Documentation
Arduino Nano RP2040 Connect Code
// SimpleTx - the master or the transmitter

#include <SPI.h>
#include <nRF24L01.h>
#include <RF24.h>

#define CE_PIN   9
#define CSN_PIN 10

const byte slaveAddress[5] = {'R','x','A','A','A'};

RF24 radio(CE_PIN, CSN_PIN); // Create a Radio

char dataToSend[10] = "Message 0";
char txNum = '0';

unsigned long currentMillis;
unsigned long prevMillis;
unsigned long txIntervalMillis = 1000; // send once per second

void setup() {
    Serial.begin(9600);
    Serial.println("SimpleTx Starting");
    radio.begin();
    radio.setDataRate( RF24_250KBPS );
    radio.setRetries(3,5); // delay, count
    radio.openWritingPipe(slaveAddress);
}

void loop() {
    currentMillis = millis();
    if (currentMillis - prevMillis >= txIntervalMillis) {
        send();
        prevMillis = millis();
    }
}

void send() {
    bool rslt;
    rslt = radio.write( &dataToSend, sizeof(dataToSend) );
    // Always use sizeof() as it gives the size as the number of bytes.
    // For example if dataToSend was an int sizeof() would correctly return 2

    Serial.print("Data Sent ");
    Serial.print(dataToSend);
    if (rslt) {
        Serial.println("  Acknowledge received");
        updateMessage();
    }
    else {
        Serial.println("  Tx failed");
    }
}

void updateMessage() {
    // so you can see that new data is being sent
    txNum += 1;
    if (txNum > '9') {
        txNum = '0';
    }
    dataToSend[8] = txNum;
}
This code is for the Arduino Nano RP2040 Connect and is responsible for transmitting data wirelessly using the nRF24L01 module. The code initializes the radio module, sets the data rate, and sends a message every second. If the transmission is successful, it updates the message to be sent next.