
ESP8266 NodeMCU Controlled Smart Irrigation and Security System
View and Edit Project In Cirkit Designer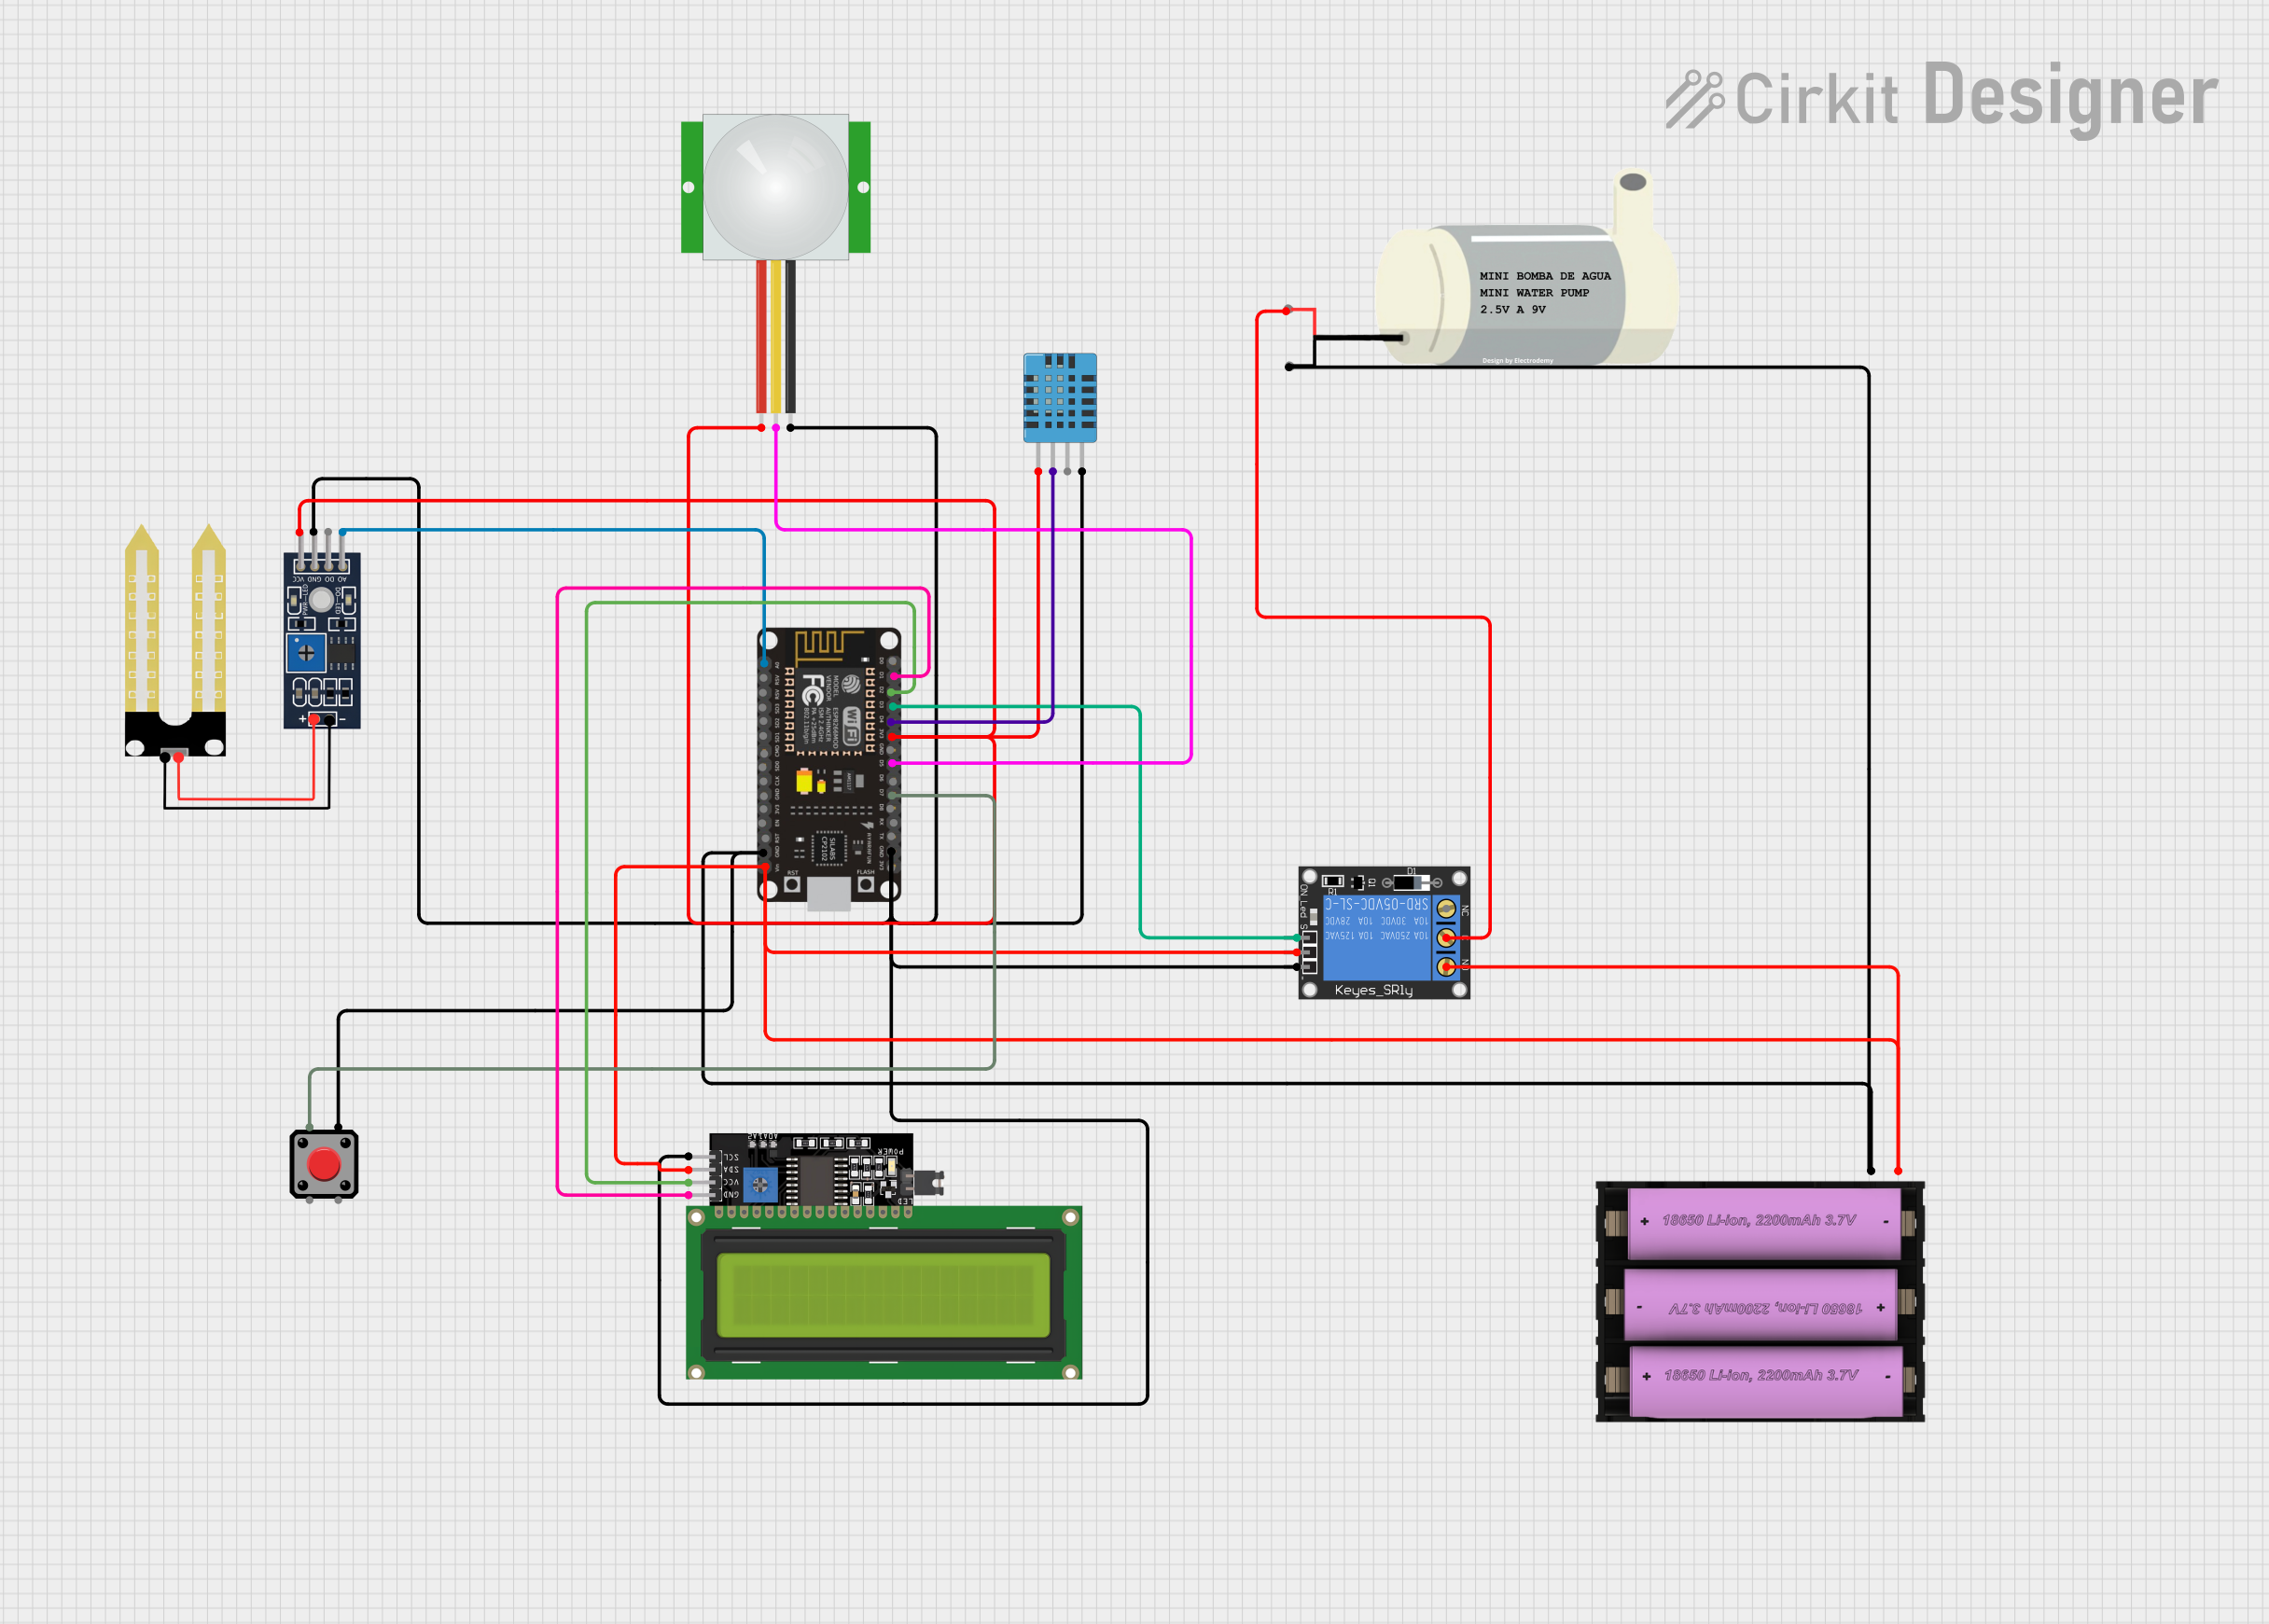
Circuit Documentation
Summary of the Circuit
This circuit is designed to interface an ESP8266 NodeMCU microcontroller with various sensors and actuators for monitoring and control purposes. The system includes a PIR sensor for motion detection, a DHT11 sensor for temperature and humidity readings, a soil moisture sensor (YL-69), an LCD display for user feedback, a relay to control a mini water pump, and a pushbutton for manual input. The circuit is powered by a 7V battery set, and the ESP8266 NodeMCU is responsible for processing sensor data, controlling the relay, and communicating with a Blynk server for remote monitoring and control.
Component List
- 1-Channel Relay (5V 10A): A relay module used to control high power devices such as the mini water pump.
- Set battery (7V): Provides power to the circuit.
- PIR Sensor: Detects motion within its range.
- Mini Water Pump: An actuator that pumps water when activated by the relay.
- DHT11 Humidity and Temperature Sensor: Measures ambient temperature and humidity.
- LCD Display 16x4 I2C: Displays information such as temperature, humidity, soil moisture, and system status.
- Humidity YL-69: A soil moisture sensor that measures the moisture level in the soil.
- Pushbutton: A manual switch that allows user interaction with the system.
- ESP8266 NodeMCU: A microcontroller with WiFi capabilities that controls the system and communicates with the Blynk server.
Wiring Details
1-Channel Relay (5V 10A)
- Signal: Connected to ESP8266 NodeMCU D3
- Power: Connected to ESP8266 NodeMCU VIN
- Ground: Connected to ESP8266 NodeMCU GND
- NO: Connected to Mini Water Pump VCC
- C: Connected to Mini Water Pump VCC
Set battery (7V)
- + (Positive): Connected to ESP8266 NodeMCU VIN and Relay NO
- - (Negative): Connected to ESP8266 NodeMCU GND
PIR Sensor
- VDD: Connected to ESP8266 NodeMCU 3V3
- SIG: Connected to ESP8266 NodeMCU D5
- GND: Connected to ESP8266 NodeMCU GND
Mini Water Pump
- VCC: Connected to Relay NO and Relay C
- GND: Connected to ESP8266 NodeMCU GND
DHT11 Humidity and Temperature Sensor
- VDD: Connected to ESP8266 NodeMCU 3V3
- DATA: Connected to ESP8266 NodeMCU D4
- GND: Connected to ESP8266 NodeMCU GND
LCD Display 16x4 I2C
- SCL: Connected to ESP8266 NodeMCU D1
- SDA: Connected to ESP8266 NodeMCU D2
- VCC: Connected to ESP8266 NodeMCU D2
- GND: Connected to ESP8266 NodeMCU D1
Humidity YL-69
- A0: Connected to ESP8266 NodeMCU A0
- D0: Not connected
- GND: Connected to ESP8266 NodeMCU GND
- VCC: Connected to ESP8266 NodeMCU 3V3
Pushbutton
- Pin 1: Connected to ESP8266 NodeMCU D7
- Pin 2: Not connected
- Pin 3: Not connected
- Pin 4: Connected to ESP8266 NodeMCU GND
Documented Code
The code provided is for the ESP8266 NodeMCU microcontroller. It includes the setup and main loop for the system, as well as functions for reading sensors, controlling the relay, and interfacing with the Blynk platform.
// Include the library files
#include <LiquidCrystal_I2C.h>
#define BLYNK_PRINT Serial
#include <ESP8266WiFi.h>
#include <BlynkSimpleEsp8266.h>
#include <DHT.h>

// Initialize the LCD display
LiquidCrystal_I2C lcd(0x3F, 16, 2);

char auth[] = "     ";  // Enter your Blynk Auth token
char ssid[] = "     ";  // Enter your WIFI SSID
char pass[] = "     ";  // Enter your WIFI Password

DHT dht(D4, DHT11); // (DHT sensor pin, sensor type) D4 DHT11 Temperature Sensor
BlynkTimer timer;

// Define component pins
#define soil A0     // A0 Soil Moisture Sensor
#define PIR D5      // D5 PIR Motion Sensor
int PIR_ToggleValue;

void checkPhysicalButton();
int relay1State = LOW;
int pushButton1State = HIGH;
#define RELAY_PIN_1       D3   // D3 Relay
#define PUSH_BUTTON_1     D7   // D7 Button
#define VPIN_BUTTON_1    V12

// Create three variables for pressure
double T, P;
char status;

void setup() {
  Serial.begin(9600);
  lcd.begin();
  lcd.backlight();
  pinMode(PIR, INPUT);

  pinMode(RELAY_PIN_1, OUTPUT);
  digitalWrite(RELAY_PIN_1, LOW);
  pinMode(PUSH_BUTTON_1, INPUT_PULLUP);
  digitalWrite(RELAY_PIN_1, relay1State);

  Blynk.begin(auth, ssid, pass, "blynk.cloud", 80);
  dht.begin();

  lcd.setCursor(0, 0);
  lcd.print("  Initializing  ");
  for (int a = 5; a <= 10; a++) {
    lcd.setCursor(a, 1);
    lcd.print(".");
    delay(500);
  }
  lcd.clear();
  lcd.setCursor(11, 1);
  lcd.print("W:OFF");
  // Call the function
  timer.setInterval(100L, soilMoistureSensor);
  timer.setInterval(100L, DHT11sensor);
  timer.setInterval(500L, checkPhysicalButton);
}

// Get the DHT11 sensor values
void DHT11sensor() {
  float h = dht.readHumidity();
  float t = dht.readTemperature();

  if (isnan(h) || isnan(t)) {
    Serial.println("Failed to read from DHT sensor!");
    return;
  }
  Blynk.virtualWrite(V0, t);
  Blynk.virtualWrite(V1, h);

  lcd.setCursor(0, 0);
  lcd.print("T:");
  lcd.print(t);

  lcd.setCursor(8, 0);
  lcd.print("H:");
  lcd.print(h);
}

// Get the soil moisture values
void soilMoistureSensor() {
  int value = analogRead(soil);
  value = map(value, 0, 1024, 0, 100);
  value = (value - 100) * -1;

  Blynk.virtualWrite(V3, value);
  lcd.setCursor(0, 1);
  lcd.print("S:");
  lcd.print(value);
  lcd.print(" ");
}

// Get the PIR sensor values
void PIRsensor() {
  bool value = digitalRead(PIR);
  if (value) {
    Blynk.logEvent("pirmotion", "WARNING! Motion Detected!"); // Enter your Event Name
    WidgetLED LED(V5);
    LED.on();
  } else {
    WidgetLED LED(V5);
    LED.off();
  }
}

BLYNK_WRITE(V6)
{
  PIR_ToggleValue = param.asInt();
}

BLYNK_CONNECTED() {
  // Request the latest state from the server
  Blynk.syncVirtual(VPIN_BUTTON_1);
}

BLYNK_WRITE(VPIN_BUTTON_1) {
  relay1State = param.asInt();
  digitalWrite(RELAY_PIN_1, relay1State);
}

void checkPhysicalButton()
{
  if (digitalRead(PUSH_BUTTON_1) == LOW) {
    // pushButton1State is used to avoid sequential toggles
    if (pushButton1State != LOW) {

      // Toggle Relay state
      relay1State = !relay1State;
      digitalWrite(RELAY_PIN_1, relay1State);

      // Update Button Widget
      Blynk.virtualWrite(VPIN_BUTTON_1, relay1State);
    }
    pushButton1State = LOW;
  } else {
    pushButton1State = HIGH;
  }
}

void loop() {
  if (PIR_ToggleValue == 1)
  {
    lcd.setCursor(5, 1);
    lcd.print("M:ON ");
    PIRsensor();
  }
  else
  {
    lcd.setCursor(5, 1);
    lcd.print("M:OFF");
    WidgetLED LED(V5);
    LED.off();
  }

  if (relay1State == HIGH)
  {
    lcd.setCursor(11, 1);
    lcd.print("W:ON ");
  }
  else if (relay1State == LOW)
  {
    lcd.setCursor(11, 1);
    lcd.print("W:OFF");
  }

  Blynk.run(); // Run the Blynk library