
Arduino UNO RFID Door Lock System with LCD Feedback and MP3 Audio Prompts
View and Edit Project In Cirkit Designer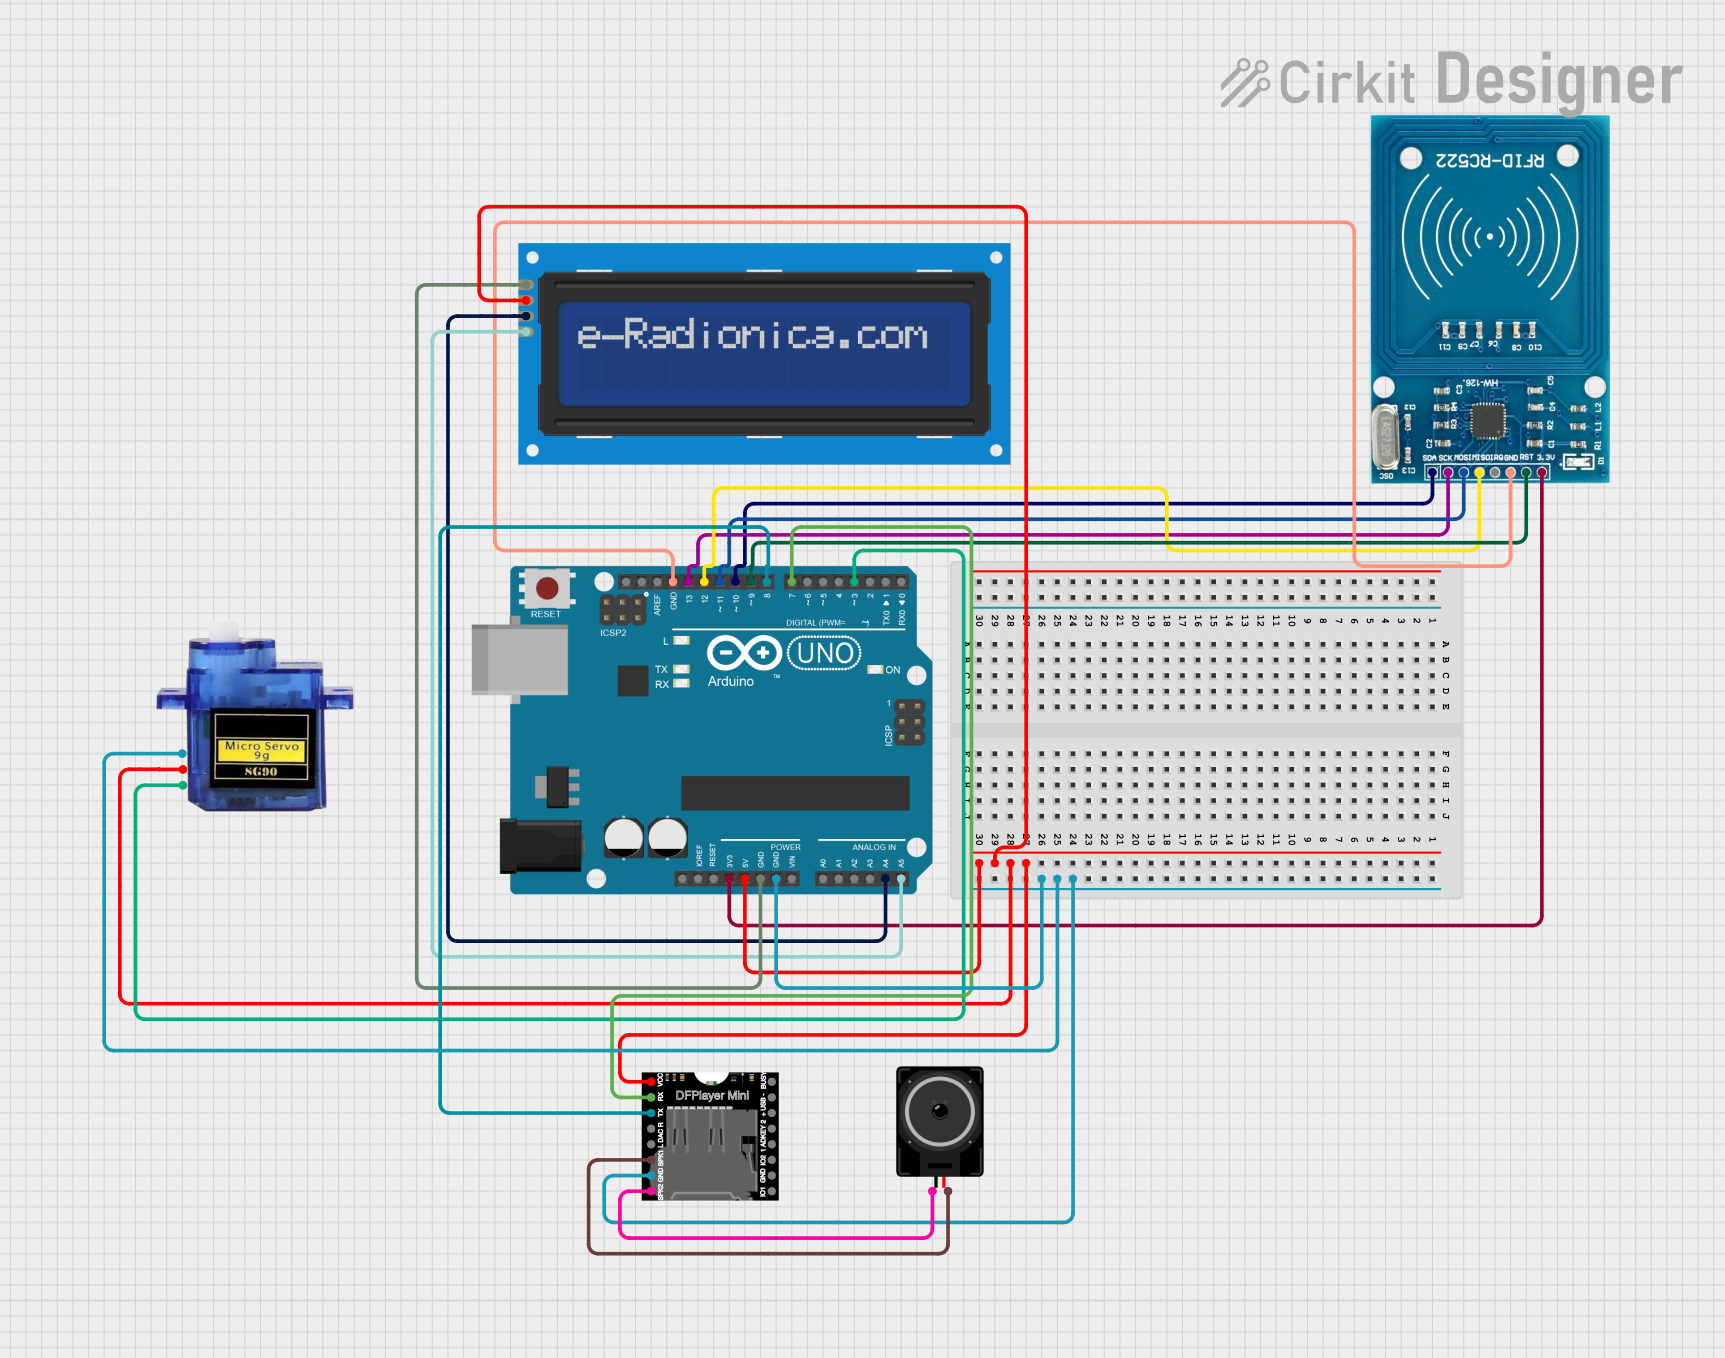
Circuit Documentation
Summary
This circuit is designed to control access through a door using RFID technology. It features an Arduino UNO microcontroller interfaced with an RFID-RC522 module for scanning RFID tags, a DFPlayer MINI for audio feedback, a micro servo motor for actuating the door lock, an LCD screen for displaying system status, and a loudspeaker for audio output. The system operates by scanning RFID tags, providing visual and audio feedback, and controlling a servo motor to lock or unlock the door based on the tag's authorization.
Component List
DFPlayer MINI
- Description: A small and low-cost MP3 module that can directly play MP3 files stored on a USB or TF card.
- Pins: VCC, BUSY, RX, USB -, TX, USB +, DAC_R, K2/ADC_KEY, DAC_L, K1/ADC_KEY, SPK1, IO 2, GND, SPK2, IO 1.
Arduino UNO
- Description: A microcontroller board based on the ATmega328P, widely used for building digital devices and interactive objects.
- Pins: UNUSED, IOREF, Reset, 3.3V, 5V, GND, Vin, A0, A1, A2, A3, A4, A5, SCL, SDA, AREF, D13, D12, D11, D10, D9, D8, D7, D6, D5, D4, D3, D2, D1, D0.
RFID-RC522
- Description: An RFID reader/writer module that operates at 13.56 MHz and is commonly used for contactless communication.
- Pins: VCC (3.3V), RST, GND, IRQ, MISO, MOSI, SCK, SDA.
Micro servo 9G
- Description: A small servo motor capable of precise control, commonly used for steering mechanisms in small robots or for controlling small levers.
- Pins: GND, +5V, PWM.
LCD screen 16x2 I2C
- Description: A liquid crystal display capable of displaying 16 characters per line on 2 lines, with an I2C interface for communication.
- Pins: SCL, SDA, VCC, GND.
Loudspeaker
- Description: An electroacoustic transducer that converts an electrical audio signal into a corresponding sound.
- Pins: pin1, pin2.
Wiring Details
DFPlayer MINI
- VCC: Connected to the 5V output from the Arduino UNO.
- GND: Common ground with Arduino UNO and Micro servo 9G.
- RX: Connected to pin D7 on the Arduino UNO.
- TX: Connected to pin D8 on the Arduino UNO.
- SPK1: Connected to pin2 of the Loudspeaker.
- SPK2: Connected to pin1 of the Loudspeaker.
Arduino UNO
- 5V: Provides power to DFPlayer MINI, Micro servo 9G, and LCD screen 16x2 I2C.
- 3.3V: Provides power to RFID-RC522.
- GND: Common ground with DFPlayer MINI, Micro servo 9G, RFID-RC522, and LCD screen 16x2 I2C.
- A4 (SDA): Connected to SDA pin on the LCD screen 16x2 I2C.
- A5 (SCL): Connected to SCL pin on the LCD screen 16x2 I2C.
- D13: Connected to SCK pin on RFID-RC522.
- D12: Connected to MISO pin on RFID-RC522.
- D11: Connected to MOSI pin on RFID-RC522.
- D10: Connected to SDA pin on RFID-RC522.
- D9: Connected to RST pin on RFID-RC522.
- D7: Connected to RX pin on DFPlayer MINI.
- D8: Connected to TX pin on DFPlayer MINI.
- D3: Connected to PWM pin on Micro servo 9G.
RFID-RC522
- VCC (3.3V): Powered by the 3.3V output from the Arduino UNO.
- RST: Connected to pin D9 on the Arduino UNO.
- GND: Common ground with Arduino UNO.
- IRQ: Not connected.
- MISO: Connected to pin D12 on the Arduino UNO.
- MOSI: Connected to pin D11 on the Arduino UNO.
- SCK: Connected to pin D13 on the Arduino UNO.
- SDA: Connected to pin D10 on the Arduino UNO.
Micro servo 9G
- +5V: Powered by the 5V output from the Arduino UNO.
- GND: Common ground with Arduino UNO and DFPlayer MINI.
- PWM: Controlled by pin D3 on the Arduino UNO.
LCD screen 16x2 I2C
- VCC: Powered by the 5V output from the Arduino UNO.
- GND: Common ground with Arduino UNO.
- SDA: Connected to pin A4 on the Arduino UNO.
- SCL: Connected to pin A5 on the Arduino UNO.
Loudspeaker
- pin1: Connected to SPK2 on DFPlayer MINI.
- pin2: Connected to SPK1 on DFPlayer MINI.
Documented Code
#include <SPI.h>
#include <MFRC522.h>
#include <LiquidCrystal_I2C.h>
#include <Servo.h>
#include <DFRobotDFPlayerMini.h>
#include <SoftwareSerial.h>

// Pin Definitions
#define SS_PIN 10           // Slave Select pin for RFID
#define RST_PIN 9           // Reset pin for RFID
#define SERVO_PIN 3         // Pin for controlling the servo motor

// Initialize RFID, Servo, LCD, and MP3 player
MFRC522 rfid(SS_PIN, RST_PIN);            // Create RFID object
Servo myservo;                            // Create Servo object
LiquidCrystal_I2C lcd(0x27, 16, 2);       // Set LCD address (0x27 is common for 16x2 displays)
SoftwareSerial mp3Serial(8, 7);           // Initialize MP3 serial (TX to pin 8, RX to pin 7)
DFRobotDFPlayerMini mp3;                  // Create MP3 player object

void setup() {
  Serial.begin(9600);                     // Start serial communication for debugging

  // Initialize RFID module
  SPI.begin();                            // Begin SPI communication
  rfid.PCD_Init();                        // Initialize RFID reader

  // Initialize LCD display
  lcd.begin(16, 2);                       // Start the LCD (16x2)
  lcd.backlight();                        // Turn on the LCD backlight
  lcd.print("Door System Ready");         // Display initial message

  // Initialize MP3 player
  mp3Serial.begin(9600);                  // Begin communication with MP3 player
  if (!mp3.begin(mp3Serial)) {            // Check if MP3 player initializes successfully
    Serial.println("MP3 player initialization failed!");
    lcd.clear();
    lcd.print("MP3 Init Failed");
  } else {
    Serial.println("MP3 player initialized successfully.");
    mp3.volume(30);                       // Set volume level (0-30)
    mp3.play(4);                          // Play "Door System Ready" sound (0004.mp3)
  }

  // Initialize Servo
  myservo.attach(SERVO_PIN);              // Attach servo to the specified pin
  myservo.write(0);                       // Initial position (door closed)

  delay(1000);                            // Wait for a moment to ensure everything is ready
}

void loop() {
  // Check if a new card is present and read it
  if (rfid.PICC_IsNewCardPresent() && rfid.PICC_ReadCardSerial()) {
    mp3.volume(30);
    mp3.play(1);                          // Play scanning sound (0001.mp3)

    lcd.clear();
    lcd.print("Scanning...");
    delay(2000);                          // Delay to simulate scanning process

    // Read the UID of the scanned card
    String uid = "";
    for (byte i = 0; i < rfid.uid.size; i++) {
      uid += String(rfid.uid.uidByte[i], HEX); // Append each byte of UID as a hex string
    }

    Serial.print("UID of the card: ");
    Serial.println(uid);                  // Print the UID to the serial monitor for debugging

    // Check if the UID matches the authorized card
    if (uid == "b376c3e4") {              // Replace with your own RFID card UID
      openDoor();                         // Call function to open the door
    } else {
      accessDenied();                     // Call function to handle unauthorized access
    }

    // Stop reading and halt the card communication
    rfid.PICC_HaltA();
    rfid.PCD_StopCrypto1();
    delay(500);                           // Small delay to prevent immediate re-triggering