
Arduino UNO Battery-Powered IR Remote-Controlled Servo System
View and Edit Project In Cirkit Designer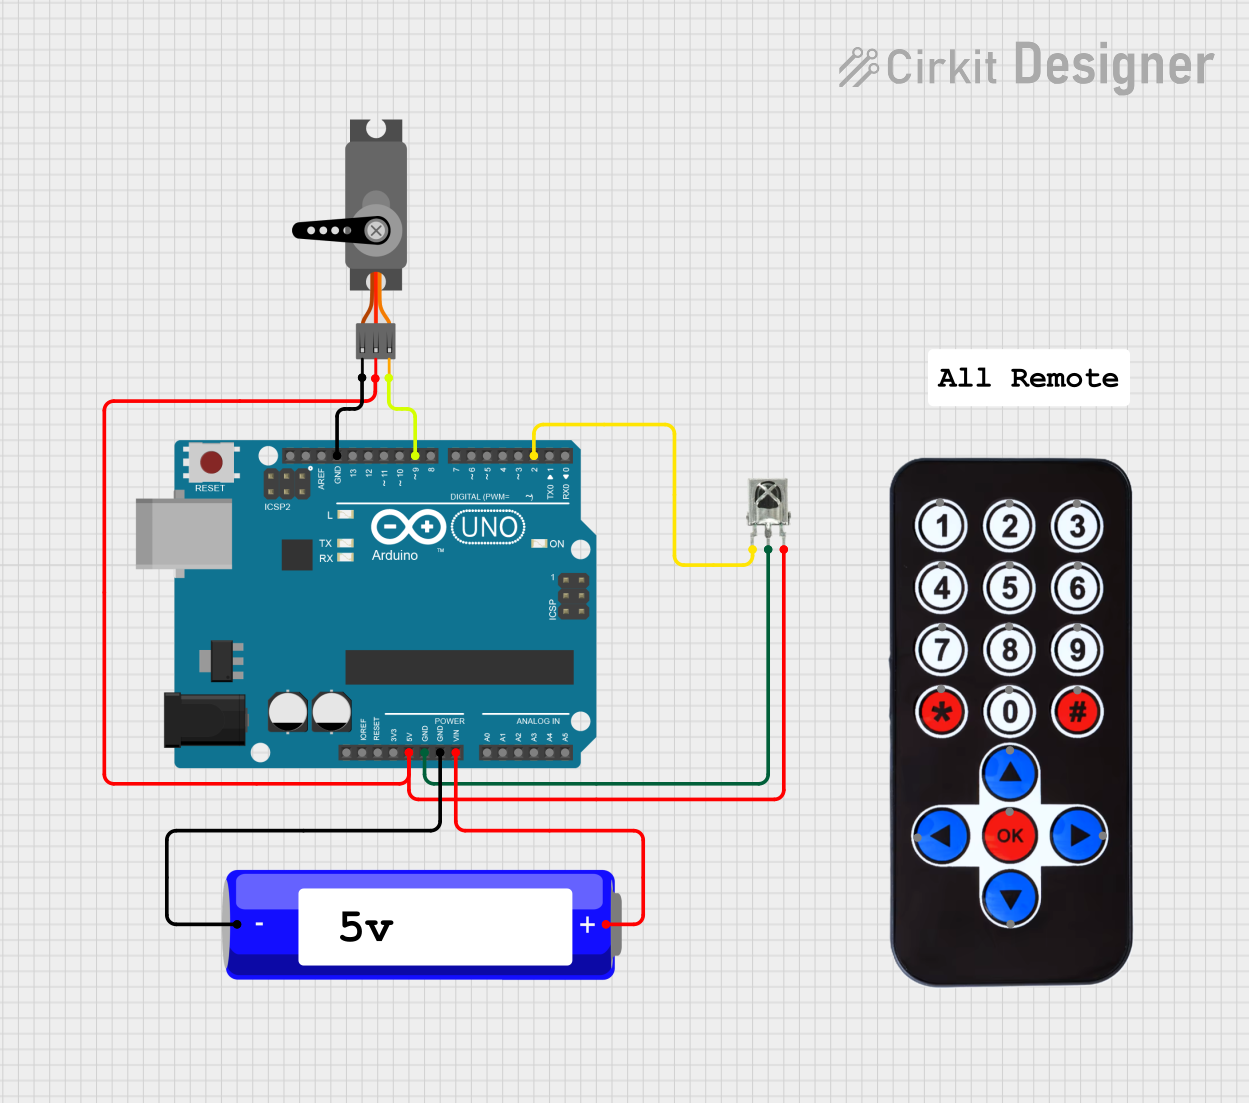
Circuit Documentation
Summary
This circuit consists of an Arduino UNO microcontroller, a VS1838B IR Receiver, a 18650 Li-ion Battery, and a Servo motor. The circuit is designed to receive infrared signals and control the servo motor accordingly. The Arduino UNO is powered by the 18650 Li-ion Battery and provides power to the IR receiver and the servo motor.
Component List
Arduino UNO
- Description: A microcontroller board based on the ATmega328P.
- Pins: UNUSED, IOREF, Reset, 3.3V, 5V, GND, Vin, A0, A1, A2, A3, A4, A5, SCL, SDA, AREF, D13, D12, D11, D10, D9, D8, D7, D6, D5, D4, D3, D2, D1, D0
VS1838B IR Receiver
- Description: An infrared receiver module used to receive IR signals.
- Pins: OUT, GND, VCC
18650 Li-ion Battery
- Description: A rechargeable lithium-ion battery.
- Pins: -, +
HX1838 Infrared IR Wireless Remote Control
- Description: An infrared remote control used to send IR signals.
- Pins: FFA25D (1), FF629D (2), FFE21D (3), FF22DD (4), FF02FD (5), FFC23D (6), FFE01F (7), FFA857 (8), FF906F (9), FF9867 (0), FFB04F (#), FF6897 (*), FF18E7 (↑), FF5AA5 (→), FF10EF (←), FF4AB5 (↓), FF38C7 (OK)
Servo
- Description: A motor used for precise control of angular position.
- Pins: GND, VCC, PWM
Wiring Details
Arduino UNO
- 5V: Connected to VCC of VS1838B IR Receiver and VCC of Servo.
- GND: Connected to GND of VS1838B IR Receiver, GND of Servo, and - of 18650 Li-ion Battery.
- Vin: Connected to + of 18650 Li-ion Battery.
- D9: Connected to PWM of Servo.
- D2: Connected to OUT of VS1838B IR Receiver.
VS1838B IR Receiver
- VCC: Connected to 5V of Arduino UNO.
- GND: Connected to GND of Arduino UNO.
- OUT: Connected to D2 of Arduino UNO.
18650 Li-ion Battery
- -: Connected to GND of Arduino UNO.
- +: Connected to Vin of Arduino UNO.
Servo
- VCC: Connected to 5V of Arduino UNO.
- GND: Connected to GND of Arduino UNO.
- PWM: Connected to D9 of Arduino UNO.
Documented Code
Arduino UNO Code (sketch.ino)
void setup() {
  // put your setup code here, to run once:

}

void loop() {
  // put your main code here, to run repeatedly:

}
Documentation (documentation.txt)
This documentation provides a comprehensive overview of the circuit, including a summary, component list, wiring details, and the code used in the Arduino UNO.