Cirkit Designer
Your all-in-one circuit design IDE
Home /
Project Documentation
Arduino UNO-Based Automated Plant Watering System with Soil Moisture Sensor and UV-C Tube
Circuit Documentation
Summary
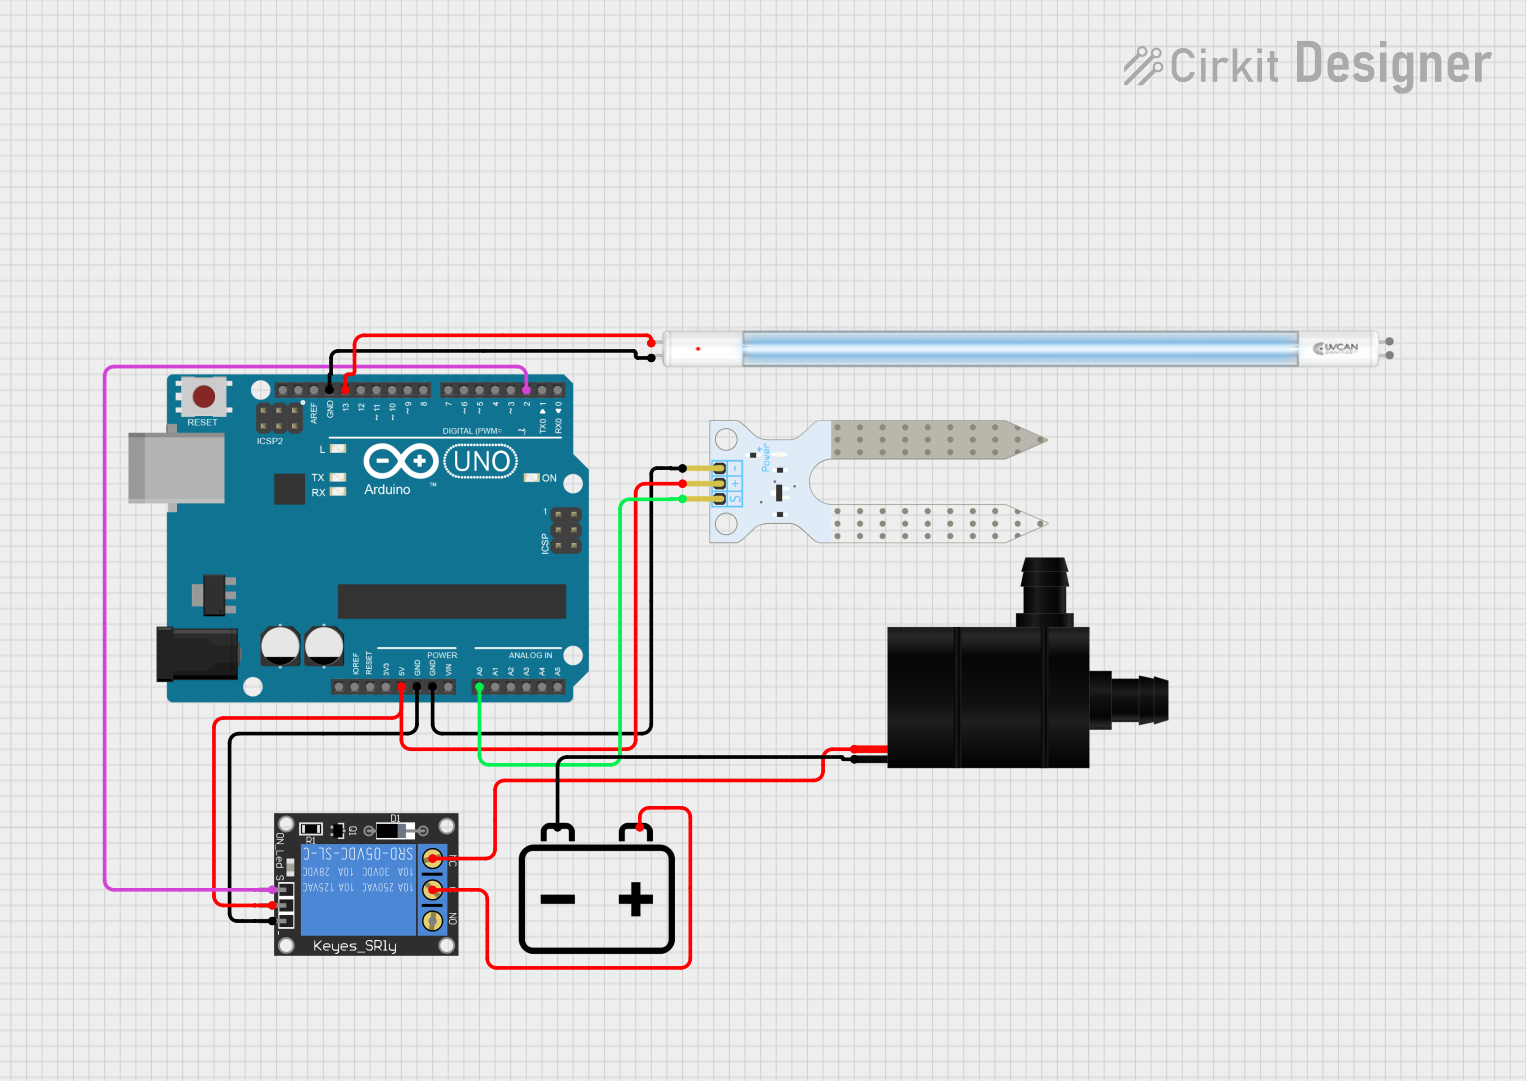
This circuit is designed to automate the watering of plants based on soil moisture levels. It uses an Arduino UNO to read the soil moisture sensor and control a water pump via a relay. Additionally, a UV-C tube is included, which can be controlled by the Arduino.
Component List
Arduino UNO
- Description: A microcontroller board based on the ATmega328P.
- Pins: UNUSED, IOREF, Reset, 3.3V, 5V, GND, Vin, A0, A1, A2, A3, A4, A5, SCL, SDA, AREF, D13, D12, D11, D10, D9, D8, D7, D6, D5, D4, D3, D2, D1, D0
Water Pump
- Description: A small water pump used to water plants.
- Pins: VCC, GND
Soil Moisture Sensor
- Description: A sensor to measure the moisture level in the soil.
- Pins: VCC, GND, SIG
1-Channel Relay (5V 10A)
- Description: A relay module to control high-power devices.
- Pins: NC, signal, C, power, NO, ground
UV-C Tube
- Description: A UV-C light tube for sterilization purposes.
- Pins: +, -
12v Battery
- Description: A 12V battery to power the water pump.
- Pins: -, +
Wiring Details
Arduino UNO
- 5V: Connected to the VCC pin of the Soil Moisture Sensor and the power pin of the 1-Channel Relay.
- GND: Connected to the GND pin of the Soil Moisture Sensor, the ground pin of the 1-Channel Relay, and the - pin of the UV-C Tube.
- A0: Connected to the SIG pin of the Soil Moisture Sensor.
- D13: Connected to the + pin of the UV-C Tube.
- D2: Connected to the signal pin of the 1-Channel Relay.
Water Pump
- VCC: Connected to the NC pin of the 1-Channel Relay.
- GND: Connected to the - pin of the 12v Battery.
Soil Moisture Sensor
- VCC: Connected to the 5V pin of the Arduino UNO.
- GND: Connected to the GND pin of the Arduino UNO.
- SIG: Connected to the A0 pin of the Arduino UNO.
1-Channel Relay (5V 10A)
- power: Connected to the 5V pin of the Arduino UNO.
- ground: Connected to the GND pin of the Arduino UNO.
- signal: Connected to the D2 pin of the Arduino UNO.
- NC: Connected to the VCC pin of the Water Pump.
- C: Connected to the + pin of the 12v Battery.
UV-C Tube
- +: Connected to the D13 pin of the Arduino UNO.
- -: Connected to the GND pin of the Arduino UNO.
12v Battery
- +: Connected to the C pin of the 1-Channel Relay.
- -: Connected to the GND pin of the Water Pump.
Code Documentation
Arduino Code
// Define pins
const int soilMoisturePin = A0;  // Analog pin for soil moisture sensor
const int ledPin = 13;            // Pin for LED
const int relayPin = 2;          // Pin for relay module

// Threshold for soil moisture (you may need to calibrate this)
int soilMoistureValue = 0;  // Variable to store the sensor reading
int threshold = 500;         // Change this value based on your soil's moisture level (adjust as needed)

void setup() {
  // Initialize the LED and relay pins
  pinMode(ledPin, OUTPUT);
  pinMode(relayPin, OUTPUT);

  // Initialize Serial Monitor for debugging
  Serial.begin(9600);
}

void loop() {
  // Read the analog value from the soil moisture sensor
  soilMoistureValue = analogRead(soilMoisturePin);

  // Print the soil moisture value to the Serial Monitor (optional)
  Serial.print("Soil Moisture Value: ");
  Serial.println(soilMoistureValue);

  // If the soil is wet (moisture detected), turn on LED
  if (soilMoistureValue > threshold) {
    digitalWrite(ledPin, HIGH);   // Turn on the LED
    digitalWrite(relayPin, LOW);  // Turn off the water pump (relay OFF)
  }
  // If the soil is dry (moisture not detected), turn on water pump
  else {
    digitalWrite(ledPin, LOW);    // Turn off the LED
    digitalWrite(relayPin, HIGH); // Turn on the water pump (relay ON)
  }

  // Wait a moment before taking another reading
  delay(1000);  // 1 second delay (adjustable)
}
This code reads the soil moisture level and controls the water pump and UV-C tube based on the moisture level. The LED on pin 13 is used to indicate the status of the soil moisture. If the soil is dry, the water pump is turned on; otherwise, it is turned off.