
Arduino UNO Solar Panel Cleaning System with Water Pump and Servo Motor
View and Edit Project In Cirkit Designer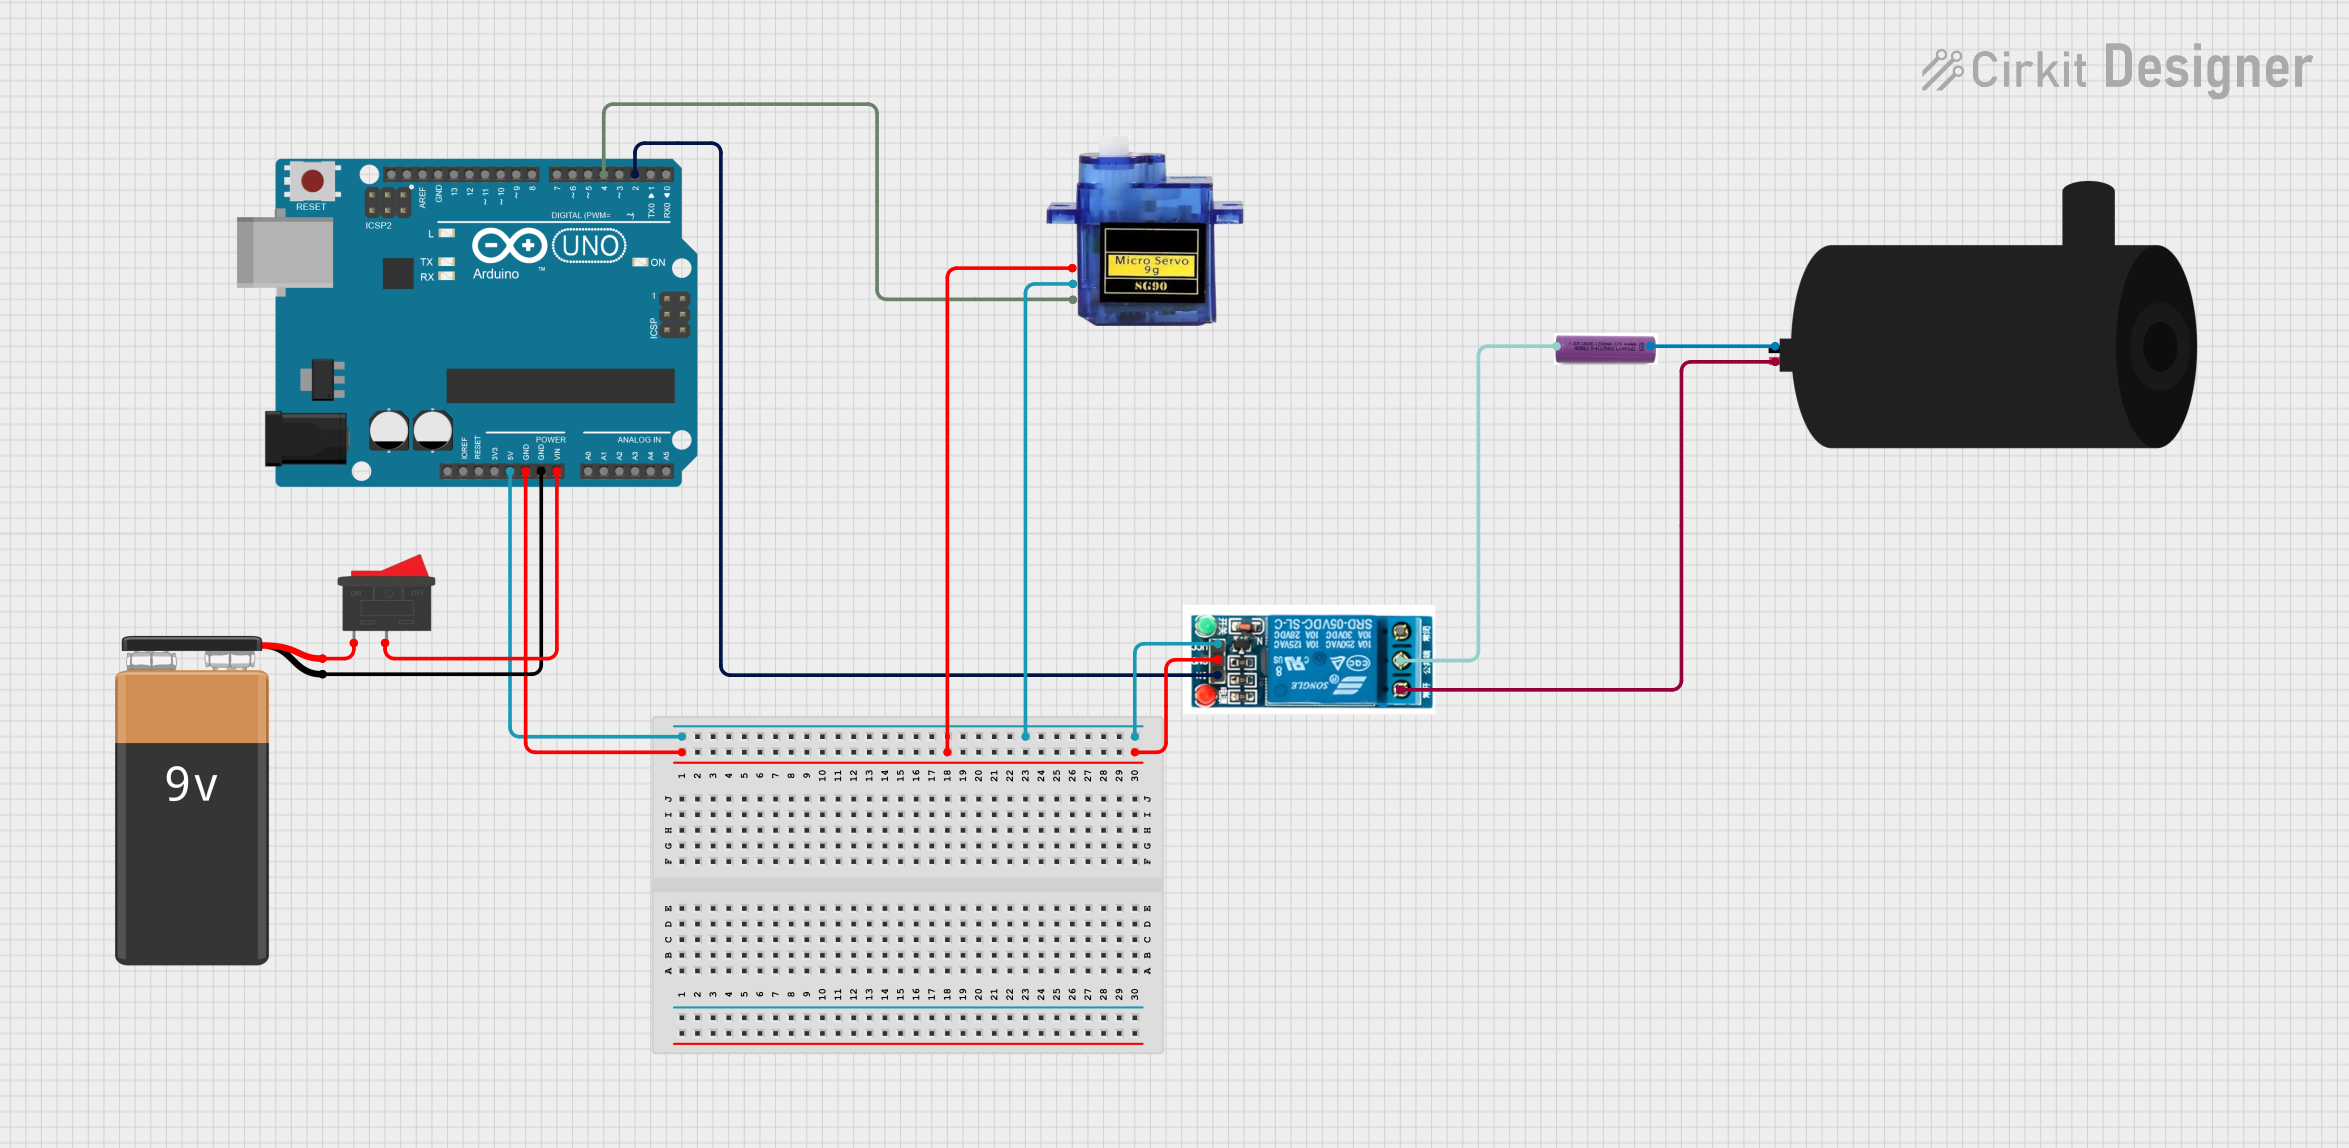
Solar Panel Cleaning System Documentation
Summary
This document provides a detailed overview of a solar panel cleaning system. The system uses an Arduino UNO microcontroller to control a water pump and a servo motor. The water pump sprays water on the solar panel, and the servo motor, equipped with a sponge, rotates to clean the panel. The system is powered by a 9V battery and a 3.7V battery, with a relay used to control the water pump.
Component List
Arduino UNO
- Description: Microcontroller board based on the ATmega328P.
- Pins: UNUSED, IOREF, Reset, 3.3V, 5V, GND, Vin, A0, A1, A2, A3, A4, A5, SCL, SDA, AREF, D13, D12, D11, D10, D9, D8, D7, D6, D5, D4, D3, D2, D1, D0
9V Battery
- Description: Provides power to the Arduino UNO.
- Pins: -, +
5V Relay
- Description: Electromechanical switch used to control the water pump.
- Pins: Normally Open, Common terminal, Normally Closed, In, GND, VCC
Water Pump
- Description: Pumps water to clean the solar panel.
- Pins: positive, negative
3.7V Battery
- Description: Provides power to the water pump.
- Pins: +, -
Micro Servo 9G
- Description: Small servo motor used to rotate the cleaning sponge.
- Pins: GND, +5V, PWM
Rocker Switch
- Description: Switch used to control the power supply to the Arduino UNO.
- Pins: 1, 2
Wiring Details
Arduino UNO
- GND: Connected to GND of Micro Servo 9G and GND of 5V Relay.
- 5V: Connected to +5V of Micro Servo 9G and VCC of 5V Relay.
- Vin: Connected to pin 2 of Rocker Switch.
- D4: Connected to PWM of Micro Servo 9G.
- D2: Connected to In of 5V Relay.
9V Battery
- -: Connected to GND of Arduino UNO.
- +: Connected to pin 1 of Rocker Switch.
5V Relay
- GND: Connected to GND of Arduino UNO.
- VCC: Connected to 5V of Arduino UNO.
- In: Connected to D2 of Arduino UNO.
- Normally Open: Connected to positive of Water Pump.
- Common terminal: Connected to + of 3.7V Battery.
Water Pump
- positive: Connected to Normally Open of 5V Relay.
- negative: Connected to - of 3.7V Battery.
3.7V Battery
- +: Connected to Common terminal of 5V Relay.
- -: Connected to negative of Water Pump.
Micro Servo 9G
- GND: Connected to GND of Arduino UNO.
- +5V: Connected to 5V of Arduino UNO.
- PWM: Connected to D4 of Arduino UNO.
Rocker Switch
- 1: Connected to + of 9V Battery.
- 2: Connected to Vin of Arduino UNO.
Code Documentation
/*
 * Solar Panel Cleaning System
 * This Arduino sketch controls a water pump and a servo motor to clean a solar
 * panel. The water pump will first spread water on the panel, and then the
 * servo motor with an attached sponge will rotate twice to clean the panel.
 */

#include <Servo.h>

// Pin definitions
const int relayPin = 2; // Relay control pin
const int servoPin = 4; // Servo control pin

// Create servo object
Servo myServo;

void setup() {
  // Initialize relay pin as an output
  pinMode(relayPin, OUTPUT);
  // Initialize servo
  myServo.attach(servoPin);
  // Ensure the relay is off initially
  digitalWrite(relayPin, LOW);
}

void loop() {
  // Turn on the water pump
  digitalWrite(relayPin, HIGH);
  delay(5000); // Run pump for 5 seconds
  // Turn off the water pump
  digitalWrite(relayPin, LOW);
  // Rotate the servo motor twice
  for (int i = 0; i < 2; i++) {
    myServo.write(180); // Rotate to 180 degrees
    delay(1000); // Wait for 1 second
    myServo.write(0); // Rotate back to 0 degrees
    delay(1000); // Wait for 1 second
  }
  // Wait for a while before the next cleaning cycle
  delay(60000); // Wait for 1 minute
}
This code initializes the relay and servo motor, then enters a loop where it turns on the water pump for 5 seconds, rotates the servo motor twice, and waits for 1 minute before repeating the cycle.