
Circuit Documentation
Summary
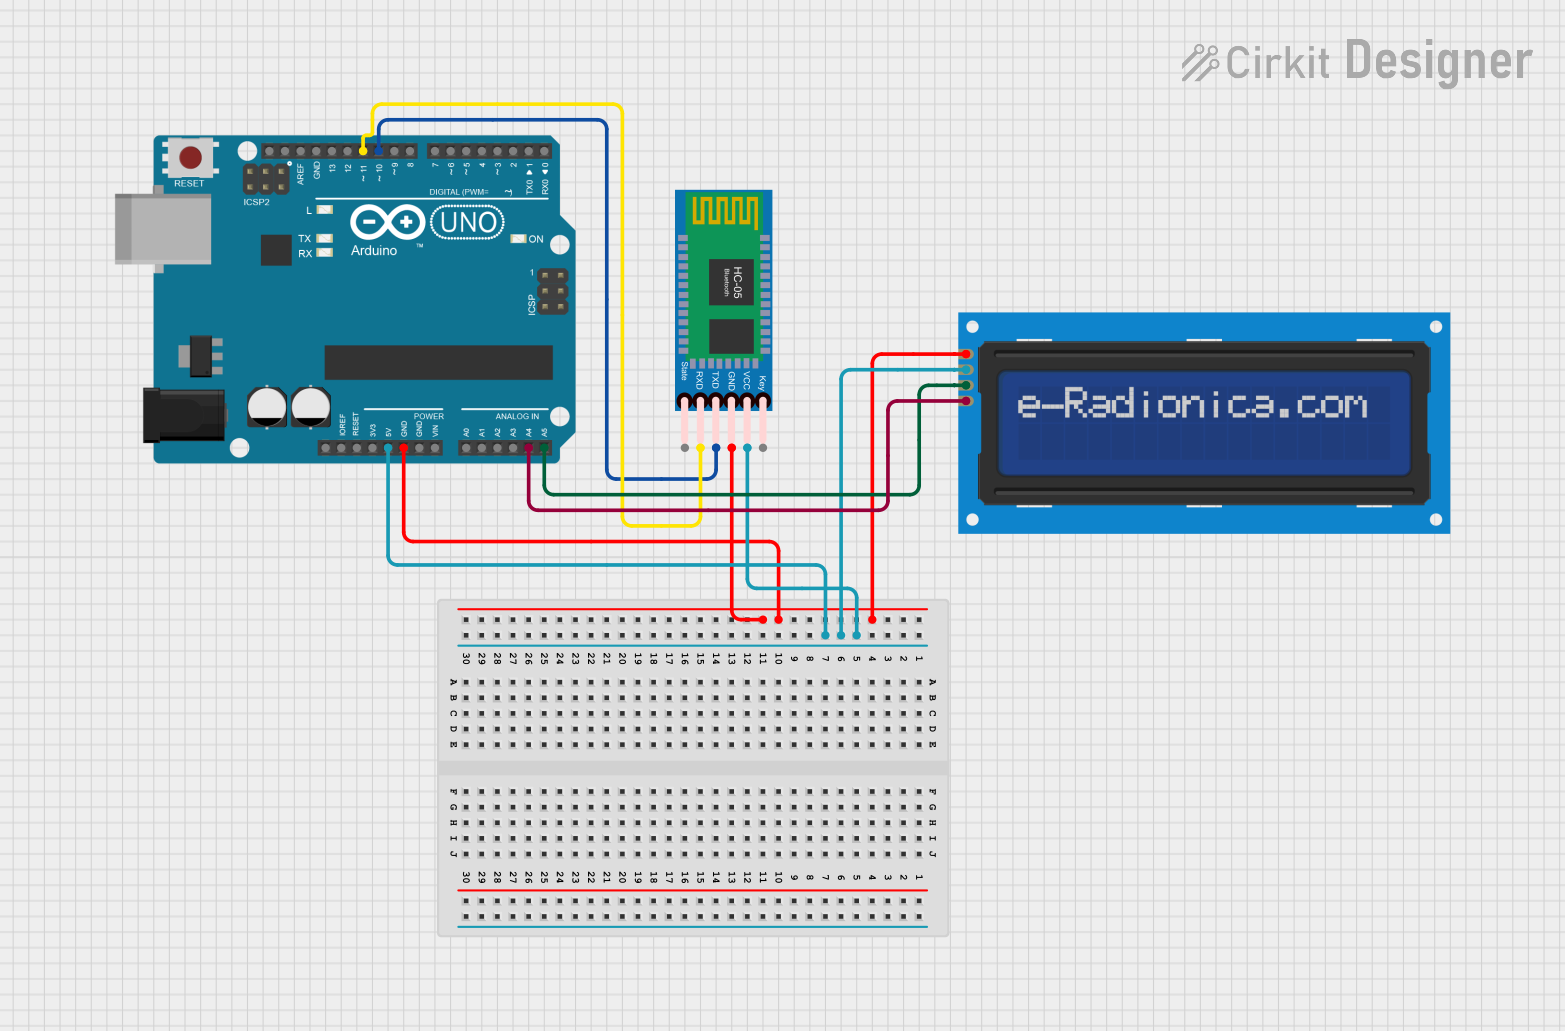
This circuit involves an Arduino UNO microcontroller, an HC-05 Bluetooth module, and a 16x2 I2C LCD screen. The Arduino UNO serves as the central controller, interfacing with the Bluetooth module for wireless communication and the LCD screen for displaying messages received via Bluetooth.
Component List
Arduino UNO
- Description: A microcontroller board based on the ATmega328P.
- Pins: UNUSED, IOREF, Reset, 3.3V, 5V, GND, Vin, A0, A1, A2, A3, A4, A5, SCL, SDA, AREF, D13, D12, D11, D10, D9, D8, D7, D6, D5, D4, D3, D2, D1, D0
HC-05 Bluetooth Module
- Description: A Bluetooth module used for wireless communication.
- Pins: Key, VCC, GND, TXD, RXD, State
LCD screen 16x2 I2C
- Description: A 16x2 character LCD screen with I2C interface.
- Pins: SCL, SDA, VCC, GND
Wiring Details
Arduino UNO
- GND: Connected to GND of HC-05 Bluetooth Module and LCD screen 16x2 I2C.
- 5V: Connected to VCC of HC-05 Bluetooth Module and LCD screen 16x2 I2C.
- A4: Connected to SCL of LCD screen 16x2 I2C.
- A5: Connected to SDA of LCD screen 16x2 I2C.
- D11: Connected to RXD of HC-05 Bluetooth Module.
- D10: Connected to TXD of HC-05 Bluetooth Module.
HC-05 Bluetooth Module
- GND: Connected to GND of Arduino UNO and LCD screen 16x2 I2C.
- VCC: Connected to 5V of Arduino UNO and LCD screen 16x2 I2C.
- RXD: Connected to D11 of Arduino UNO.
- TXD: Connected to D10 of Arduino UNO.
LCD screen 16x2 I2C
- GND: Connected to GND of Arduino UNO and HC-05 Bluetooth Module.
- VCC: Connected to 5V of Arduino UNO and HC-05 Bluetooth Module.
- SCL: Connected to A4 of Arduino UNO.
- SDA: Connected to A5 of Arduino UNO.
Code Documentation
Arduino UNO Code
#include <Wire.h>
#include <LiquidCrystal_I2C.h>
#include <SoftwareSerial.h>

// Initialize I2C LCD (change 0x27 if your address is different)
LiquidCrystal_I2C lcd(0x27, 16, 2); // 16x2 LCD

// Initialize SoftwareSerial for Bluetooth (RX, TX)
SoftwareSerial Bluetooth(10, 11);

void setup() {
    // Initialize the LCD
    lcd.begin(16,2);  // Specify columns and rows
    lcd.backlight();   // Turn on the backlight
    lcd.print("Waiting...");  // Initial message

    // Start Bluetooth communication
    Bluetooth.begin(9600);  // Baud rate for HC-05/HC-06

    // Start Serial for debugging
    Serial.begin(9600);
}

void loop() {
    // Check if Bluetooth has received any data
    if (Bluetooth.available()) {
        lcd.clear();  // Clear the LCD before displaying new text

        // Read the incoming data (message)
        String message = "";
        while (Bluetooth.available()) {
            char data = Bluetooth.read();  // Read each character
            message += data;  // Append each character to the string
        }

        // Debugging: Print raw received data to Serial Monitor
        Serial.print("Raw Received: ");
        Serial.println(message);  // Print the received message for debugging

        // Clean up the message
        message.trim();  // Trim leading and trailing whitespace
        message.replace("\n", "");  // Remove newline characters
        message.replace("\r", "");  // Remove carriage return characters

        // Explicitly remove non-printable characters
        for (int i = 0; i < message.length(); i++) {
            if (message[i] < 32 || message[i] > 126) {  // ASCII printable range
                message.remove(i);
                i--;  // Adjust index after removal
            }
        }

        // Limit message length to 16 characters (for 16x2 LCD)
        if (message.length() > 16) {
            message = message.substring(0, 16);  // Truncate to first 16 characters
        }

        // Continuously scroll the message
        scrollMessage(message);
    }
}

// Function to continuously scroll a message on the LCD
void scrollMessage(String message) {
    // Create a buffer for the scrolling effect
    String buffer = message + "                ";  // Adding spaces for smoother scrolling

    // Loop forever to create continuous scrolling
    while (true) {
        // Display the message
        for (int i = 0; i < buffer.length() - 15; i++) {
            lcd.setCursor(0, 0);  // Set cursor to the top-left corner
            lcd.print(buffer.substring(i, i + 16)); // Display 16 characters at a time

            // Delay for a smooth scrolling effect
            delay(300); // Adjust delay for speed of scrolling

            // Check for new incoming messages
            if (Bluetooth.available()) {
                return; // Exit the scrolling if new data is available
            }
        }
    }
}
This code initializes the LCD and Bluetooth module, waits for incoming Bluetooth messages, and displays them on the LCD screen. The message is cleaned up to remove non-printable characters and is limited to 16 characters for proper display on the 16x2 LCD. The message is then scrolled continuously on the LCD screen.