
Arduino UNO Controlled Smart Parking System with RFID and IR Sensors
View and Edit Project In Cirkit Designer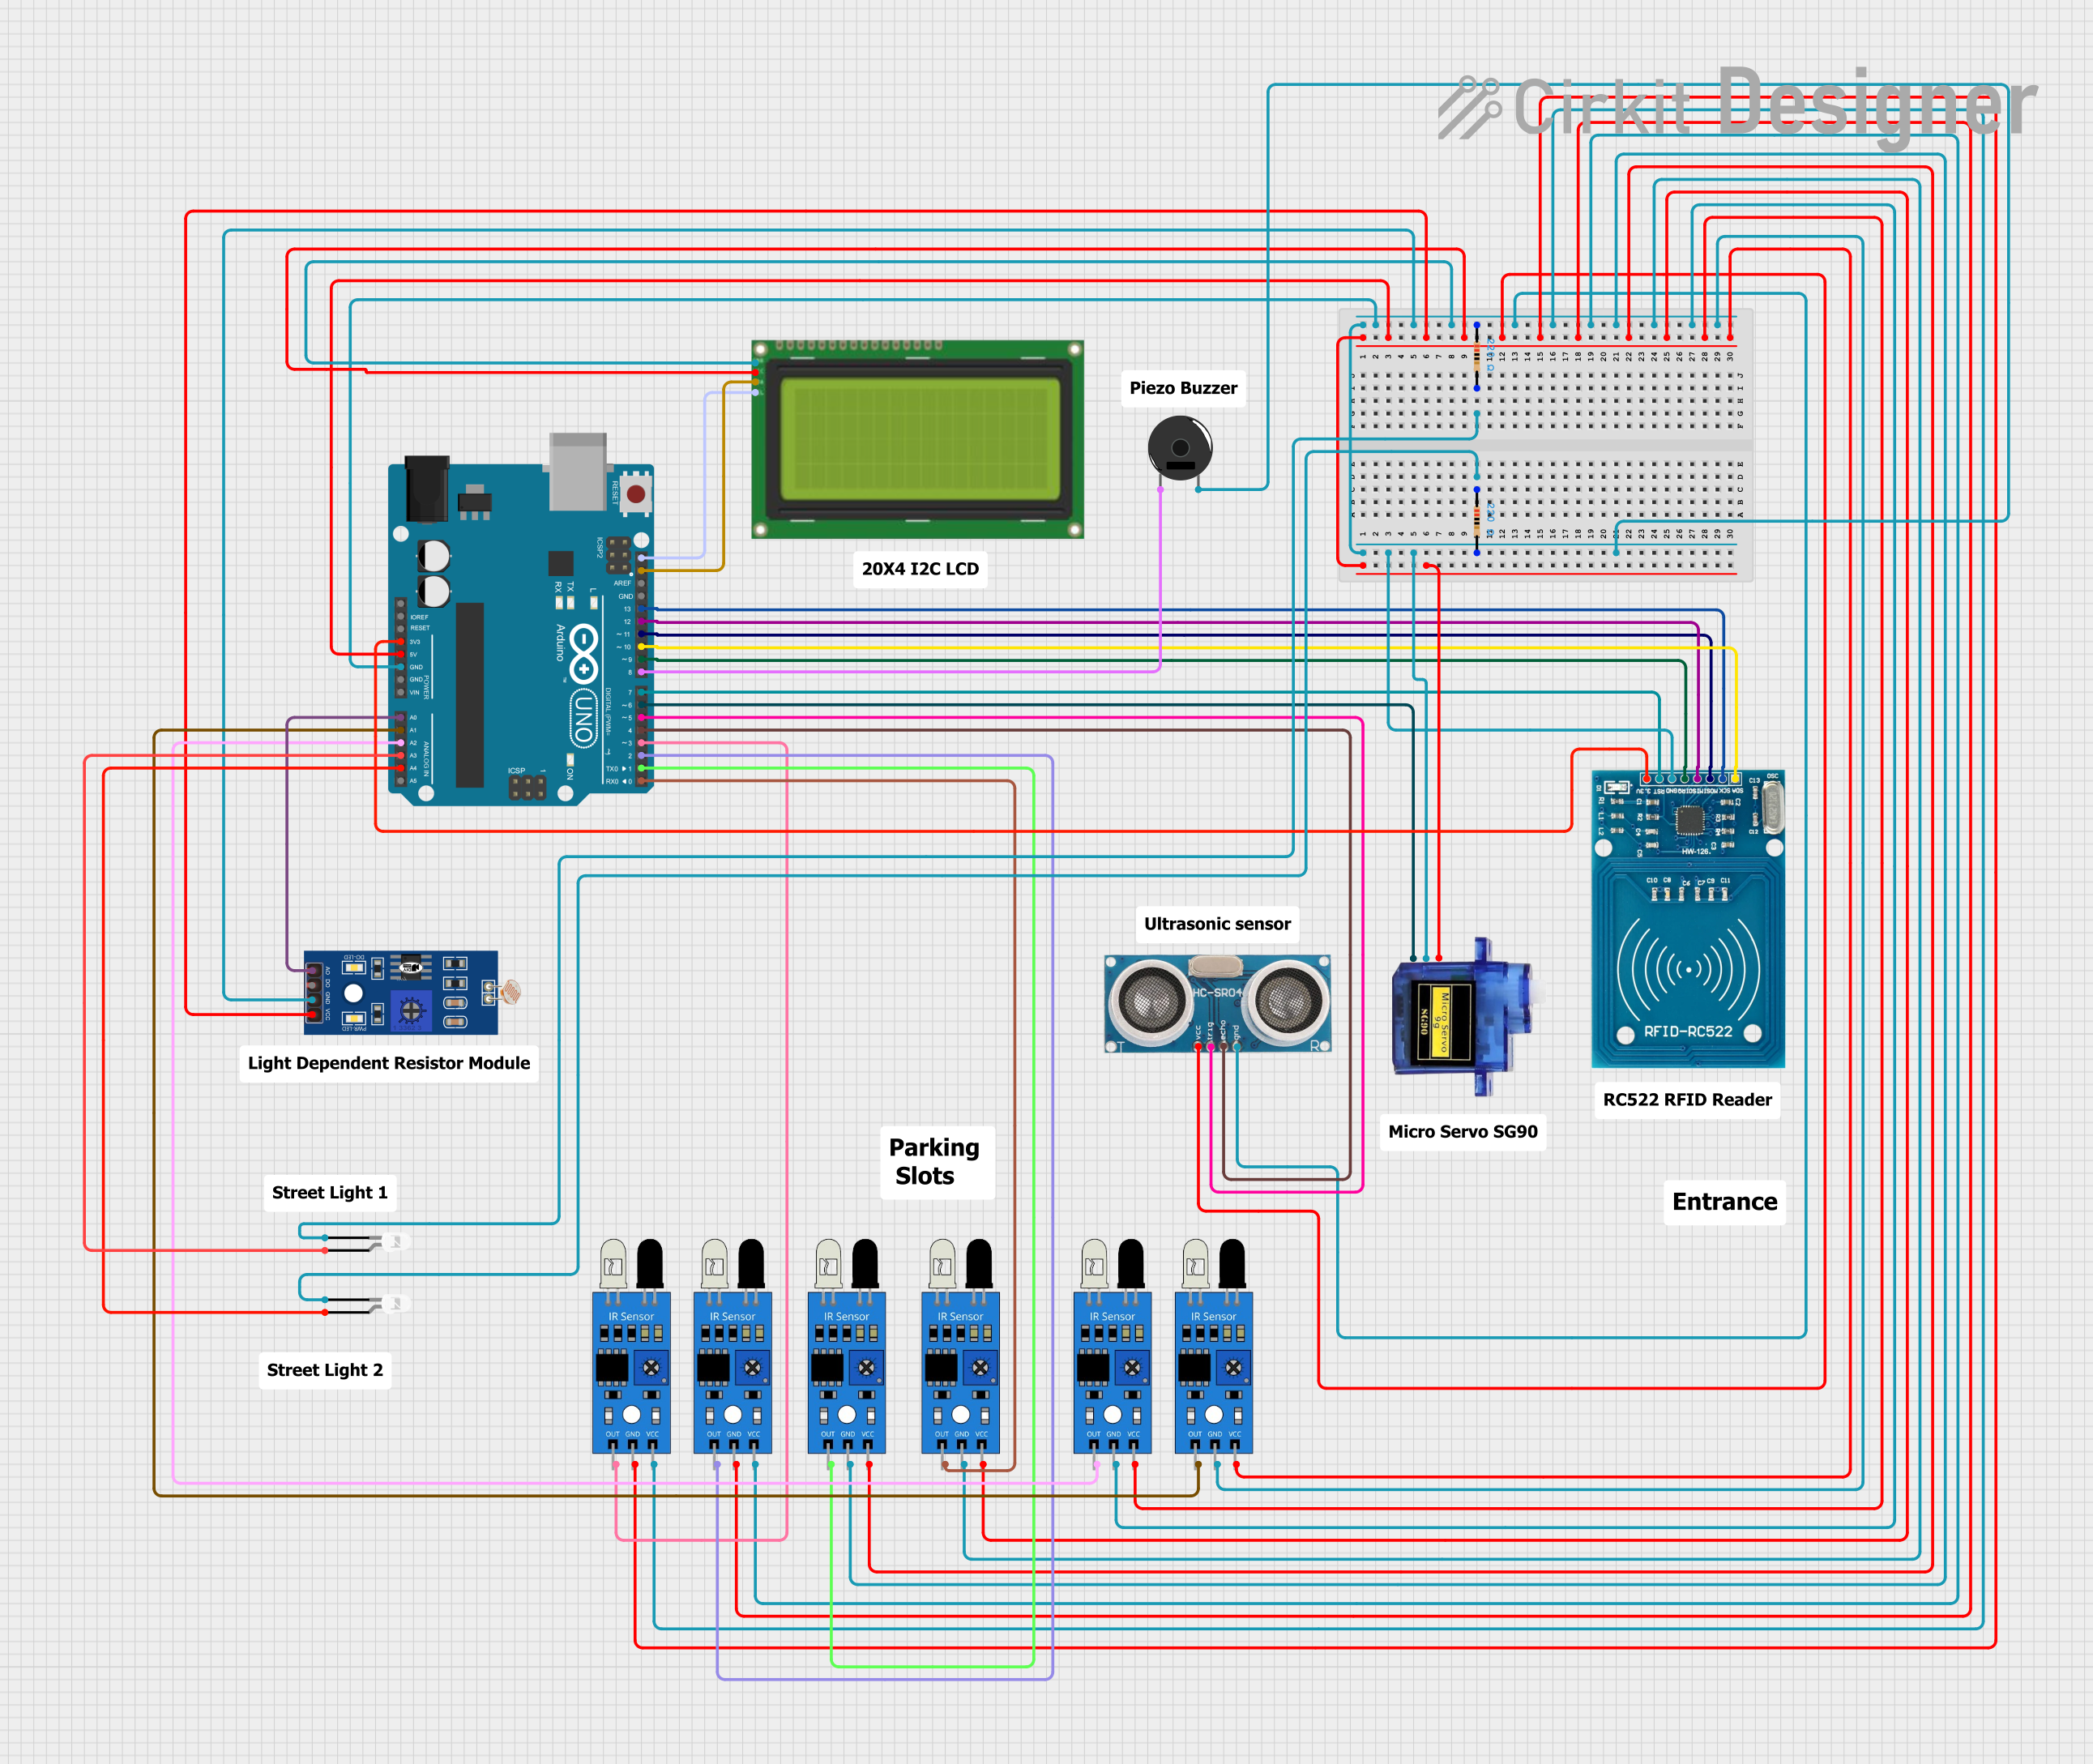
Circuit Documentation
Summary
The circuit is designed to interface various sensors, actuators, and an LCD display with an Arduino UNO microcontroller. It includes input devices like IR sensors and an LDR, output devices such as LEDs, a piezo buzzer, and a micro servo, as well as communication modules like an RFID-RC522 and an I2C LCD display. The circuit appears to be configured for a parking system with entry and exit control, slot occupancy detection, and adaptive street lighting based on ambient light levels.
Component List
Lcd 20x4 i2c
- Description: A 20x4 character LCD display with an I2C interface for displaying information.
- Pins: GND, 5v, SCA, SCL
IR Sensor
- Description: Infrared sensors used for detecting object presence.
- Pins: out, gnd, vcc
LDR (Light Dependent Resistor)
- Description: A sensor for detecting the ambient light level.
- Pins: A0, D0, GND, VCC
LED: Two Pin (white)
- Description: White LEDs used for indicating status or for lighting purposes.
- Pins: cathode, anode
RFID-RC522
- Description: An RFID reader/writer module for contactless communication using radio frequency.
- Pins: VCC (3.3V), RST, GND, IRQ, MISO, MOSI, SCK, SDA
Ultrasonic Sensor
- Description: A sensor for measuring distance using ultrasonic waves.
- Pins: +VCC, Trigger, Echo, GND
Micro servo 9G
- Description: A small servo motor for precise angular movement.
- Pins: GND, +5V, PWM
Piezo Buzzer
- Description: An electronic buzzer for audible alerts.
- Pins: pin 1, pin 2
Arduino UNO
- Description: A microcontroller board based on the ATmega328P.
- Pins: Various digital and analog pins, power supply pins, and communication interface pins.
Resistor (220 Ohms)
- Description: A resistor with a resistance of 220 Ohms, likely used for current limiting for LEDs.
- Pins: pin1, pin2
Wiring Details
Lcd 20x4 i2c
- GND to Arduino GND
- 5v to Arduino 5V
- SCA to Arduino SDA
- SCL to Arduino SCL
IR Sensor
- out to various Arduino digital pins (D0, D1, D2, D3, A1, A2)
- gnd to Arduino GND
- vcc to Arduino 5V
LDR
- A0 to Arduino A0
- D0 (not used in the provided code)
- GND to Arduino GND
- VCC to Arduino 5V
LED: Two Pin (white)
- cathode to Resistor (220 Ohms) and then to Arduino GND
- anode to Arduino digital pins (A3, A4)
RFID-RC522
- VCC (3.3V) to Arduino 3.3V
- RST to Arduino D7
- GND to Arduino GND
- IRQ to Arduino D9
- MISO to Arduino D12
- MOSI to Arduino D11
- SCK to Arduino D13
- SDA to Arduino D10
Ultrasonic Sensor
- +VCC to Arduino 5V
- Trigger to Arduino D5
- Echo to Arduino D4
- GND to Arduino GND
Micro servo 9G
- GND to Arduino GND
- +5V to Arduino 5V
- PWM to Arduino D6
Piezo Buzzer
- pin 1 to Arduino D8
- pin 2 to Arduino GND
Resistor (220 Ohms)
- pin1 to LED cathode
- pin2 to Arduino GND
Documented Code
Arduino UNO Code
#include <SPI.h>
#include <MFRC522.h>
#include <Wire.h>
#include <LiquidCrystal_I2C.h>
#include <Servo.h>

// RFID Configuration
#define SS_PIN 10
#define RST_PIN 7
MFRC522 rfid(SS_PIN, RST_PIN);

// LCD Configuration
LiquidCrystal_I2C lcd(0x27, 20, 4);

// Servo Configuration
Servo servo;
#define SERVO_PIN 6

// Ultrasonic Sensor Configuration
#define TRIG_PIN 5
#define ECHO_PIN 4

// Piezo Buzzer
#define BUZZER_PIN 8

// IR Sensors for Parking Slots
#define IR_SENSOR_1 0
#define IR_SENSOR_2 1
#define IR_SENSOR_3 2
#define IR_SENSOR_4 3
#define IR_SENSOR_5 A1
#define IR_SENSOR_6 A2

// LDR and LED Configuration
#define LDR_PIN A0
#define LED_1_PIN A3
#define LED_2_PIN A4

// RFID Card UIDs (replace with actual card UIDs)
byte cardUIDs[6][4] = {
  {0xDE, 0xAD, 0xBE, 0xEF},  // Nicholas
  {0xAA, 0xBB, 0xCC, 0xDD},  // Nathen
  {0x11, 0x22, 0x33, 0x44},  // Joshua
  {0x55, 0x66, 0x77, 0x88},  // Sarrvesh
  {0x99, 0xAA, 0xBB, 0xCC},  // Shalen
  {0x12, 0x34, 0x56, 0x78}   // Hassan
};
String cardNames[6] = {"Nicholas", "Nathen", "Joshua", "Sarrvesh", "Shalen", "Hassan"};

void setup() {
  Serial.begin(9600);

  // Initialize RFID
  SPI.begin();
  rfid.PCD_Init();

  // Initialize LCD
  lcd.init();
  lcd.backlight();

  // Initialize Servo
  servo.attach(SERVO_PIN);
  servo.write(0);  // Close the barrier initially

  // Initialize Ultrasonic Sensor
  pinMode(TRIG_PIN, OUTPUT);
  pinMode(ECHO_PIN, INPUT);

  // Initialize Buzzer
  pinMode(BUZZER_PIN, OUTPUT);

  // Initialize IR Sensors
  pinMode(IR_SENSOR_1, INPUT);
  pinMode(IR_SENSOR_2, INPUT);
  pinMode(IR_SENSOR_3, INPUT);
  pinMode(IR_SENSOR_4, INPUT);
  pinMode(IR_SENSOR_5, INPUT);
  pinMode(IR_SENSOR_6, INPUT);

  // Initialize LDR and LEDs
  pinMode(LDR_PIN, INPUT);
  pinMode(LED_1_PIN, OUTPUT);
  pinMode(LED_2_PIN, OUTPUT);

  // Display initial slots availability
  displayAvailableSlots();
}

void loop() {
  checkRFID();
  updateParkingSlots();
  controlStreetLights();
  checkExit();
}

// Additional functions are defined here...
RFID-RC522 Code
void setup() {
  // put your setup code here, to run once:

}

void loop() {
  // put your main code here, to run repeatedly:

}
(Note: The code for the RFID-RC522 microcontroller is minimal and does not include any functional code. It is likely that the main code is intended to run on the Arduino UNO, and the RFID-RC522 is interfaced through the Arduino.)