
Arduino UNO-Based RFID and Keypad Door Lock System with Servo Motor
View and Edit Project In Cirkit Designer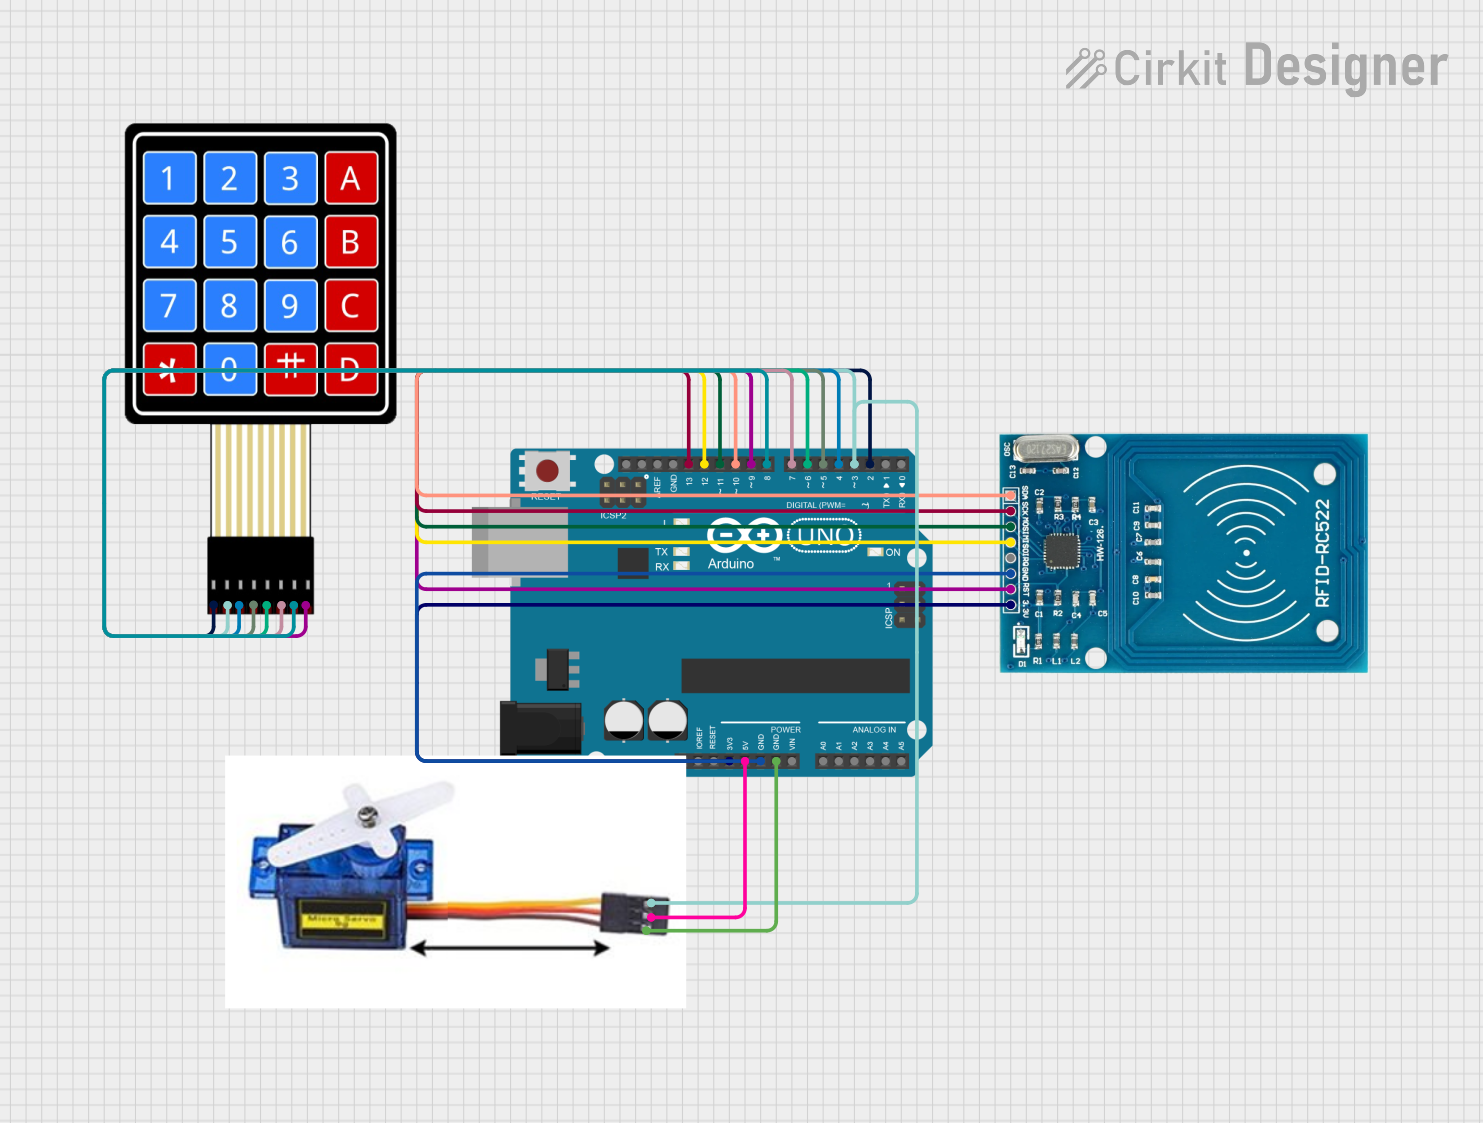
Door Locking System using RFID, Keypad, Servo Motor, and Arduino UNO
Summary
This project is a door locking system that utilizes an Arduino UNO microcontroller, an RFID reader (RFID-RC522), a 4x4 membrane matrix keypad, and a 9G servo motor. The system unlocks a door when either the correct RFID tag is scanned or the correct password is entered on the keypad. The servo motor rotates to unlock the door upon successful authentication.
Component List
Arduino UNO
- Description: A microcontroller board based on the ATmega328P.
- Pins: UNUSED, IOREF, Reset, 3.3V, 5V, GND, Vin, A0, A1, A2, A3, A4, A5, SCL, SDA, AREF, D13, D12, D11, D10, D9, D8, D7, D6, D5, D4, D3, D2, D1, D0
RFID-RC522
- Description: An RFID reader module that operates at 13.56 MHz.
- Pins: VCC (3.3V), RST, GND, IRQ, MISO, MOSI, SCK, SDA
4X4 Membrane Matrix Keypad
- Description: A 4x4 matrix keypad used for user input.
- Pins: R1, R2, R3, R4, C1, C2, C3, C4
Servo Motor 9G
- Description: A small servo motor used to control the locking mechanism.
- Pins: VCC 5V, PMW, GND
Wiring Details
Arduino UNO
- 3.3V: Connected to VCC (3.3V) of RFID-RC522
- 5V: Connected to VCC 5V of Servo Motor 9G
- GND: Connected to GND of RFID-RC522 and Servo Motor 9G
- D13: Connected to SCK of RFID-RC522
- D12: Connected to MISO of RFID-RC522
- D11: Connected to MOSI of RFID-RC522
- D10: Connected to SDA of RFID-RC522
- D9: Connected to RST of RFID-RC522 and C4 of 4X4 Membrane Matrix Keypad
- D8: Connected to C3 of 4X4 Membrane Matrix Keypad
- D7: Connected to C2 of 4X4 Membrane Matrix Keypad
- D6: Connected to C1 of 4X4 Membrane Matrix Keypad
- D5: Connected to R4 of 4X4 Membrane Matrix Keypad
- D4: Connected to R3 of 4X4 Membrane Matrix Keypad
- D3: Connected to PMW of Servo Motor 9G and R2 of 4X4 Membrane Matrix Keypad
- D2: Connected to R1 of 4X4 Membrane Matrix Keypad
RFID-RC522
- VCC (3.3V): Connected to 3.3V of Arduino UNO
- RST: Connected to D9 of Arduino UNO and C4 of 4X4 Membrane Matrix Keypad
- GND: Connected to GND of Arduino UNO
- SCK: Connected to D13 of Arduino UNO
- MISO: Connected to D12 of Arduino UNO
- MOSI: Connected to D11 of Arduino UNO
- SDA: Connected to D10 of Arduino UNO
4X4 Membrane Matrix Keypad
- C4: Connected to RST of RFID-RC522 and D9 of Arduino UNO
- C3: Connected to D8 of Arduino UNO
- C2: Connected to D7 of Arduino UNO
- C1: Connected to D6 of Arduino UNO
- R4: Connected to D5 of Arduino UNO
- R3: Connected to D4 of Arduino UNO
- R2: Connected to PMW of Servo Motor 9G and D3 of Arduino UNO
- R1: Connected to D2 of Arduino UNO
Servo Motor 9G
- VCC 5V: Connected to 5V of Arduino UNO
- PMW: Connected to R2 of 4X4 Membrane Matrix Keypad and D3 of Arduino UNO
- GND: Connected to GND of Arduino UNO
Code Documentation
/*
 * Project: Door Locking System using RFID, Keypad, Servo Motor, and Arduino UNO
 * Description: This project unlocks a door using either an RFID tag or a keypad.
 * If the correct password is entered on the keypad or the correct RFID tag is
 * scanned, the servo motor will rotate to unlock the door.
 */

#include <Servo.h>
#include <Keypad.h>
#include <SPI.h>
#include <MFRC522.h>

// Pin definitions
#define RST_PIN 9
#define SS_PIN 10
#define SERVO_PIN 3

// RFID setup
MFRC522 rfid(SS_PIN, RST_PIN);

// Servo setup
Servo myServo;

// Keypad setup
const byte ROWS = 4; // Four rows
const byte COLS = 4; // Four columns
char keys[ROWS][COLS] = {
  {'1','2','3','A'},
  {'4','5','6','B'},
  {'7','8','9','C'},
  {'*','0','#','D'}
};
byte rowPins[ROWS] = {2, 3, 4, 5}; // Connect to the row pinouts of the keypad
byte colPins[COLS] = {6, 7, 8, 9}; // Connect to the column pinouts of the keypad
Keypad keypad = Keypad(makeKeymap(keys), rowPins, colPins, ROWS, COLS);

// Password and RFID tag
String correctPassword = "1234";
String inputPassword;
byte correctTag[4] = {0xDE, 0xAD, 0xBE, 0xEF};

void setup() {
  Serial.begin(9600);
  SPI.begin();
  rfid.PCD_Init();
  myServo.attach(SERVO_PIN);
  myServo.write(0); // Lock position
  Serial.println("System Ready");
}

void loop() {
  // Check RFID
  if (rfid.PICC_IsNewCardPresent() && rfid.PICC_ReadCardSerial()) {
    if (checkRFID()) {
      unlockDoor();
    }
    rfid.PICC_HaltA();
  }

  // Check Keypad
  char key = keypad.getKey();
  if (key) {
    if (key == '#') {
      if (inputPassword == correctPassword) {
        unlockDoor();
      }
      inputPassword = "";
    } else if (key == '*') {
      inputPassword = "";
    } else {
      inputPassword += key;
    }
  }
}

bool checkRFID() {
  for (byte i = 0; i < 4; i++) {
    if (rfid.uid.uidByte[i] != correctTag[i]) {
      return false;
    }
  }
  return true;
}

void unlockDoor() {
  Serial.println("Door Unlocked");
  myServo.write(90); // Unlock position
  delay(5000); // Keep unlocked for 5 seconds
  myServo.write(0); // Lock position
  Serial.println("Door Locked");
}
This code initializes the RFID reader, servo motor, and keypad. It continuously checks for a valid RFID tag or the correct password entered on the keypad. If either is detected, the servo motor rotates to unlock the door for 5 seconds before returning to the locked position.