
Arduino MKR WiFi 1010 LoRa-Enabled Pushbutton Message Sender
View and Edit Project In Cirkit Designer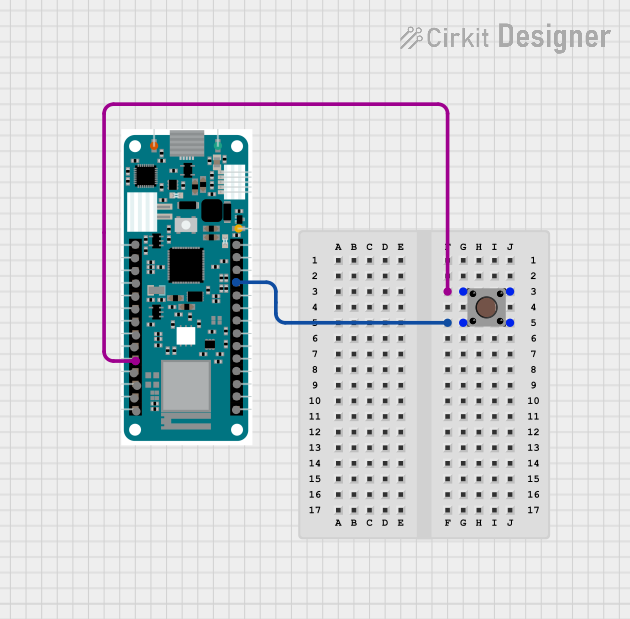
Circuit Documentation
Summary of the Circuit
This circuit consists of an Arduino MKR WiFi 1010 microcontroller and a pushbutton. The Arduino MKR WiFi 1010 is equipped with various digital and analog pins, communication interfaces like SPI, I2C, and serial UART, as well as power pins. The pushbutton is a simple switch that, when pressed, creates a connection between its pins. In this circuit, the pushbutton is used to trigger a signal to the Arduino, which then sends a message using LoRa communication.
Component List
Arduino MKR WiFi 1010
- Description: A microcontroller board based on the Atmel SAMD21 and a U-Blox ESP32 module for Wi-Fi connectivity. It is designed for IoT applications and supports LoRa communication.
- Pins: A0-A6 (Analog Inputs), D0-D7 (Digital I/O), MOSI, SCK, MISO (SPI), SDA, SCL (I2C), RX, TX (UART), RESET, GND, VCC, VIN, 5V.
Pushbutton
- Description: A simple switch that connects two pairs of terminals internally when pressed.
- Pins: Pin 1 (in), Pin 2 (in), Pin 3 (out), Pin 4 (out).
Wiring Details
Arduino MKR WiFi 1010
- D2: Connected to Pushbutton Pin 1 (in) and Pin 2 (in).
- GND: Connected to Pushbutton Pin 3 (out) and Pin 4 (out).
Pushbutton
- Pin 1 (in) and Pin 2 (in): Connected to Arduino MKR WiFi 1010 D2.
- Pin 3 (out) and Pin 4 (out): Connected to Arduino MKR WiFi 1010 GND.
Documented Code
#include <SPI.h>
#include <LoRa.h>

int counter = 0;
int button = 2; // Button connected to digital pin 2
int buttonState;

void setup() {
  pinMode(button, INPUT_PULLUP); // Set the button as an input with an internal pull-up resistor

  Serial.begin(9600); // Begin serial communication at 9600 baud rate

  while (!Serial); // Wait for serial port to connect
  Serial.println("LoRa Sender");

  if (!LoRa.begin(868E6)) { // Initialize LoRa at 868 MHz
    Serial.println("Starting LoRa failed!");
    while (1); // Infinite loop if LoRa initialization fails
  }

  delay(1000); // Wait for a second after initializing LoRa
}

void loop() {
  buttonState = digitalRead(button); // Read the state of the button

  if (buttonState == LOW) { // If the button is pressed
    // send packet
    LoRa.beginPacket(); // Start a new LoRa packet
    LoRa.print("button pressed"); // Print message to the LoRa packet
    LoRa.endPacket(); // Finish the LoRa packet

    counter++; // Increment the counter
    Serial.print("Sending packet: "); // Print a message to the serial monitor
    Serial.println(counter); // Print the value of the counter to the serial monitor

    delay(500); // Wait for half a second
  }
}
The code provided is for the Arduino MKR WiFi 1010 microcontroller. It initializes the LoRa communication and sets up a button on digital pin 2. When the button is pressed, a message is sent over LoRa, and the event is logged via the serial monitor. The button uses an internal pull-up resistor, and the state is checked in the main loop. If the button is pressed (logic LOW), a "button pressed" message is sent, and the packet counter is incremented.