
Circuit Documentation
Summary of the Circuit
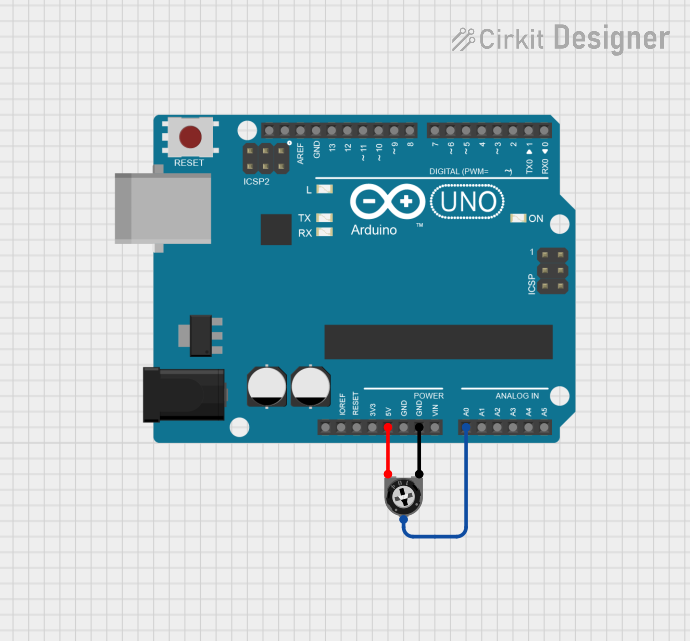
This circuit consists of an Arduino UNO microcontroller board and a trimmer potentiometer. The Arduino UNO is used as the central processing unit of the circuit, capable of reading analog voltages and executing embedded code to perform various tasks. The trimmer potentiometer is used as an adjustable voltage divider, providing a variable voltage input to one of the Arduino's analog pins.
Component List
Arduino UNO
- Description: A microcontroller board based on the ATmega328P.
- Pins: UNUSED, IOREF, Reset, 3.3V, 5V, GND, Vin, A0-A5, SCL, SDA, AREF, D0-D13.
- Purpose: Acts as the main controller for the circuit, capable of executing programmed instructions and interfacing with various electronic components.
Trimmer Potentiometer
- Description: A three-terminal resistor with an adjustable center tap (wiper).
- Pins: leg1, wiper, leg2.
- Properties: Resistance - 10,000 Ohms.
- Purpose: Provides an adjustable voltage level to the Arduino's analog input for calibration or variable control purposes.
Wiring Details
Arduino UNO
- 5V: Connected to the leg2 of the Trimmer Potentiometer.
- GND: Connected to the leg1 of the Trimmer Potentiometer.
- A0: Connected to the wiper of the Trimmer Potentiometer.
Trimmer Potentiometer
- leg1: Connected to the GND of the Arduino UNO.
- wiper: Connected to the A0 of the Arduino UNO.
- leg2: Connected to the 5V of the Arduino UNO.
Documented Code
Arduino UNO Code (sketch.ino)
void setup() {
  // put your setup code here, to run once:

}

void loop() {
  // put your main code here, to run repeatedly:

}
Additional Notes
- The provided code is a template and does not include specific functionality. It needs to be populated with instructions to read the analog voltage from the potentiometer and perform desired actions based on the input.
- The
setup()function is intended for initialization code that runs once, such as setting pin modes. - The
loop()function contains code that runs repeatedly, which is where the main logic of the program will reside.
This documentation provides an overview of the circuit's components, their wiring, and the initial code structure for the Arduino UNO. Further development of the code is required to achieve the desired functionality of the circuit.