
Arduino-Based Temperature and Humidity Monitoring System with LCD Display
View and Edit Project In Cirkit Designer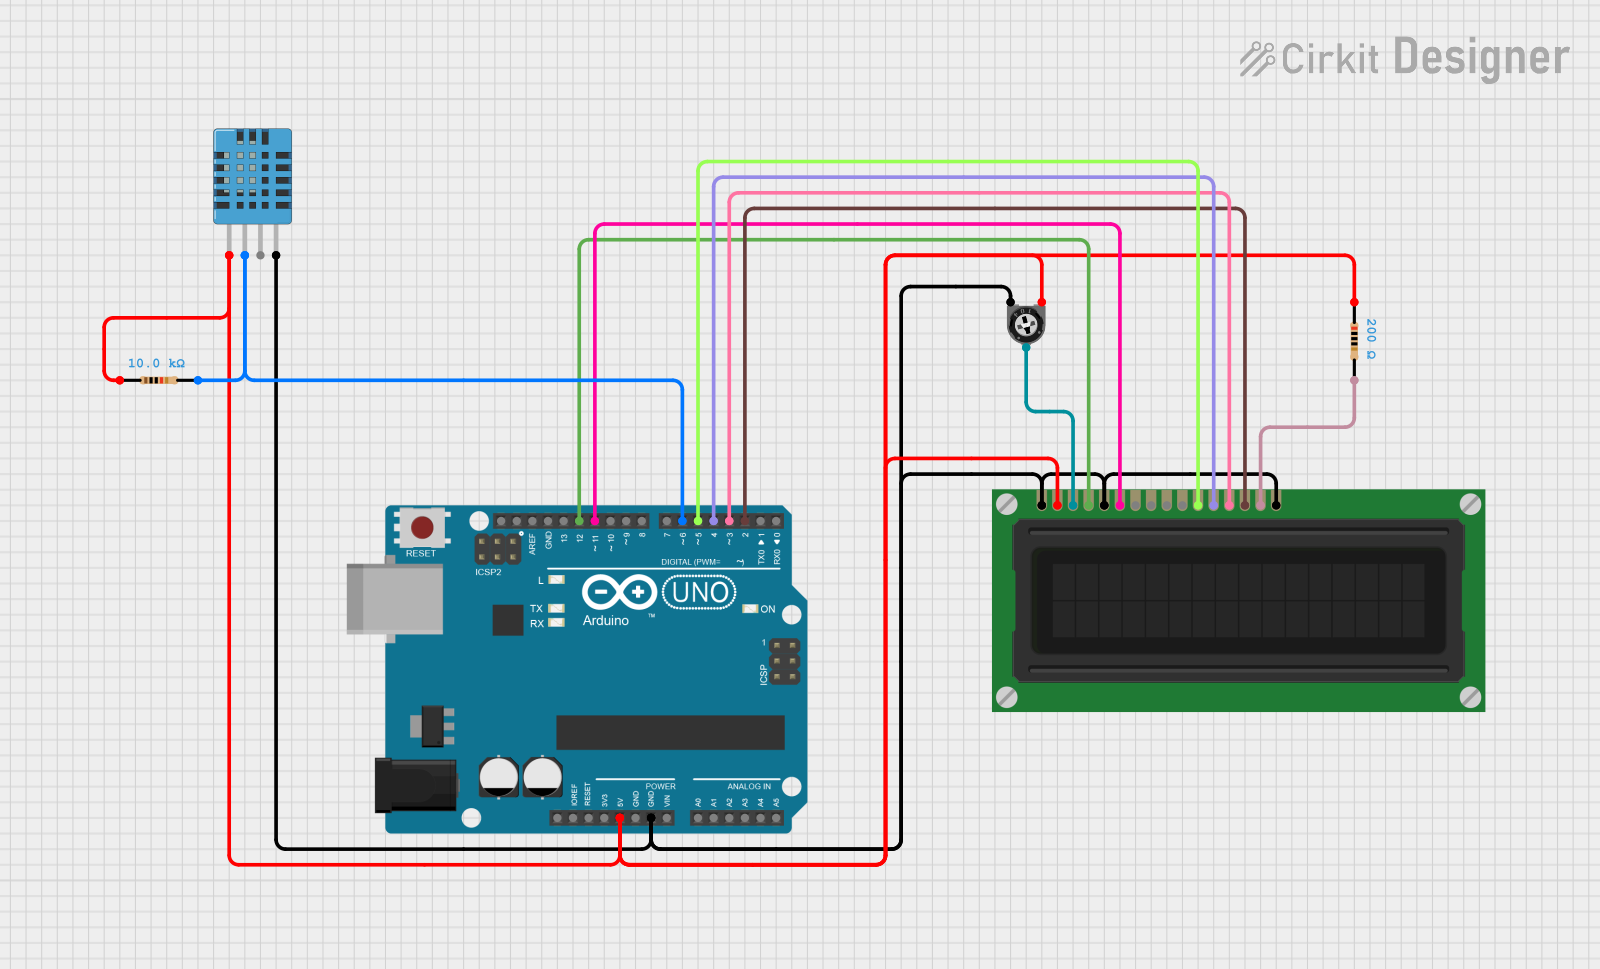
Circuit Documentation
Summary
This circuit is designed to interface a DHT11 humidity and temperature sensor with an Arduino UNO, displaying the readings on a 16-pin LCD display. A trimmer potentiometer is used to adjust the contrast of the LCD. The circuit is powered by the Arduino's 5V output, and the readings from the DHT11 sensor are processed and displayed in real-time.
Component List
Arduino UNO
- Description: A microcontroller board based on the ATmega328P.
- Purpose: Acts as the main controller for the circuit, processing data from the DHT11 sensor and controlling the LCD display.
Trimmer Potentiometer
- Description: A variable resistor used to adjust the voltage.
- Purpose: Used to adjust the contrast of the LCD display.
- Resistance: 10k Ohms.
LCD Display (16 pin)
- Description: A 16x2 character LCD that can display alphanumeric characters.
- Purpose: Displays temperature and humidity readings from the DHT11 sensor.
Resistor (200 Ohms)
- Description: A passive electrical component that resists the flow of current.
- Purpose: Used in the circuit to limit current to the LCD display.
Resistor (10k Ohms)
- Description: A passive electrical component that resists the flow of current.
- Purpose: Used in conjunction with the DHT11 sensor for proper operation.
DHT11 Humidity and Temperature Sensor
- Description: A digital sensor that measures temperature and humidity.
- Purpose: Provides temperature and humidity readings to the Arduino.
Wiring Details
Arduino UNO
5V: Connected to the VDD pin of the DHT11 sensor, VDD pin of the LCD display, and leg1 of the trimmer potentiometer.
GND: Connected to the GND pin of the DHT11 sensor, VSS pin of the LCD display, and leg2 of the trimmer potentiometer.
D12: Connected to the RS pin of the LCD display.
D11: Connected to the E pin of the LCD display.
D6: Connected to the DATA pin of the DHT11 sensor.
D5: Connected to the DB4 pin of the LCD display.
D4: Connected to the DB5 pin of the LCD display.
D3: Connected to the DB6 pin of the LCD display.
D2: Connected to the DB7 pin of the LCD display.
Trimmer Potentiometer
leg1: Connected to the 5V pin of the Arduino.
leg2: Connected to the GND pin of the Arduino.
wiper: Connected to the VO pin of the LCD display.
LCD Display (16 pin)
VDD: Connected to the 5V pin of the Arduino.
VSS: Connected to the GND pin of the Arduino.
VO: Connected to the wiper of the trimmer potentiometer.
RS: Connected to the D12 pin of the Arduino.
R_W: Connected to GND (write mode).
E: Connected to the D11 pin of the Arduino.
DB0 to DB3: Not connected.
DB4: Connected to the D5 pin of the Arduino.
DB5: Connected to the D4 pin of the Arduino.
DB6: Connected to the D3 pin of the Arduino.
DB7: Connected to the D2 pin of the Arduino.
A: Connected to 5V (backlight anode).
K: Connected to GND (backlight cathode).
DHT11 Humidity and Temperature Sensor
VDD: Connected to the 5V pin of the Arduino.
GND: Connected to the GND pin of the Arduino.
DATA: Connected to the D6 pin of the Arduino.
Documented Code
#include <DHT.h>
#include <LiquidCrystal.h>

// Define the pin where the DHT11 is connected
#define DHTPIN 6
#define DHTTYPE DHT11

// Initialize the DHT sensor
DHT dht(DHTPIN, DHTTYPE);

// Initialize the LCD with the pins connected to the Arduino
// RS, E, D4, D5, D6, D7
LiquidCrystal lcd(12, 11, 5, 4, 3, 2);

void setup() {
  // Start the serial communication
  Serial.begin(9600);

  // Initialize the DHT sensor
  dht.begin();

  // Set up the LCD's number of columns and rows
  lcd.begin(16, 2);
}

void loop() {
  // Wait a few seconds between measurements
  delay(2000);

  // Read temperature as Celsius
  float temperature = dht.readTemperature();
  // Read humidity
  float humidity = dht.readHumidity();

  // Check if any reads failed and exit early (to try again)
  if (isnan(temperature) || isnan(humidity)) {
    Serial.println("Failed to read from DHT sensor!");
    lcd.setCursor(0, 0);
    lcd.print("Read Error");
    lcd.setCursor(0, 1);
    lcd.print("Check Sensor");
    return;
  }

  // Print the temperature and humidity to the Serial Monitor
  Serial.print("Temperature: ");
  Serial.print(temperature);
  Serial.println(" *C");
  Serial.print("Humidity: ");
  Serial.print(humidity);
  Serial.println(" %");

  // Display the temperature on the first line of the LCD
  lcd.setCursor(0, 0);
  lcd.print("Temp: ");
  lcd.print(temperature);
  lcd.print(" C  "); // Extra spaces to clear any previous data

  // Display the humidity on the second line of the LCD
  lcd.setCursor(0, 1);
  lcd.print("Humidity: ");
  lcd.print(humidity);
  lcd.print(" %  "); // Extra spaces to clear any previous data
}
This documentation provides a comprehensive overview of the circuit, detailing each component, its purpose, wiring connections, and the code used to operate the system.