
Arduino UNO Solar-Powered Light-Tracking System with Servo Motors
View and Edit Project In Cirkit Designer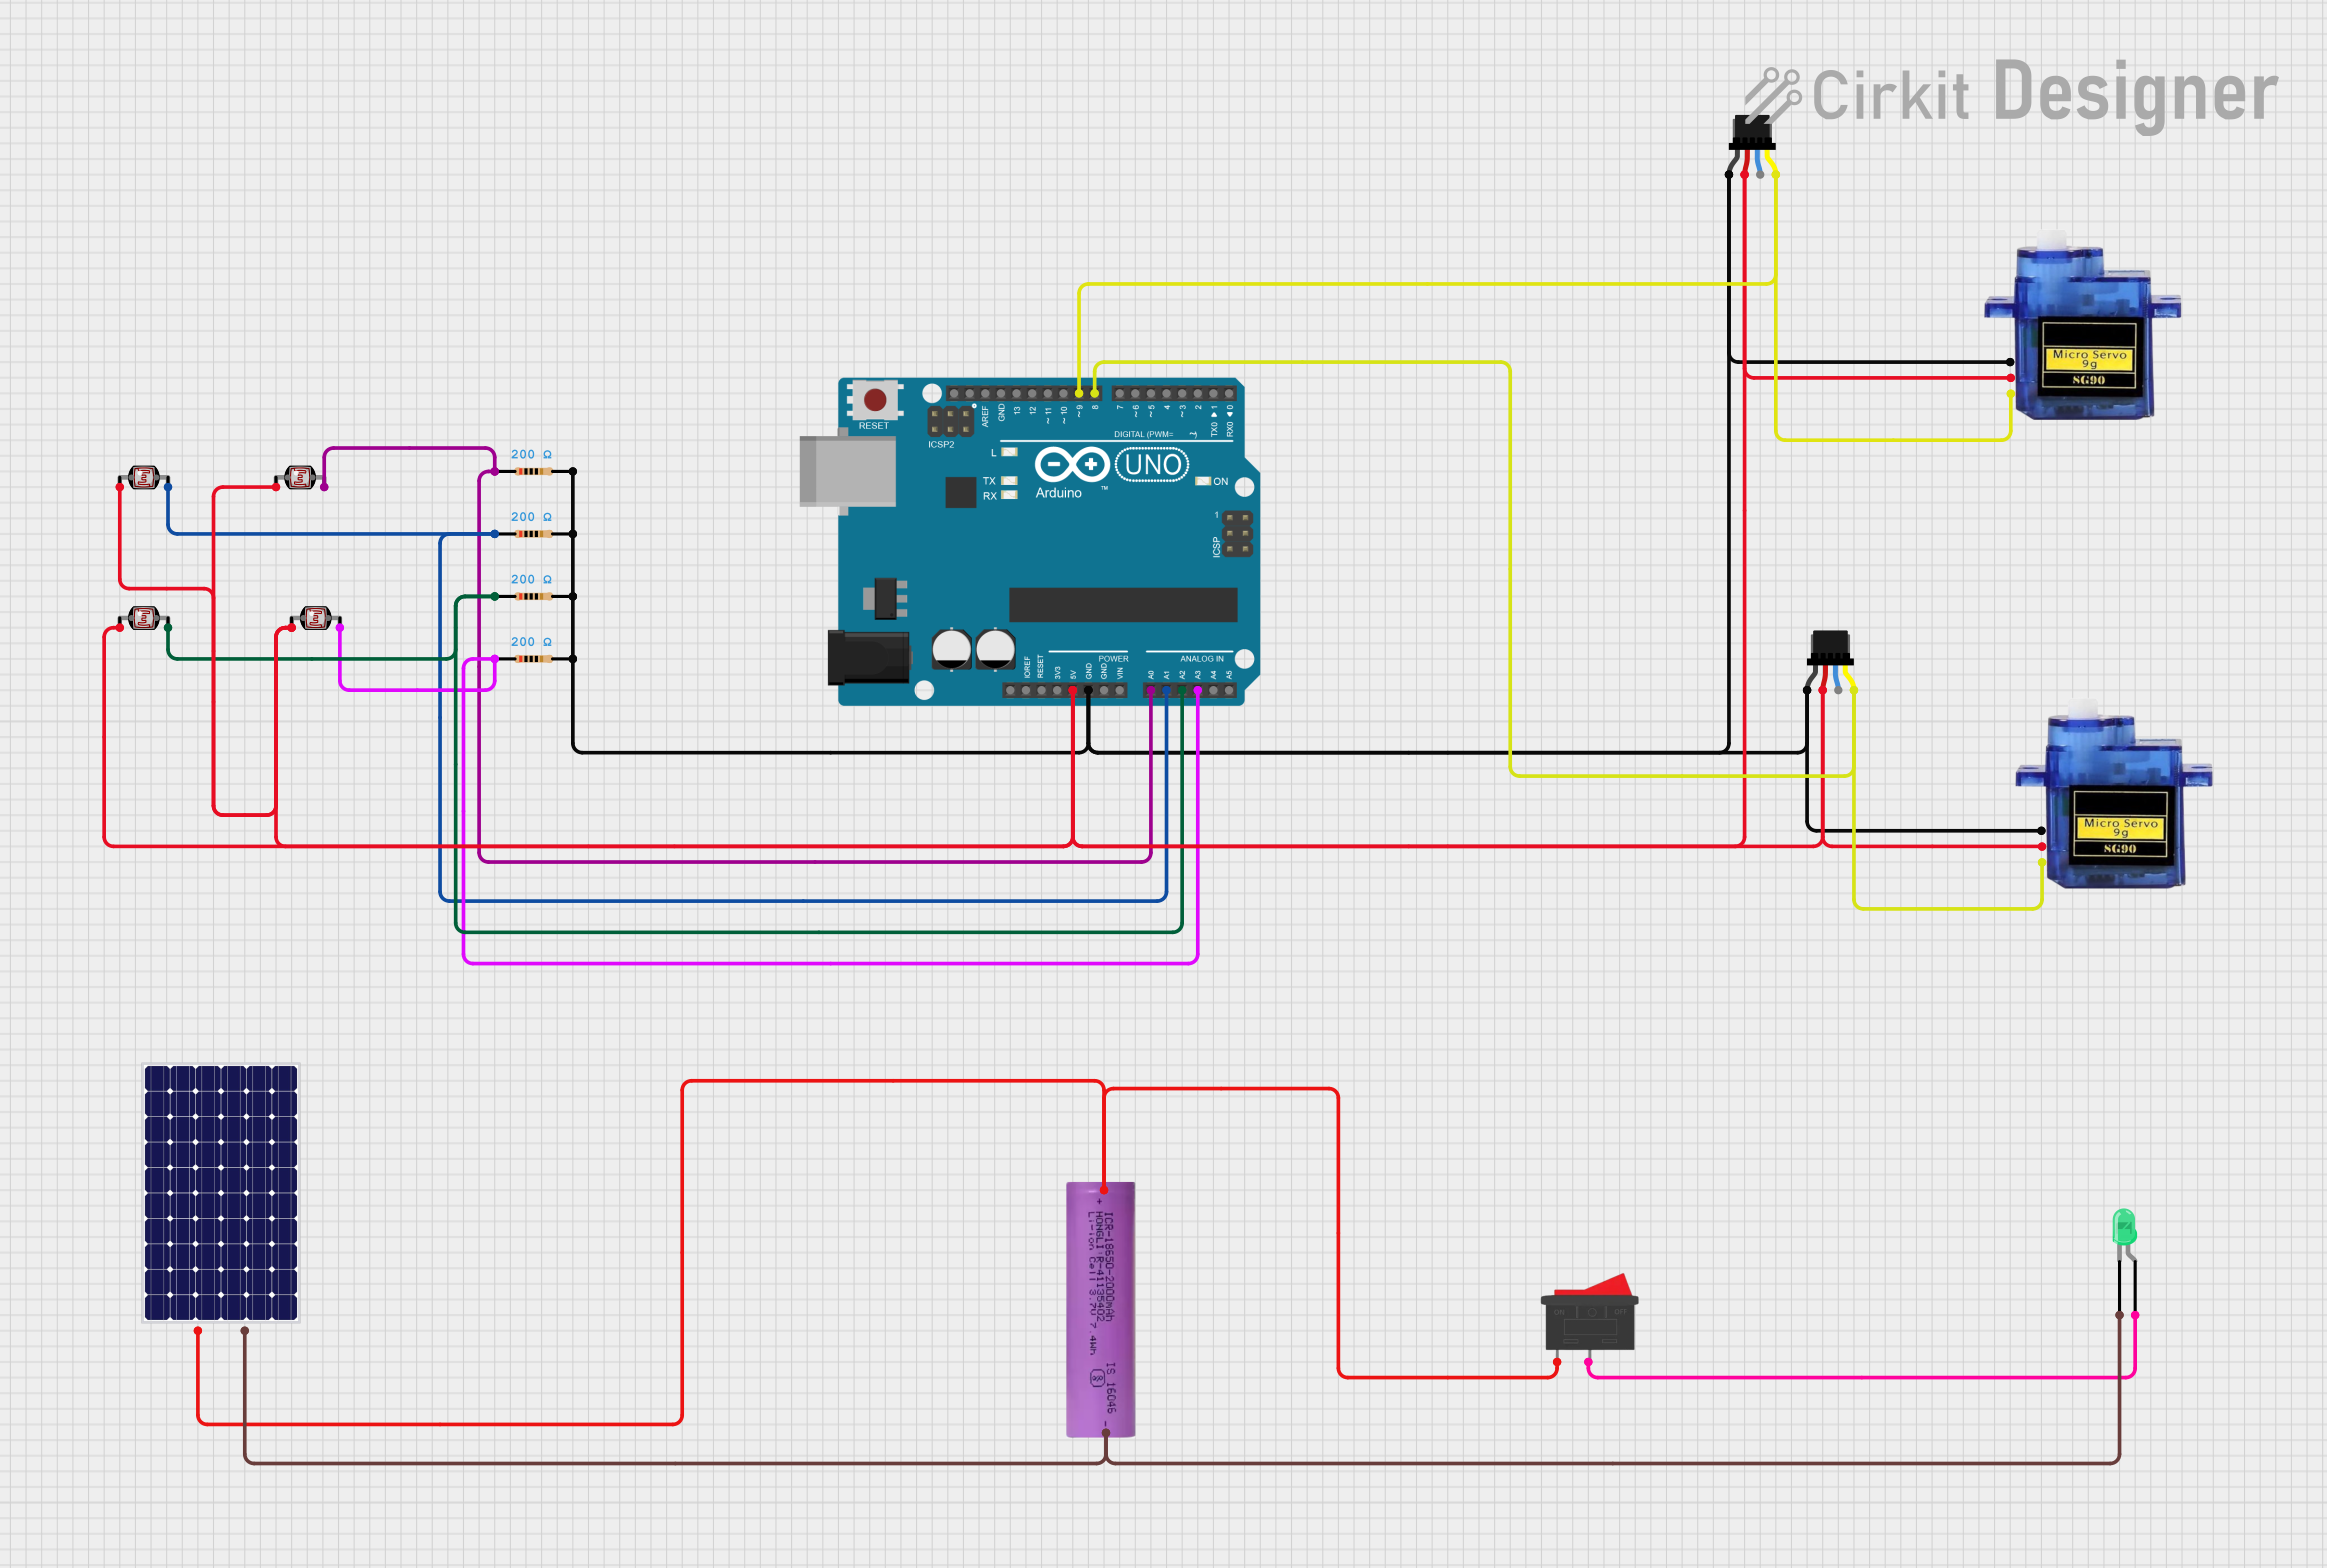
Circuit Documentation
Summary
This circuit involves an Arduino UNO microcontroller interfacing with multiple components including resistors, photocells (LDRs), micro servos, a solar panel, a Li-ion battery, a rocker switch, and an LED. The circuit is designed to read light levels using photocells, control servos, and manage power using a solar panel and battery.
Component List
Arduino UNO
- Description: Microcontroller board based on the ATmega328P.
- Pins: UNUSED, IOREF, Reset, 3.3V, 5V, GND, Vin, A0, A1, A2, A3, A4, A5, SCL, SDA, AREF, D13, D12, D11, D10, D9, D8, D7, D6, D5, D4, D3, D2, D1, D0
Resistor
- Description: 200 Ohms resistor.
- Pins: pin1, pin2
Photocell (LDR)
- Description: Light-dependent resistor.
- Pins: pin 0, pin 1
Micro servo 9G
- Description: Small servo motor.
- Pins: GND, +5V, PWM
Qwiic Cable - Breadboard Jumper (4-pin)
- Description: 4-pin jumper cable.
- Pins: GND, 3.3V, SDA, SCL
Solar panel
- Description: Solar panel for power generation.
- Pins: +, -
Li-ion battery 18650-2000mAh 3.7V 7.4WH
- Description: Rechargeable lithium-ion battery.
- Pins: +, -
Rocker Switch
- Description: On/Off switch.
- Pins: 1, 2
LED: Two Pin (green)
- Description: Green LED.
- Pins: cathode, anode
Wiring Details
Arduino UNO
5V is connected to:
- pin 0 of all Photocells (LDRs)
- +5V of both Micro servos
- 3.3V of both Qwiic Cables
GND is connected to:
- pin2 of all Resistors
- GND of both Micro servos
- GND of both Qwiic Cables
A0 is connected to:
- pin1 of a Resistor
- pin 1 of a Photocell (LDR)
A1 is connected to:
- pin1 of a Resistor
- pin 1 of a Photocell (LDR)
A2 is connected to:
- pin1 of a Resistor
- pin 1 of a Photocell (LDR)
A3 is connected to:
- pin1 of a Resistor
- pin 1 of a Photocell (LDR)
D9 is connected to:
- SCL of a Qwiic Cable
- PWM of a Micro servo
D8 is connected to:
- SCL of a Qwiic Cable
- PWM of a Micro servo
Resistors
pin1 of each Resistor is connected to:
- pin 1 of a Photocell (LDR)
- A0, A1, A2, or A3 of the Arduino UNO
pin2 of each Resistor is connected to:
- GND of the Arduino UNO
- GND of a Qwiic Cable
Photocells (LDRs)
pin 0 of each Photocell is connected to:
- 5V of the Arduino UNO
pin 1 of each Photocell is connected to:
- pin1 of a Resistor
- A0, A1, A2, or A3 of the Arduino UNO
Micro servos
GND of each Micro servo is connected to:
- GND of the Arduino UNO
+5V of each Micro servo is connected to:
- 5V of the Arduino UNO
PWM of each Micro servo is connected to:
- D9 or D8 of the Arduino UNO
Qwiic Cables
GND of each Qwiic Cable is connected to:
- GND of the Arduino UNO
3.3V of each Qwiic Cable is connected to:
- 5V of the Arduino UNO
SCL of each Qwiic Cable is connected to:
- D9 or D8 of the Arduino UNO
Solar panel
+ is connected to:
- pin 1 of the Rocker Switch
-
- of the Li-ion battery
- is connected to:
- cathode of the LED
-
- of the Li-ion battery
Li-ion battery
+ is connected to:
- pin 1 of the Rocker Switch
-
- of the Solar panel
- is connected to:
- cathode of the LED
-
- of the Solar panel
Rocker Switch
pin 1 is connected to:
-
- of the Solar panel
-
- of the Li-ion battery
-
pin 2 is connected to:
- anode of the LED
LED: Two Pin (green)
cathode is connected to:
-
- of the Solar panel
-
- of the Li-ion battery
-
anode is connected to:
- pin 2 of the Rocker Switch
Documented Code
Arduino UNO Code
void setup() {
  // put your setup code here, to run once:

}

void loop() {
  // put your main code here, to run repeatedly:

}
This code is a basic template for the Arduino UNO. The setup() function is where you initialize your components, and the loop() function is where you place the main code that runs repeatedly.